
Cardboard crafting isn’t only a fun hobby for kids—it also offers plenty of amazing benefits! It sparks creativity, boosts self-confidence, and helps improve fine motor skills. Plus, it’s a fantastic way for families to spend quality time together and make lasting memories. Want to explore some simple and exciting craft ideas for your little one? Keep reading to discover more!
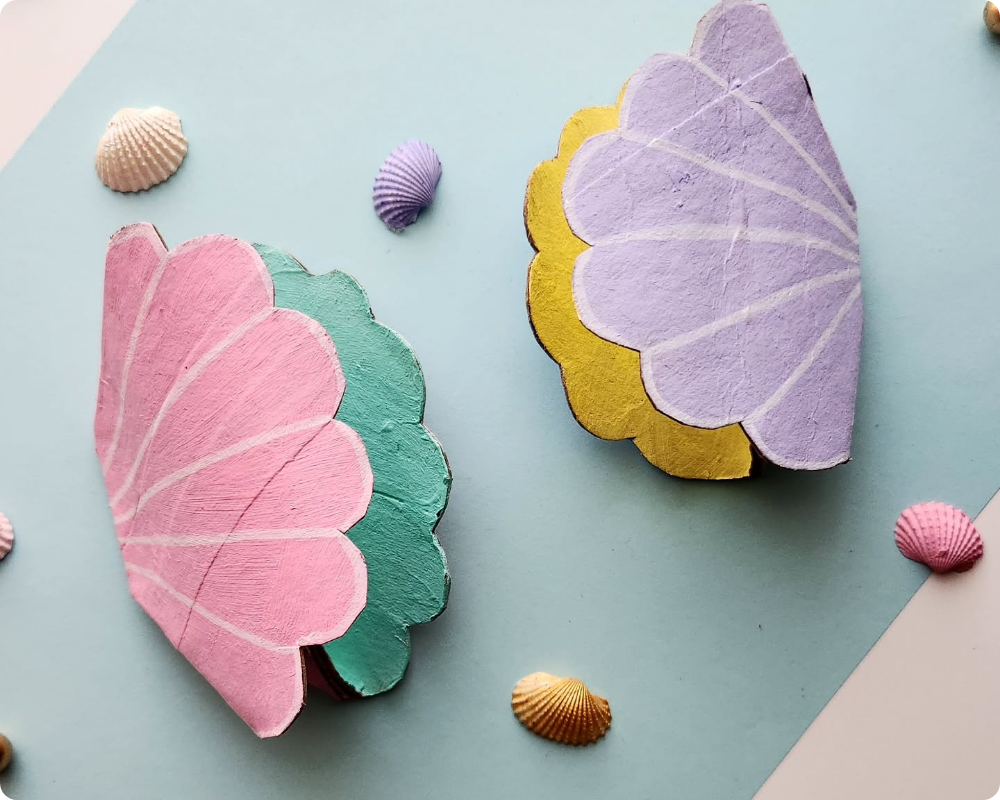
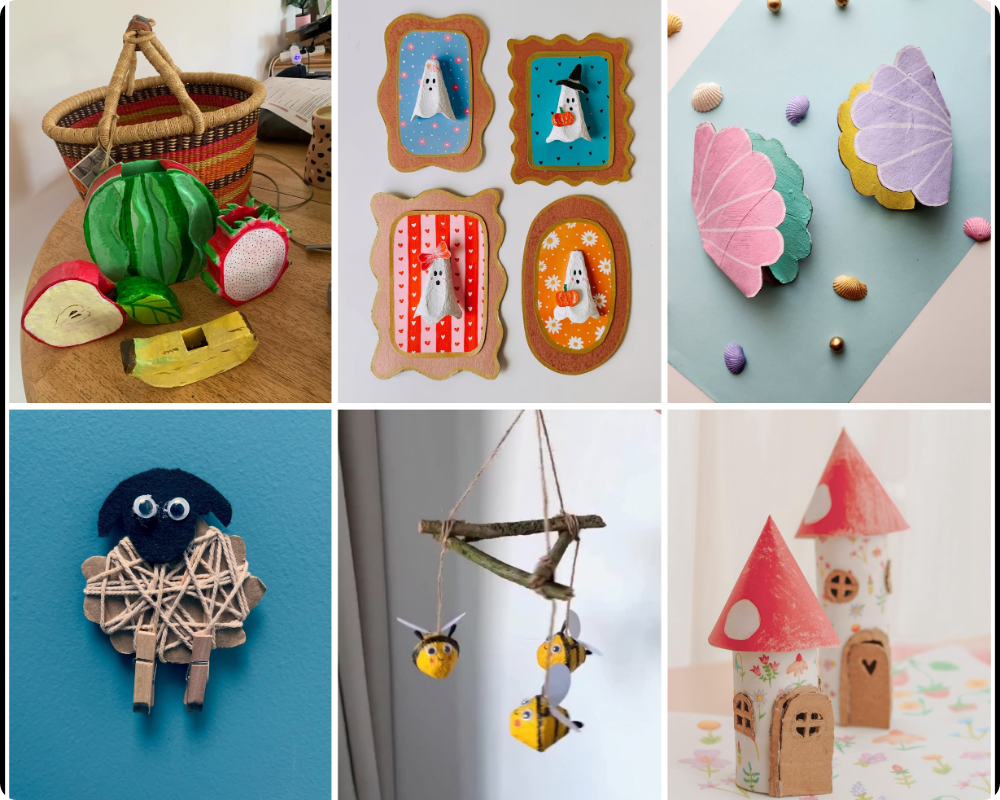
1. Shell Craft
To make a cardboard shell, start by drawing a large spiral shape on a piece of thick cardboard and carefully cutting it out to form the base. Cut another identical spiral piece to layer on top, giving the shell some thickness. Between the two layers, insert small strips of cardboard rolled or curved slightly to create a 3D effect. Once the structure is complete, paint the shell in soft shades like brown, beige, or pastel colors, and add details such as lines or dots to mimic natural shell patterns. Let it dry completely before displaying it. This simple craft is perfect for ocean-themed projects or as a decorative piece for your room!
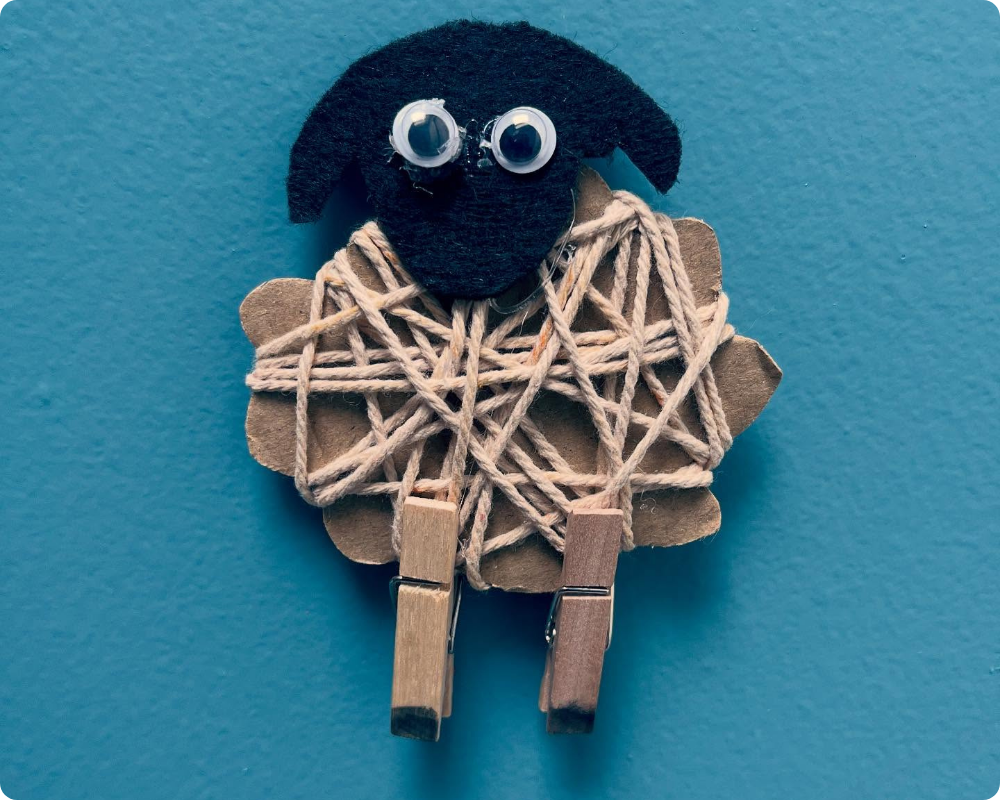
2. Cardboard Sheep
To make a sheep with cardboard, start by drawing and cutting out two large oval shapes for the body and four small rectangles for the legs. Glue or tape the legs to the bottom of one oval to form the base. Next, cut out a smaller oval or circle for the sheep’s head and attach it to the front of the body using glue. Cover the body with cotton balls or crumpled tissue paper to give it a fluffy, wool-like texture. Add facial details such as eyes, ears, and a smile using colored paper or markers. Once dry, your adorable cardboard sheep will be ready — perfect for farm-themed crafts or classroom displays!
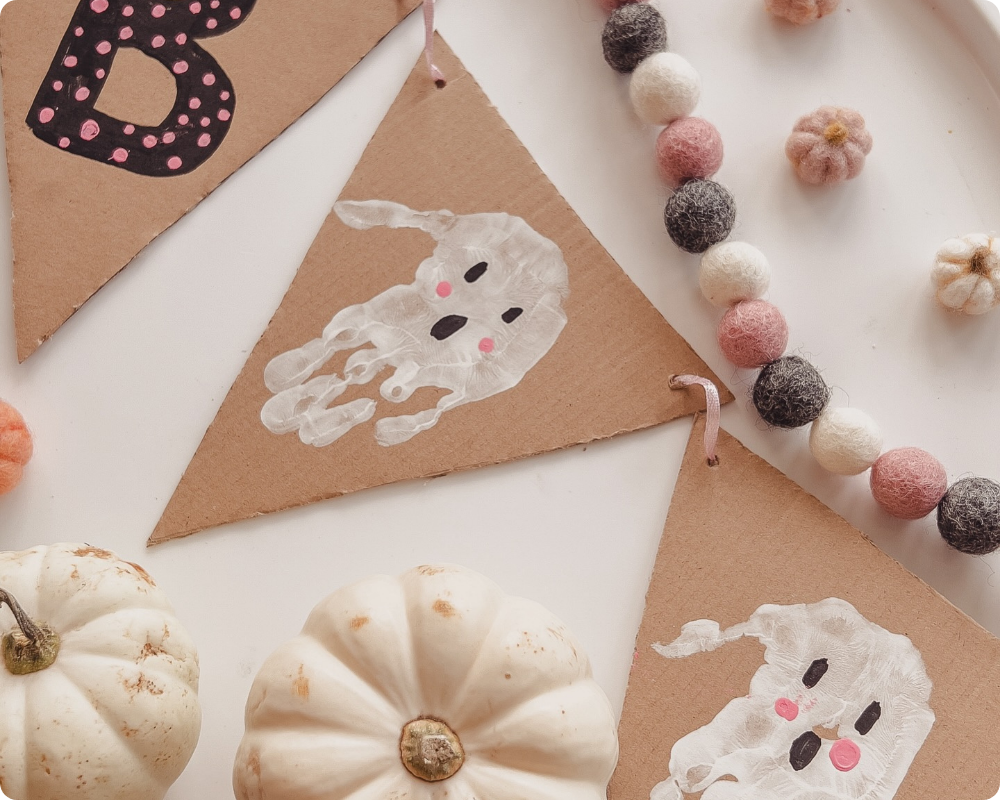
3. Cardboard Decoration for Halloween
To make this cardboard decoration, take a square cardboard and cut it into half diagonally. Now with white paint draw ghosts on every cardboard piece. Make holes on cardboard piece and attach them with a string or ribbon.

4. Cardboard Wall Hanging
To make this cardboard wall hanging, take 3-4 cardboard pieces and make designs on them. Now tie each cardboard piece with rope, your wall hanging is ready.
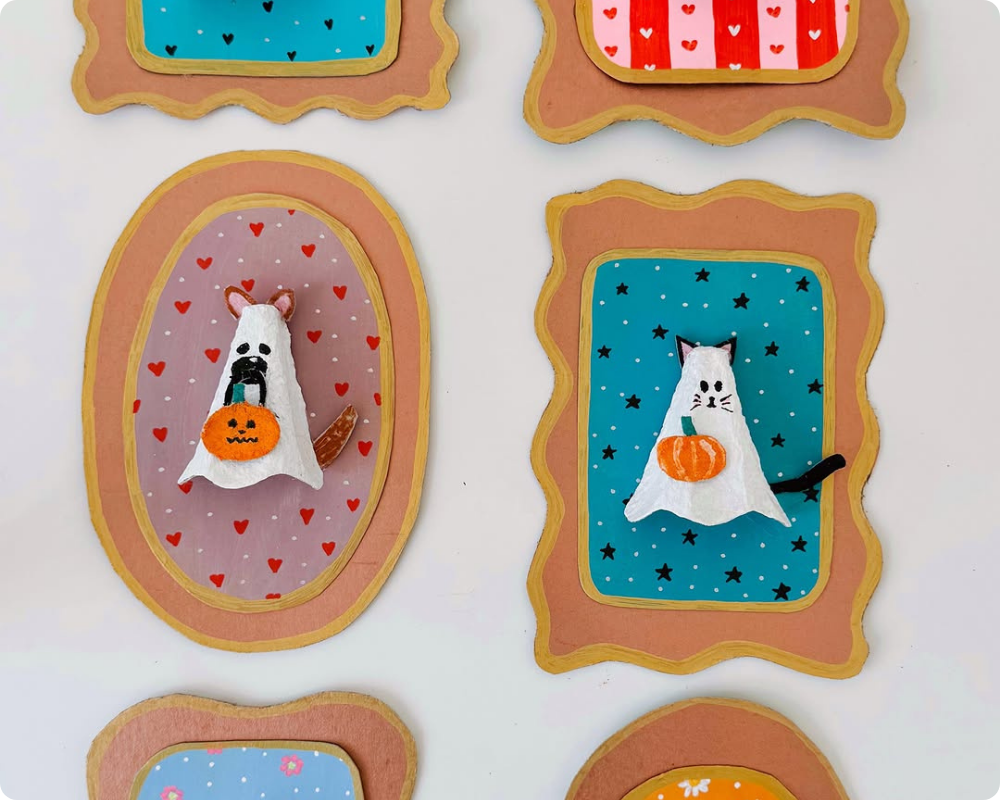
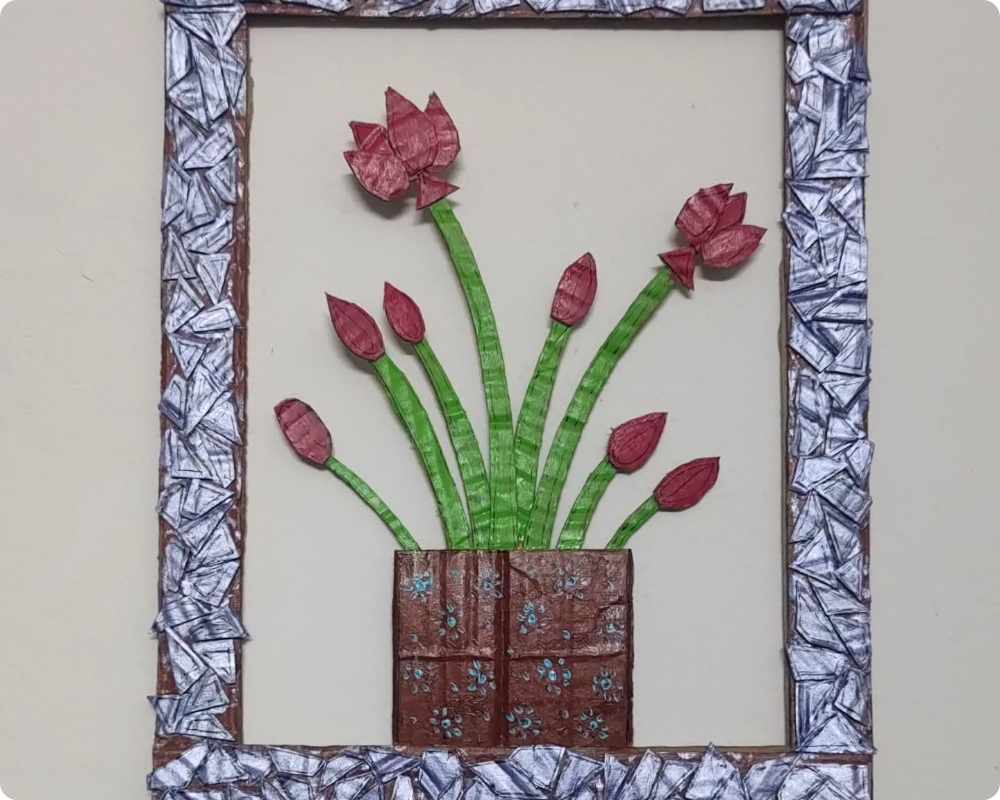
5. Cardboard Frames
To make these adorable ghost frame crafts, start by cutting out wavy or oval frame shapes from thick cardboard and painting them in warm colors like brown, pink, or gold. Next, cut smaller rectangles or ovals from patterned paper—such as floral, heart, or striped designs—and glue them in the center of each frame. For the ghosts, use sections of an egg carton, trimming and shaping them into small ghost forms. Paint them white and add tiny black dots for eyes and a mouth. Decorate each ghost with small details like a bow, hat, or mini pumpkin made from colored paper or clay. Once dry, glue the ghosts onto the center of the frames. These cute Halloween-themed crafts are perfect for decorating walls or gifting as handmade art!
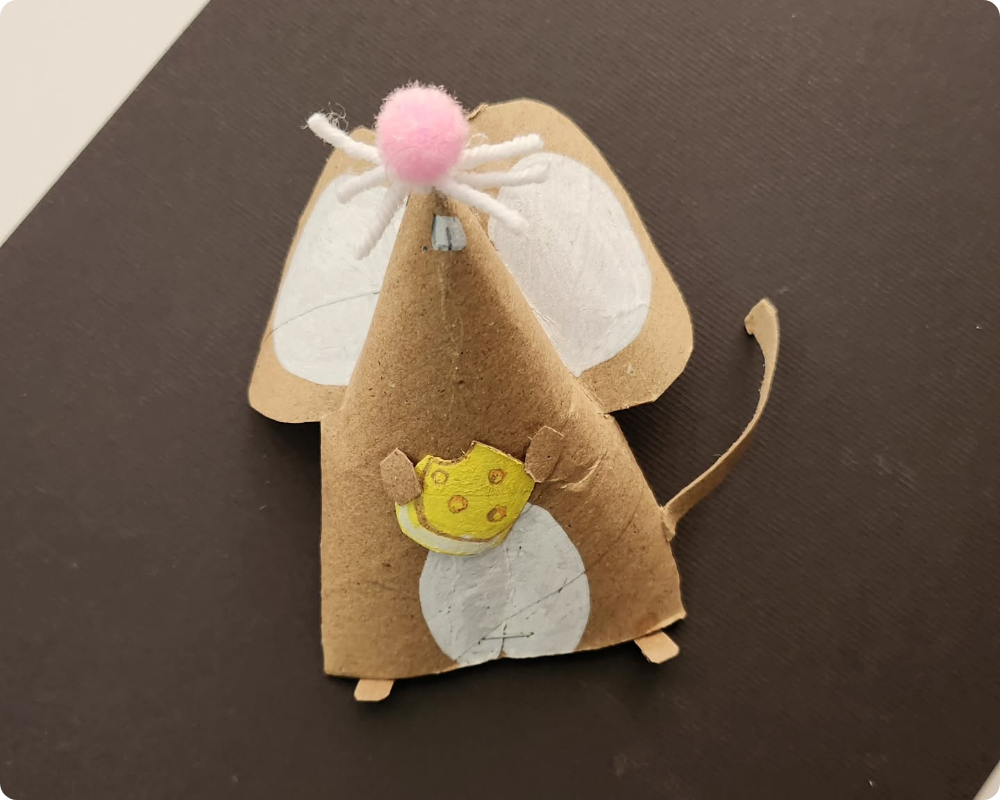
6. Cardboard Rat
To make this adorable mouse craft, start by cutting a small cone shape from cardboard or using a piece of a toilet paper roll. Roll and glue it into a cone to form the mouse’s body. Cut two round shapes for the ears and attach them to the back of the cone. Paint or color the front of the body light brown, adding a white oval for the tummy. Draw or glue small paper arms and a long thin tail made from cardboard. Stick a pink pom-pom on top for the nose and add white yarn pieces for the whiskers. Finally, cut and color a small piece of paper to look like cheese and place it in the mouse’s hands. Your cute cardboard mouse is now ready—perfect for display or storytelling crafts!
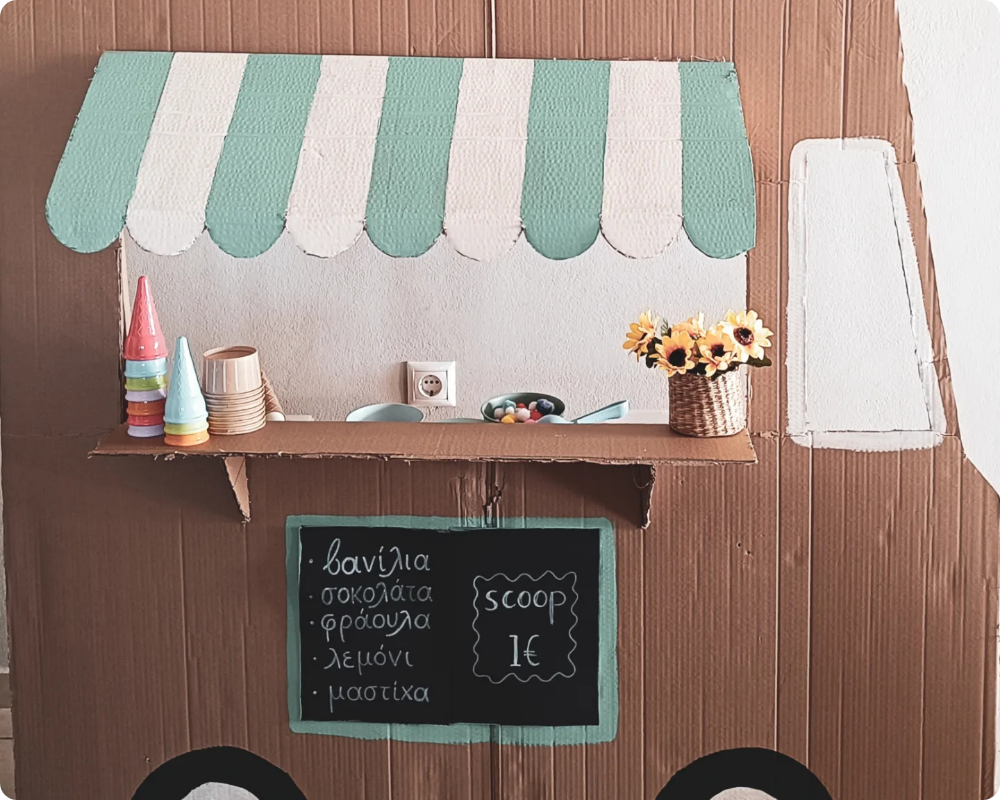
7. Icecream Parlour
To make an ice cream parlour with cardboard, start by taking a medium-sized cardboard box and cutting out one side to create an open front. Cover the box with colourful paper or paint it in bright shades like pink, blue, or yellow to give it a cheerful look. Use smaller pieces of cardboard to make counters, shelves, and a signboard that says “Ice Cream Parlour.” You can make mini ice creams using paper cones, cotton balls, or clay scoops, and display them on the counter. Add decorations such as stickers, paper bunting, and a menu card for extra charm. This fun craft not only looks adorable but also inspires creative play!
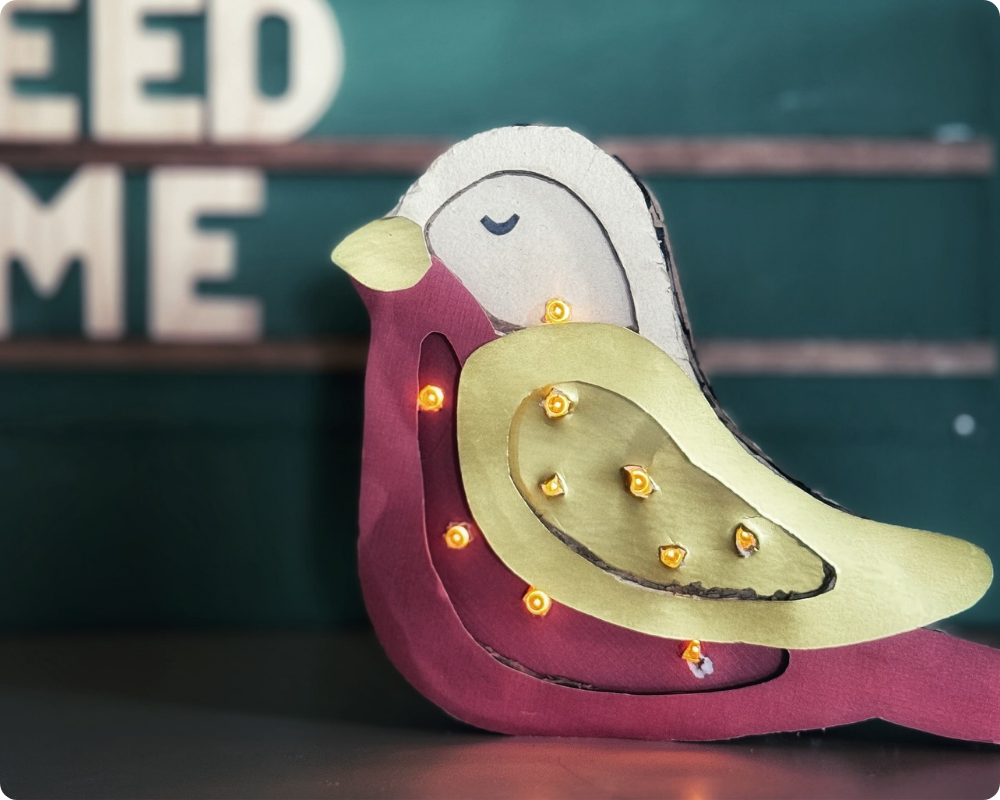
8. Cardboard Bird
To make this beautiful glowing bird craft, start by cutting out a large bird shape from thick cardboard. Then, cut smaller pieces for the wings and beak, layering them to give a 3D effect. Cover each piece with colorful paper—use shades like maroon, yellow, and white to create contrast. Once the pieces are ready, glue them together carefully. To add lights, poke small holes along the wing area and insert tiny LED bulbs or fairy lights from behind so that they shine through. Draw simple facial features, such as a closed eye, using a black marker. When finished, turn on the lights to see your charming illuminated cardboard bird come to life!
9. Cardboard Photo Frame
To create this , first draw the entire structure, cut it out from a piece of cardboard, and then attach colourful papers. To give a mirror effect on the sides, cut out white papers, colour it grey and attach them on the sides for mirror effect.
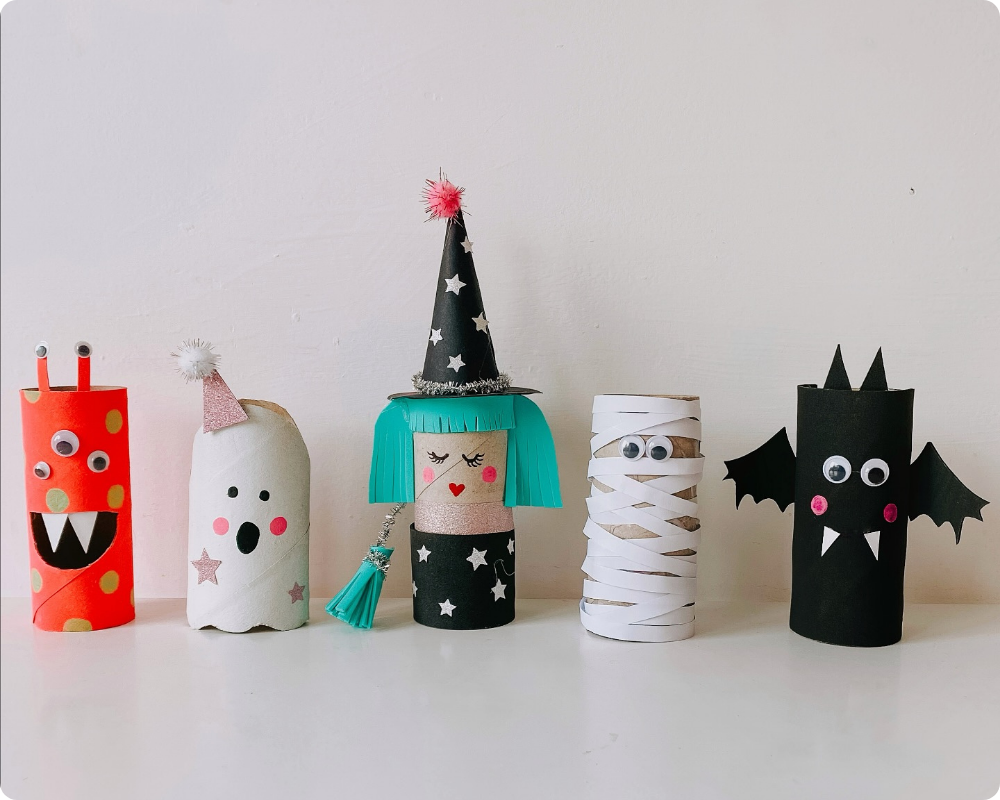
10. Halloween Miniatures
To make these Halloween miniatures we need tissue paper roll. Now colour it, add eyes and other accessories, draw teeth, you will get the above creatures.
11. Light Bird
To make this beautiful light-up bird craft, start by cutting a large bird shape from thick cardboard. Next, cut smaller pieces for the wings, beak, and body layers to give a 3D look. Cover each piece with colored paper — use shades like maroon, cream, and light green for a pretty contrast. Glue the layers together carefully, making sure the shapes align nicely. Use a marker to outline the bird’s features, such as the eye and feather details. To add lights, poke small holes in the wings and body, then insert tiny LED bulbs or fairy lights from the back so they shine through. Once done, turn on the lights and watch your glowing cardboard bird brighten up your room with charm!
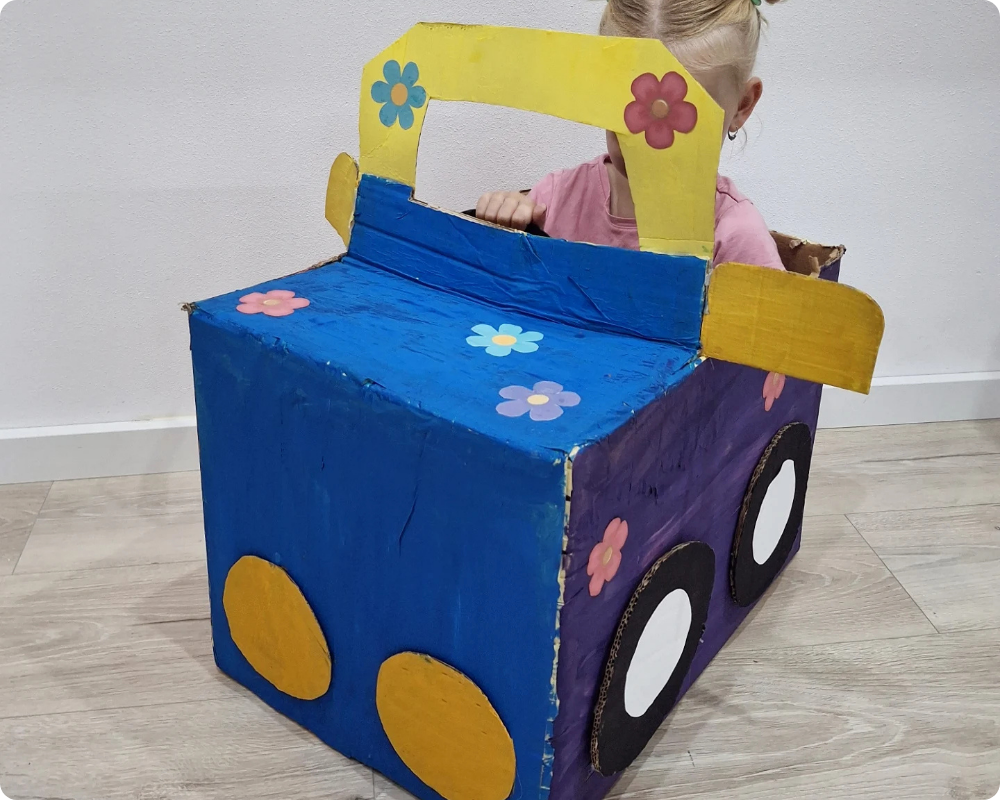
12. Giant Car
To make a giant car with cardboard, start by collecting large cardboard boxes and joining them together to form the body of the car. Cut out windows, doors, and a front windshield using scissors or a cutter. Use extra pieces of cardboard to make the wheels, headlights, and steering wheel, then attach them securely with glue or tape. Paint the car in your favorite color and decorate it with paper strips, stickers, or markers to make it look more realistic. You can even add seats inside using small boxes or cushions. This giant cardboard car is perfect for imaginative play and makes a great DIY project for kids!
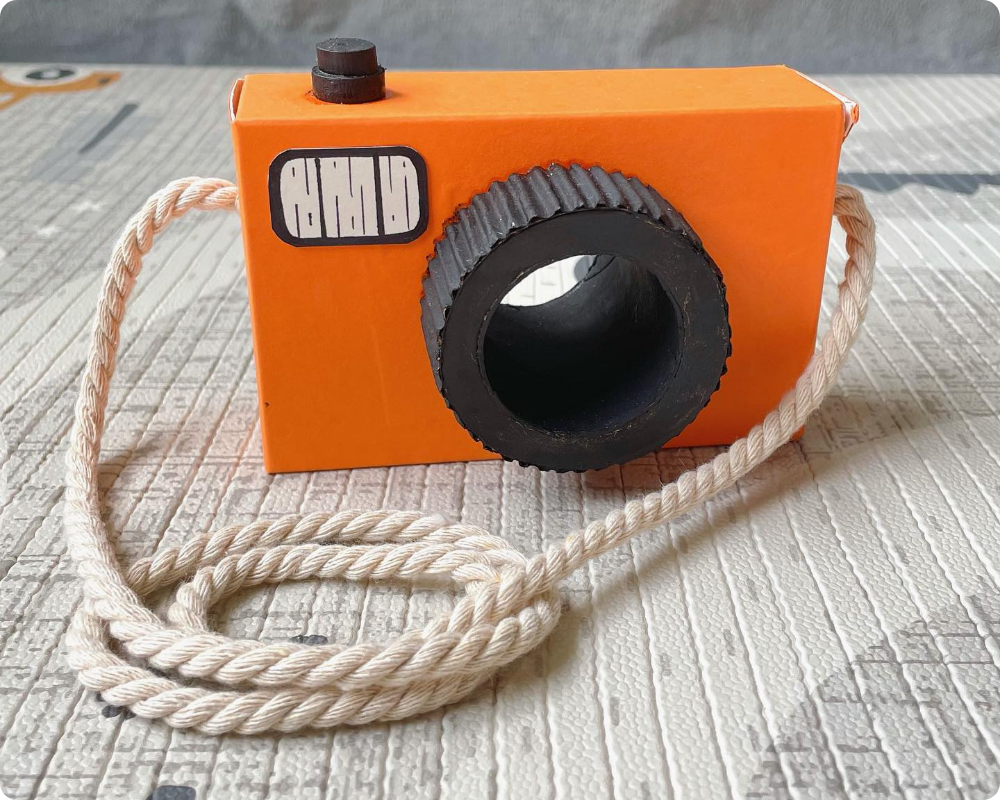
13. Camera
To make a camera with cardboard, start by cutting a rectangular box to form the main body of the camera. Cover it with black or silver paper to give it a realistic look. Cut a small circle in the front and attach a cardboard tube or a rolled piece of paper to make the camera lens. Add buttons on top using small cardboard circles or bottle caps, and draw details like the flash or brand name with a marker. You can also make a strap using ribbon or string and attach it to both sides. Once finished, your cardboard camera will look just like the real thing—perfect for pretend play and photography fun!
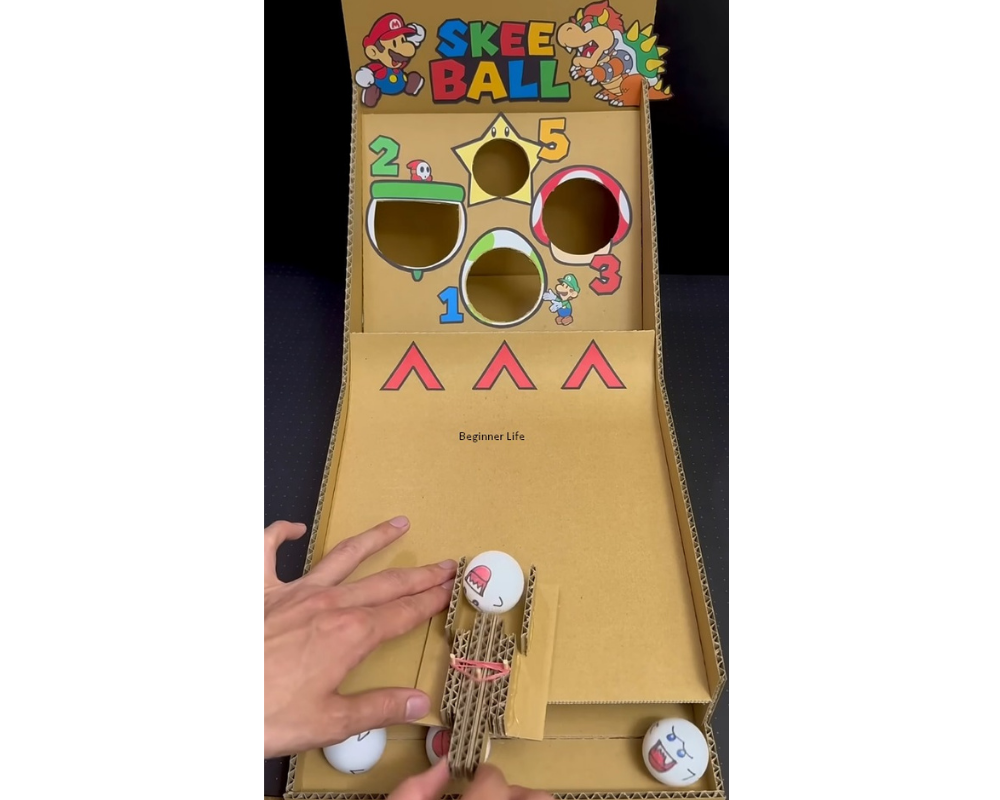
14. Skeeball
To make this fun cardboard skee-ball game, start by cutting a long rectangular base and a slanted backboard from thick cardboard. Create three circular holes of different sizes in the backboard and label them with different point values like 1, 2, 3, or 5. Decorate the surface with colorful paper or printed cartoon characters to make it more attractive. Next, build a small launcher at the front using layered cardboard strips and a rubber band — this will help you shoot the balls. Attach the launcher securely and test it with lightweight ping-pong balls. When finished, players can pull back the launcher to shoot the ball into the holes to score points. It’s a creative and exciting DIY game perfect for kids and family fun!

15. Snowman
To make a snowman with cardboard, start by cutting out three circles of different sizes for the head, middle, and bottom parts of the snowman. Stack and glue them together from largest to smallest. Cover the shapes with white paper or paint them white to give a snowy look. Use colored paper or markers to create eyes, a carrot nose, and a smiling mouth. Add buttons down the front and make a scarf from ribbon or fabric. You can also craft a hat from extra cardboard and paint it black. Once everything is glued in place, your cute cardboard snowman is ready to brighten up your winter decorations!
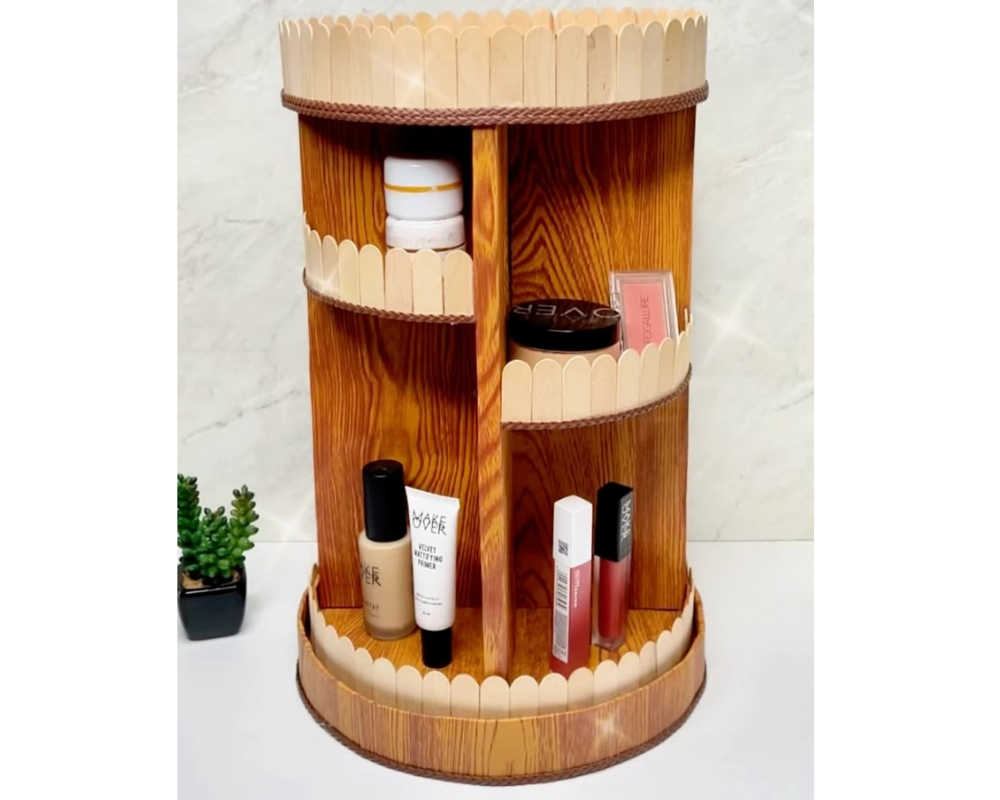
16. DIY Organizer
To make this rotating organizer with cardboard and popsicle sticks, start by cutting two large circular pieces of thick cardboard for the top and bottom. Cut several rectangular cardboard pieces to form the walls and vertical dividers, then glue them upright between the circles to create storage sections. Wrap the outer surface with wood-textured paper or paint it brown for a polished wooden look. Decorate the edges by gluing popsicle sticks around the top and bottom rims, creating a neat fence-like design. For extra style, add braided rope or decorative tape around the borders. Once dry, you can use it to organize makeup, stationery, or small items. It’s both functional and beautiful—a perfect DIY addition to your table!
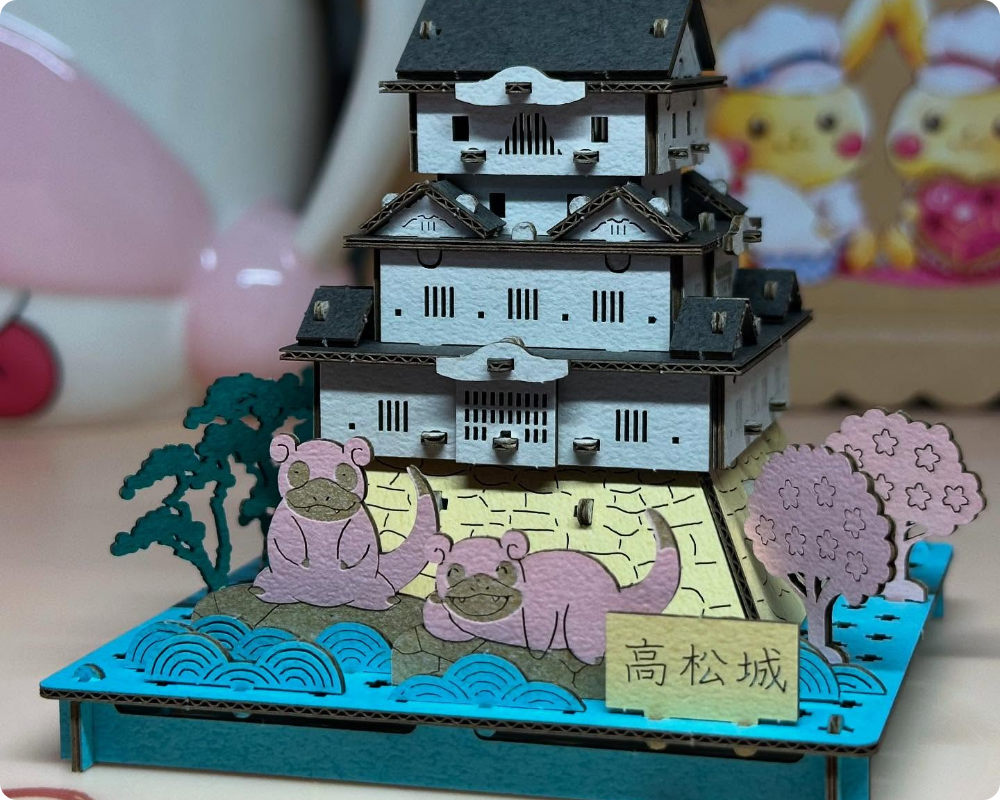
17. Japanese Castle
To make a Japanese castle with cardboard, start by cutting and stacking several cardboard boxes to form the base and multiple tower levels. Trim the edges neatly to create the tiered structure typical of Japanese castles. Use extra cardboard pieces to craft slanted roofs, and fold the edges slightly upward to give them the traditional curved look. Cover the castle with grey or stone-patterned paper to resemble walls and use black paper for the rooftops. Add windows, doors, and tiny flags using colored paper or markers for extra detail. Once complete, decorate the surroundings with paper trees or a small bridge to give it a realistic touch—your majestic cardboard Japanese castle will look stunning!
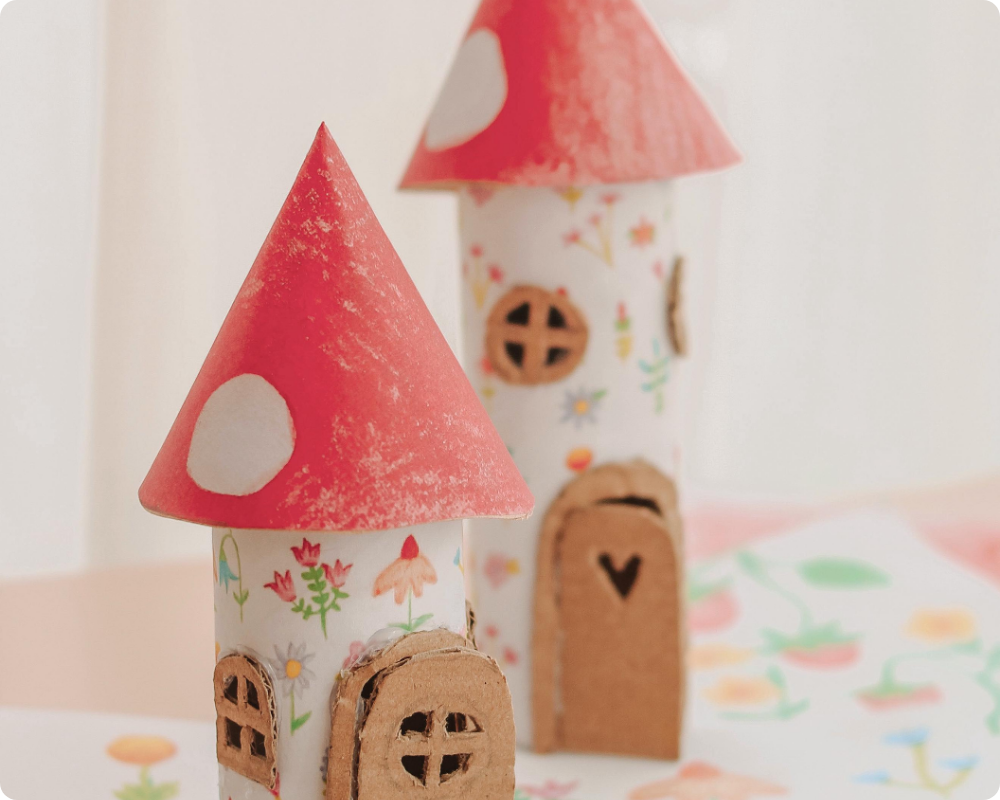
18. Fairy House
To make this DIY fairy house, take toilet paper roll for the body of the house. With help of another piece of cardboard make windows and doors. For the roof, take a paper and roll it, so your fairy house is ready.
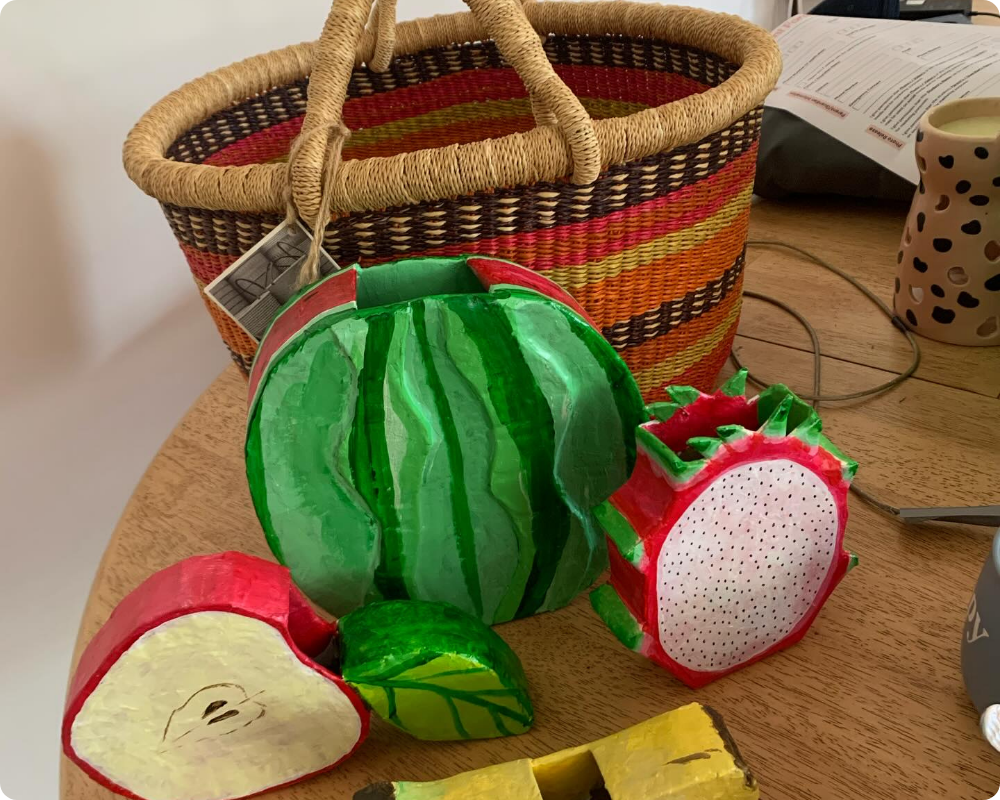
19. Fruits
To make fruits with cardboard, start by drawing outlines of different fruits like apples, bananas, oranges, and grapes on a piece of cardboard. Carefully cut them out using scissors and paint each fruit in its natural color—red for apples, yellow for bananas, orange for oranges, and so on. You can also add details like stems and leaves using green paper or markers. For a 3D effect, cut out two identical shapes of the same fruit, fold one slightly in the middle, and glue them together. Once dry, arrange all your fruits in a cardboard basket or tray. This colorful craft is a fun way to learn about fruits while being creative!

20. Barbie House
To make a Barbie house with cardboard, start by taking a large cardboard box and cutting it open to create rooms and windows. Use extra pieces of cardboard to divide the space into different sections like a bedroom, kitchen, and living room. Cover the walls with colorful paper or paint them in bright shades to make the house look lively. You can make tiny furniture such as beds, tables, and chairs using small cardboard pieces and decorate them with fabric or colored paper. Add curtains, wall art, and even a paper door for extra charm. Once done, place your Barbie dolls inside and enjoy playing in your handmade cardboard dream house!


