
Need a fun activity to help you refresh after a hard week? Why waste time finding anything when you have origami with you? With a single paper, you can try out multiple things.
Origami will help you declutter your mind and improve your creative skills. Follow us to learn more about origami and the various crafts you can try your hand at.
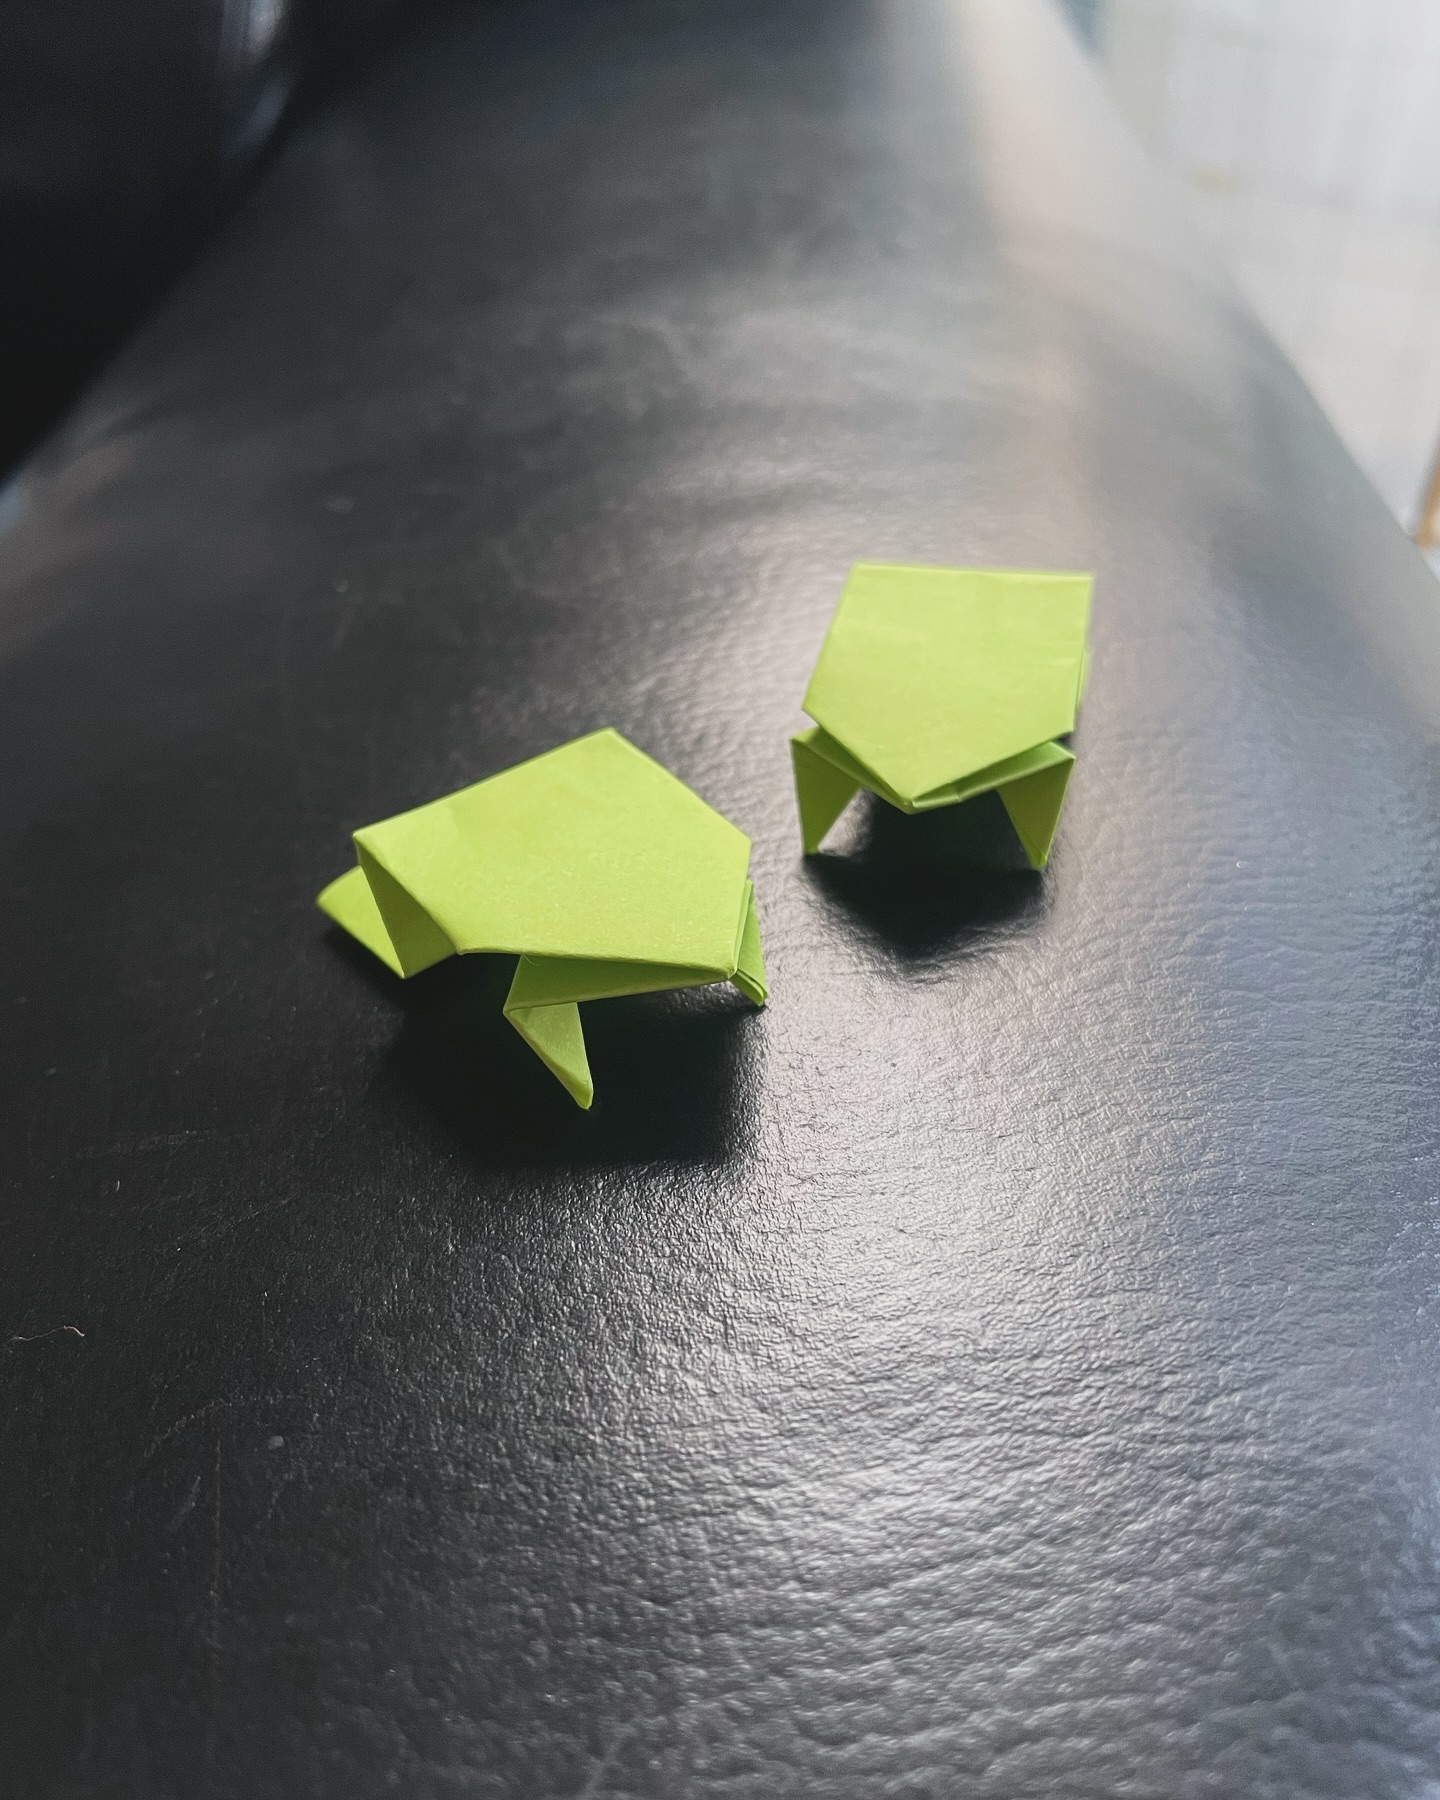
1. Origami Frog
This is one of the easiest crafts to make. Take a small green piece of rectangle paper. For it from the edge for the legs, and from the front in a diagonal way for the face – remember that the upper body will be flat. It will be a kind of slim frog. You can add eyes with a marker.
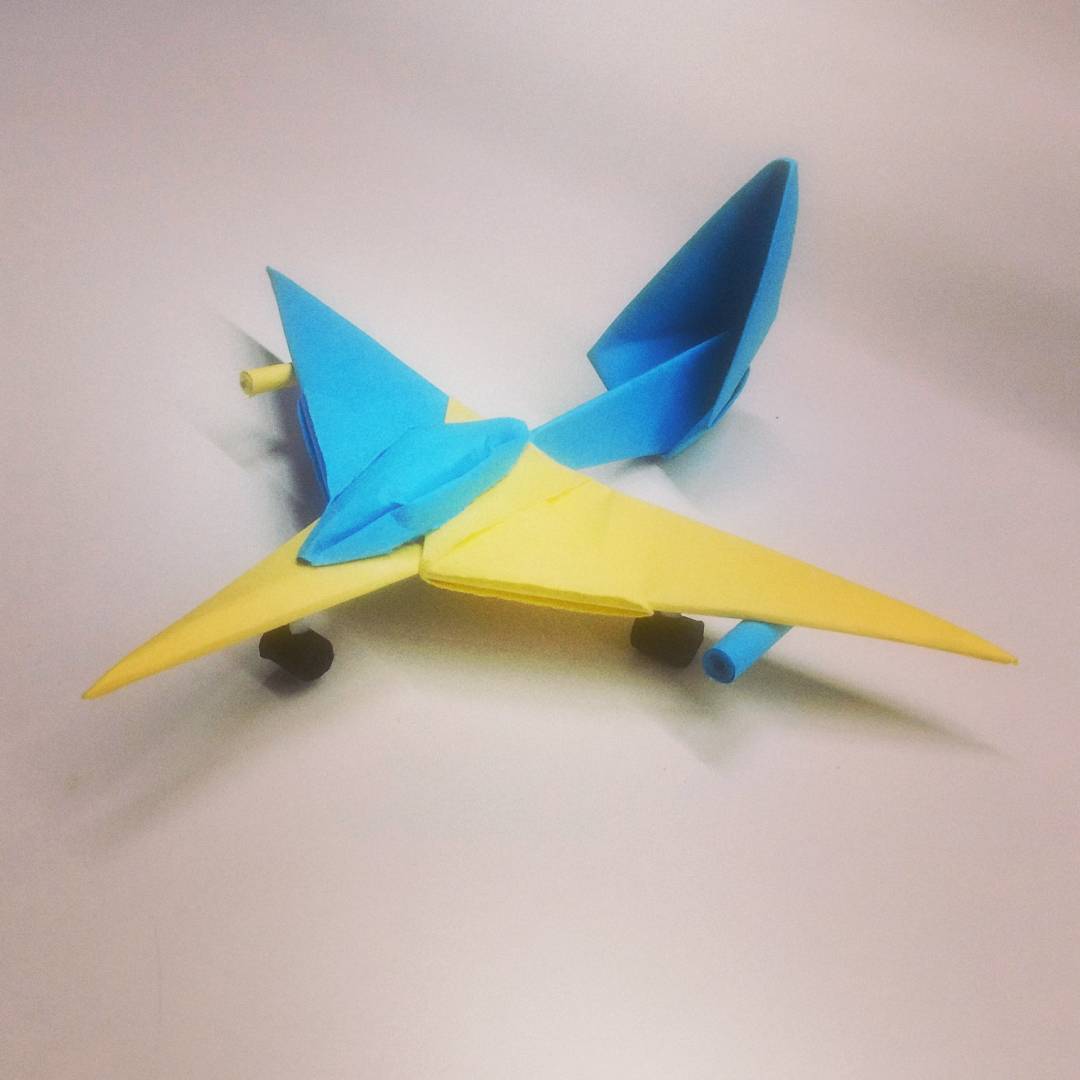
2. Aeroplane
To make a paper aeroplane, begin with a rectangular sheet of paper placed vertically on a flat surface. Fold it in half lengthwise to create a centre crease, then unfold it. Next, fold the top two corners down toward the centre crease, forming triangular shapes that create a pointed tip. Fold the slanted edges down again to meet the center, sharpening the nose of the plane. Then, fold the paper in half along the original crease, ensuring the pointed tip is at the front. To form the wings, fold both sides downward, keeping them even for balanced flight. Slightly tilt the wings upward for smoother gliding. Your paper aeroplane is now ready to take off! You can experiment with different folds and angles to see how they affect its flight path.
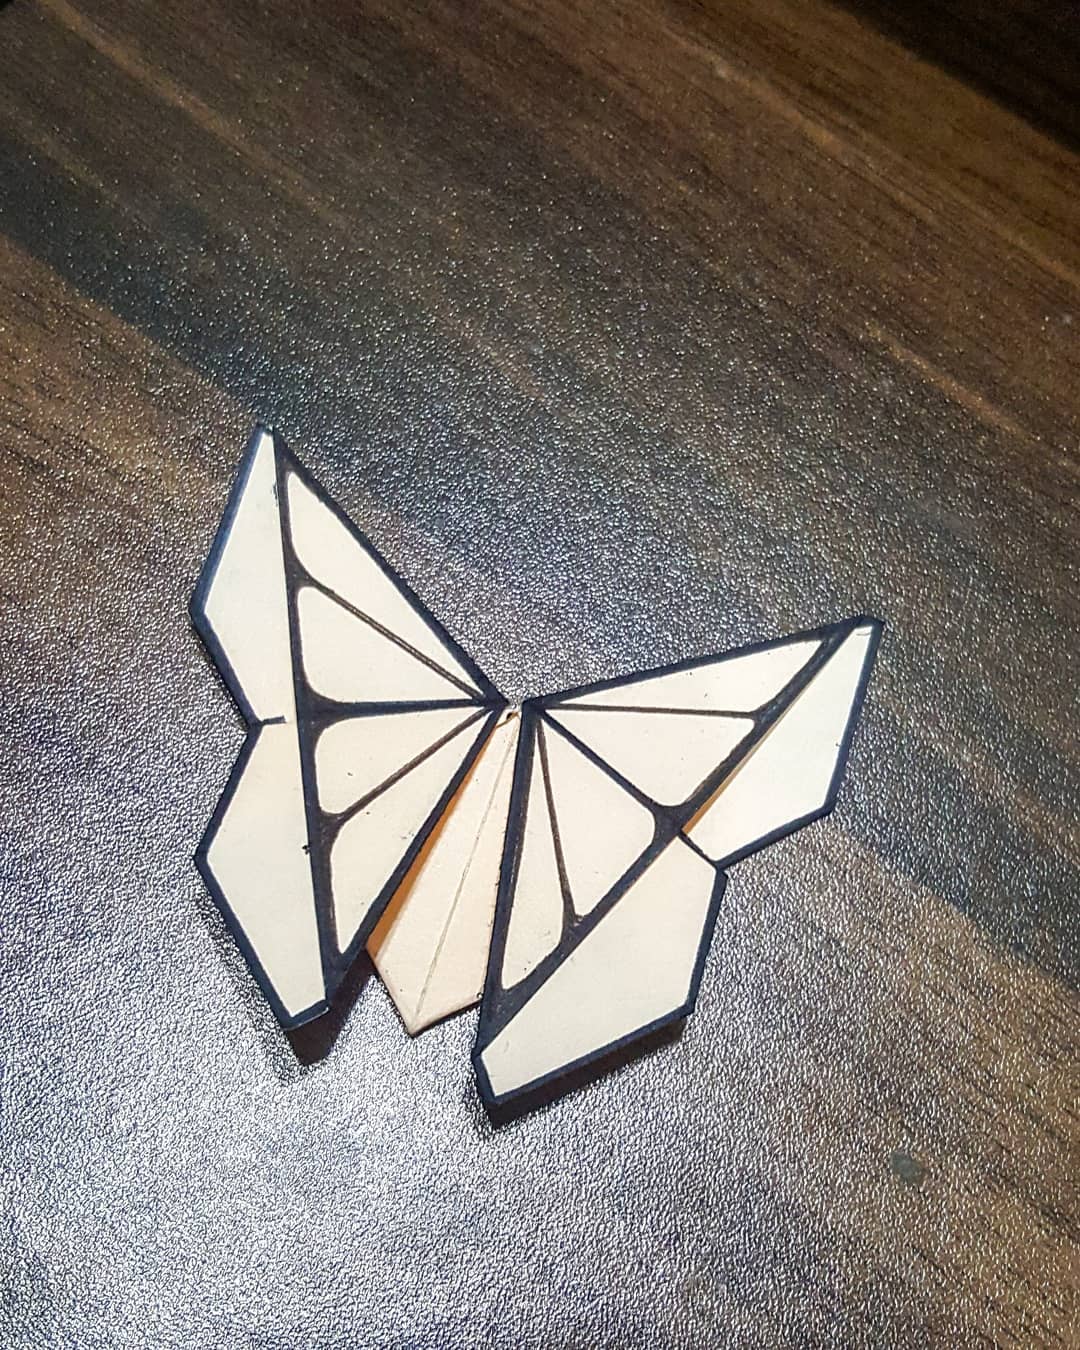
3. Butterfly
To make a paper butterfly, start with a square sheet of origami paper in a vibrant color. First, fold the paper in half diagonally to form a triangle, then unfold it. Fold it diagonally in the opposite direction to create a second triangle, and unfold it again. Next, fold the paper horizontally and vertically to form crease lines, then collapse it into a smaller triangle using the existing folds. With the triangle’s pointed end facing down, fold the two top corners downward to meet at the bottom point. Flip the paper over and fold the top triangular flap downwards. Then, fold the paper in half along the center to shape the body of the butterfly.
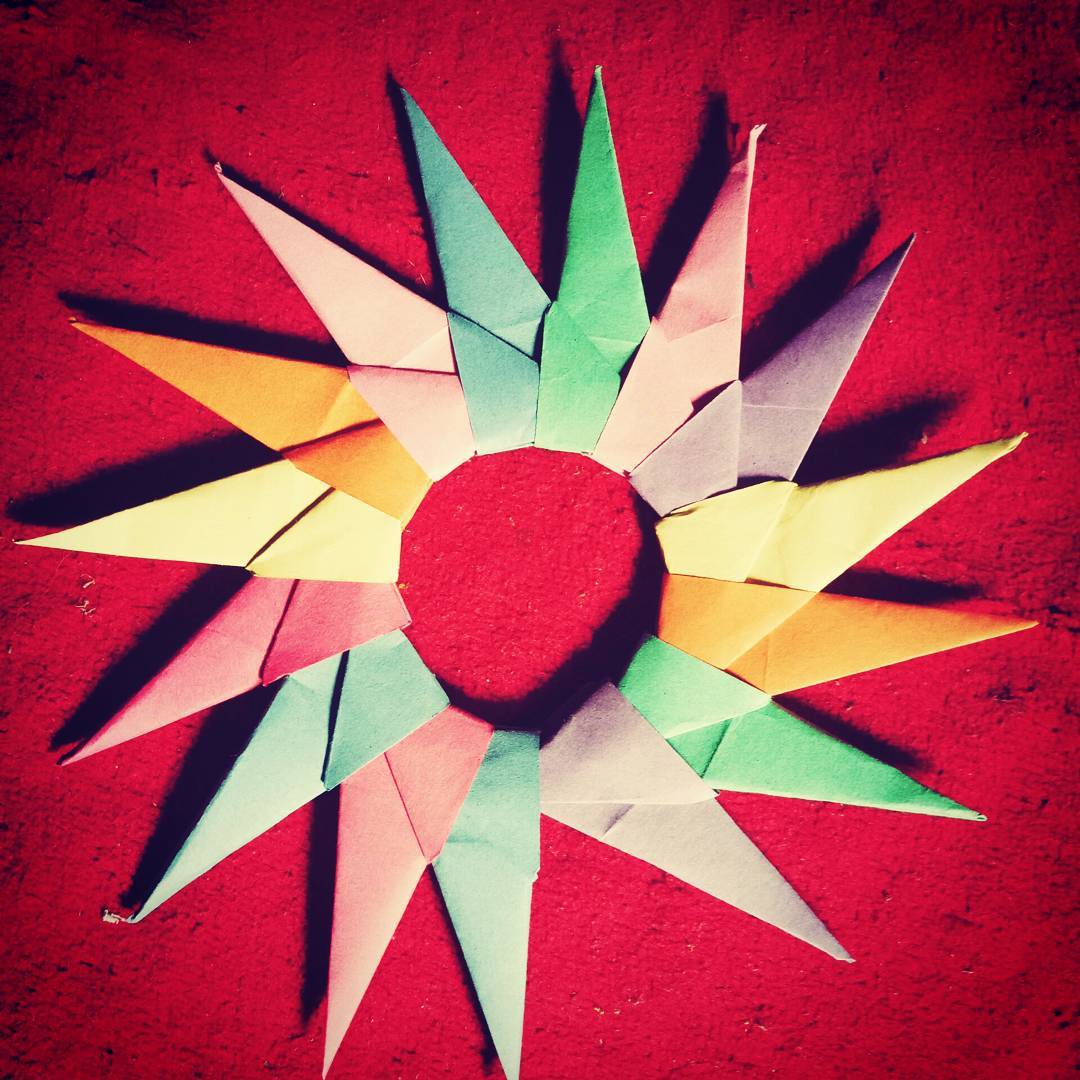
4. Asterisk
To make an asterisk you have to take multiple papers, minimum 6. Fold it into a cone and attach one after the other. The bigger you want the more paper you need to have.
5. Shirt
To make a paper shirt, start with a rectangular sheet of paper, preferably in a color or pattern that resembles fabric. Place the paper vertically on a flat surface. First, fold the paper in half lengthwise and then unfold it to create a center crease. Fold both sides of the paper inwards so they meet at the center crease. Next, fold the top edge down about an inch to form the collar area. Then, carefully fold both top corners diagonally towards the center to create the shape of a collar. For the sleeves, fold the top edges of both sides outward. Finally, fold the bottom edge of the paper upwards, tucking it under the collar to complete the shirt shape. You can add buttons or a pocket using markers or small paper cutouts for extra detail.
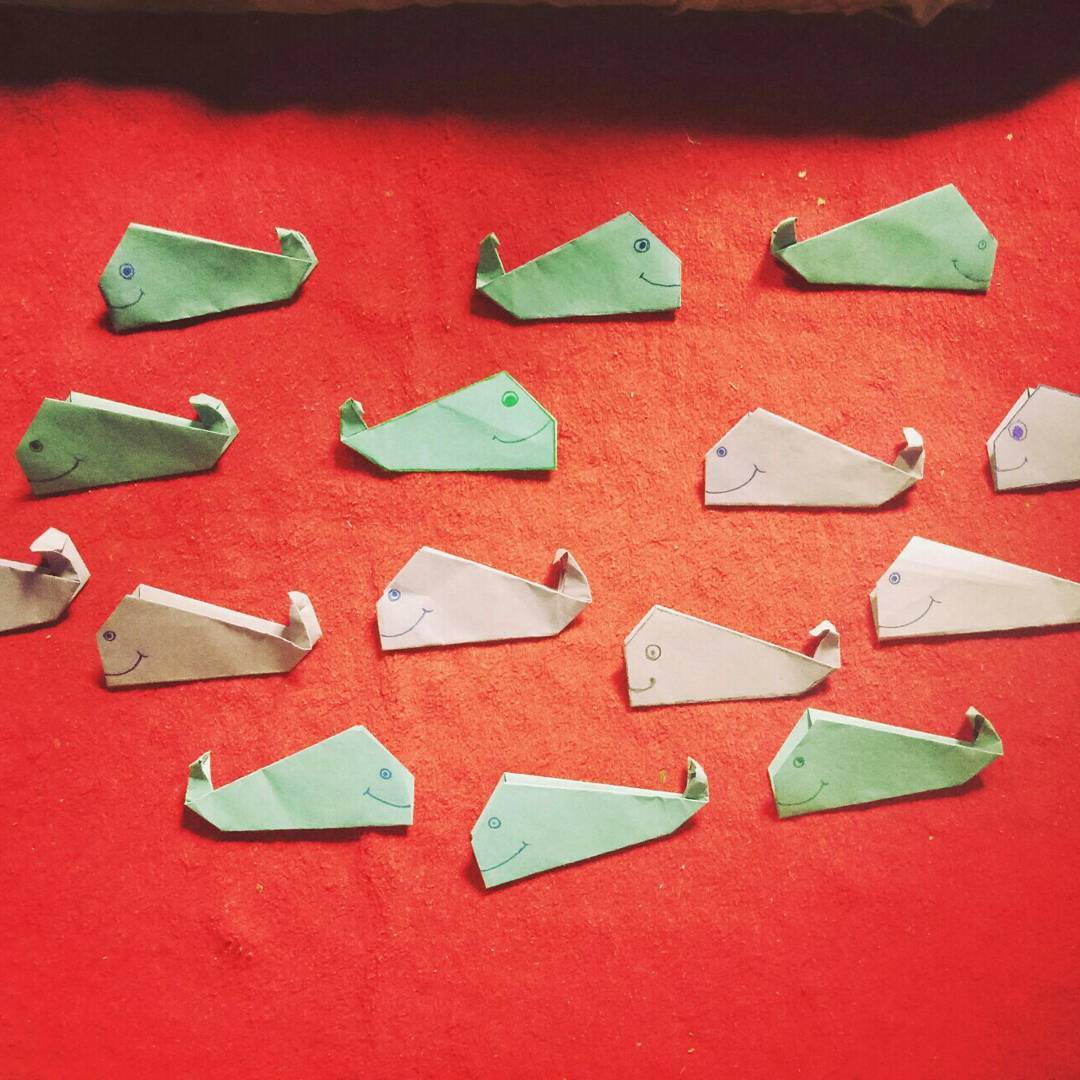
6. Whale
To make a paper whale, start with a square sheet of blue origami paper for a classic ocean look. Begin by folding the paper diagonally to form a triangle, then unfold it. Fold it in half horizontally to create a rectangular shape. Next, fold it in half vertically and unfold it to leave a centre crease. Fold the top corners down towards the centerline, forming a triangle at one end, which will become the whale’s head. Then, fold the other end upwards to create the tail, shaping it into two flukes by making small diagonal cuts or folds. Adjust the tail to give it a realistic look. Draw a small eye and a smile using a marker to bring your whale to life.
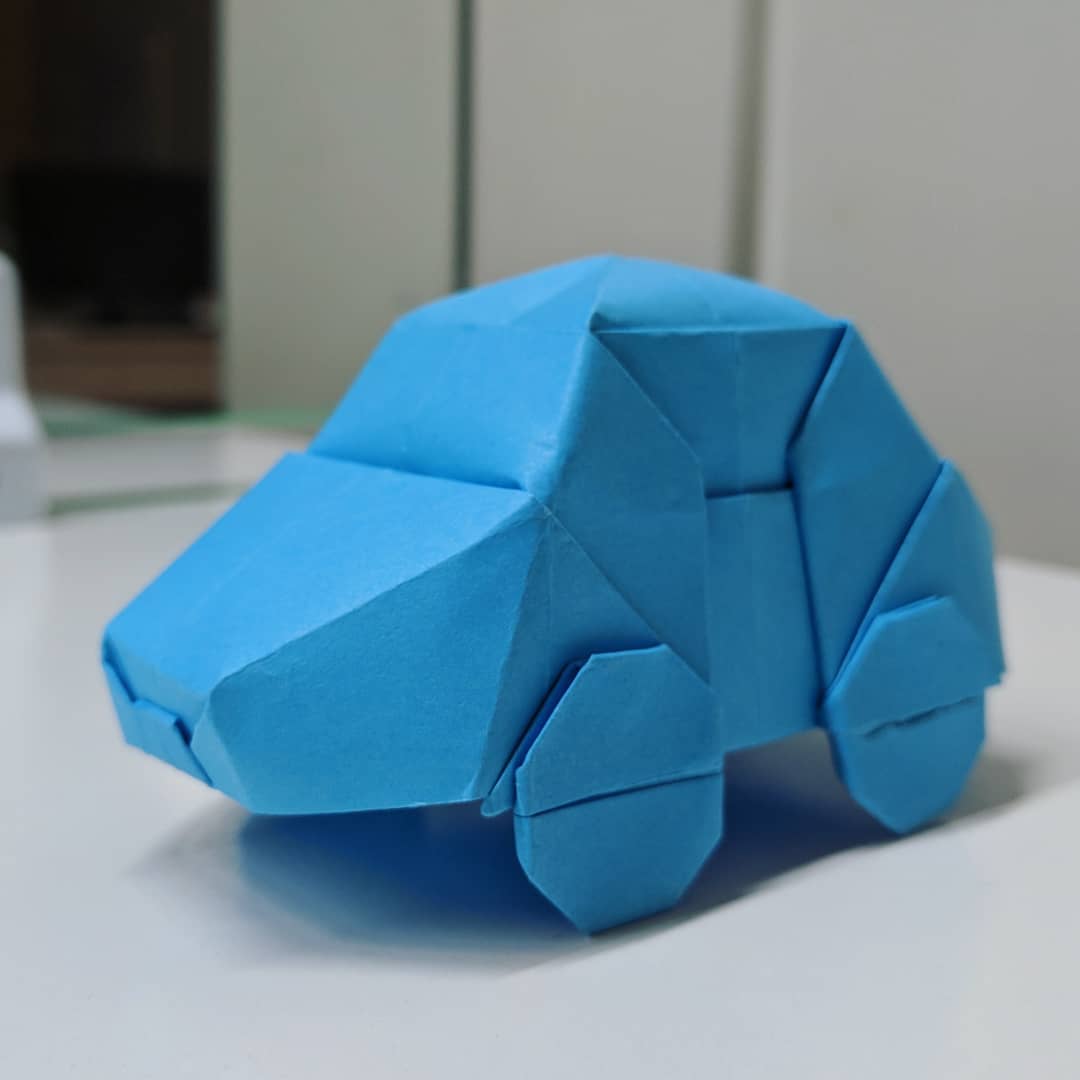
7. Car
To make a paper car, start with a rectangular piece of paper. Place it horizontally on a flat surface and fold it in half lengthwise, then unfold it to create a centre crease. Next, fold both the top and bottom edges toward the centre crease to form two horizontal flaps. Fold the paper in half vertically to mark the middle, then unfold it. On one side, fold the top corners downward to create a slanted front windshield. On the other side, fold a small section downward to shape the back of the car. To add wheels, you can either cut out small circles from black paper and glue them to the bottom or fold small triangular flaps to represent wheels.
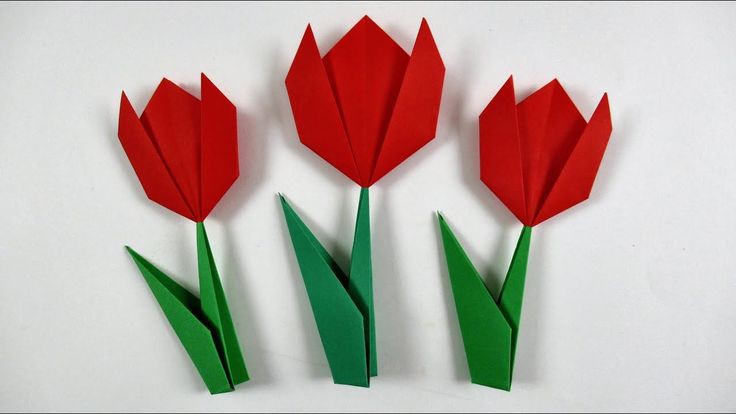
8. Tulip
Tulips definitely represent Japan but they are not from there. To create a tulip you need a square cut paper and fold them diagonally on both sides. Make a triangle with both sides of the same length and long base. Then fold the two long opposite sides of the triangle to give the shape of a petal.
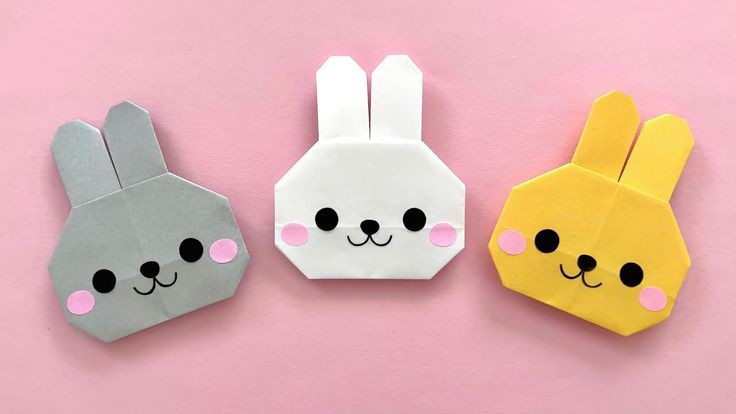
9. Rabbit
To make a paper rabbit face, start with a square sheet of origami paper, preferably white or light pink. First, fold the paper in half diagonally to form a triangle. Then, fold it in half again to create a smaller triangle and unfold it to mark the center crease. Next, fold the top point of the triangle downwards to form the rabbit’s forehead. Fold the two side points upwards to create the ears, making sure they are symmetrical. Adjust the shape by slightly curving the ears for a softer look. For the face, draw or glue on round eyes, a small triangular nose, and whiskers using markers or cut-out paper shapes. You can add rosy cheeks for an extra cute touch. This simple and adorable paper rabbit face is perfect for children’s crafts, Easter decorations, or as a fun origami project!
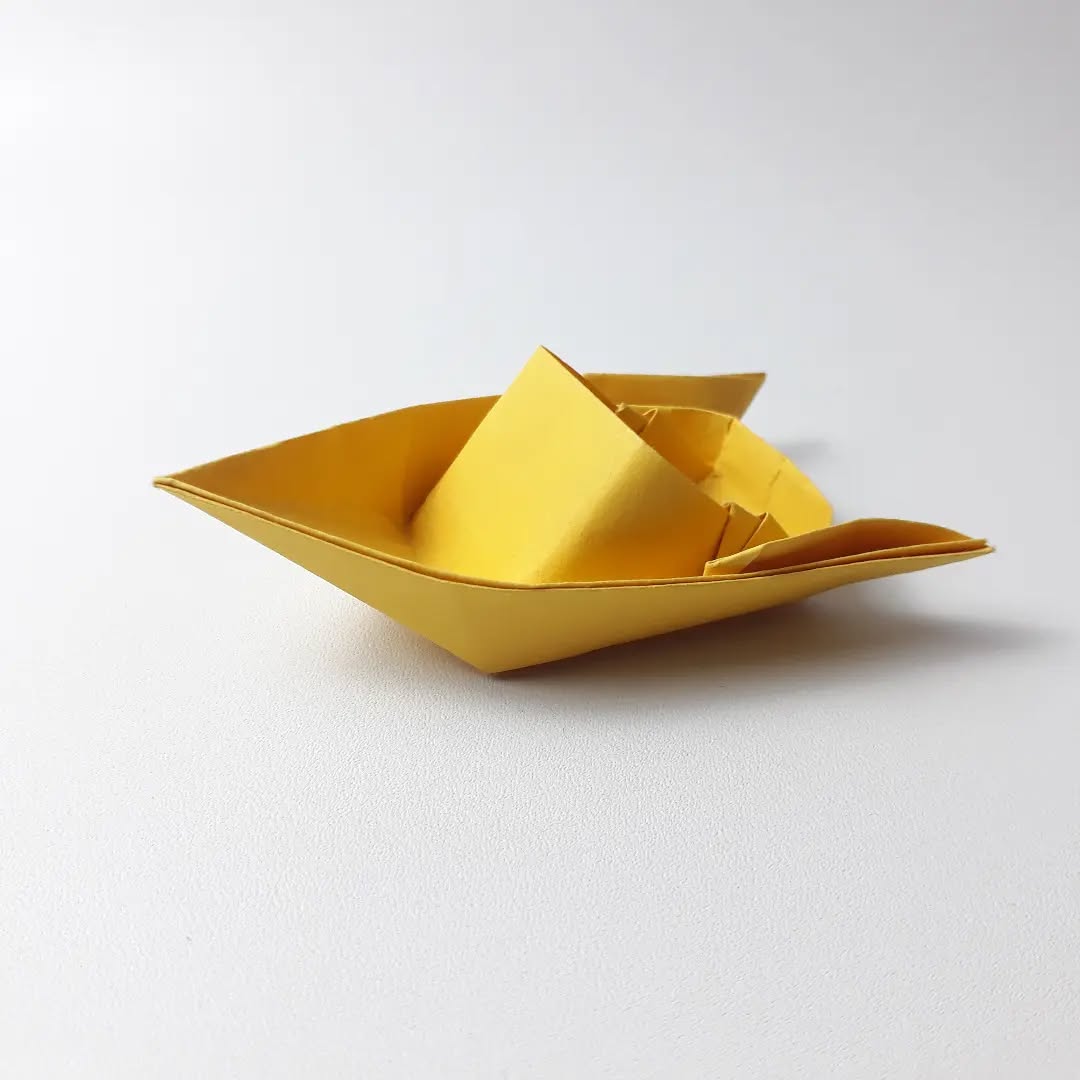
10. Speed Boat
To make a paper speed boat, start with a rectangular sheet of paper. Place it horizontally on a flat surface. First, fold the paper in half lengthwise to create a crease, then unfold it. Next, fold it in half vertically to form a centerline. With the folded side facing you, fold the top corners downwards towards the centerline, creating two triangles that form a pointed top. Fold the bottom edge of the paper upwards on both sides, overlapping the triangles to secure the shape. Then, open the bottom and flatten it into a diamond shape. Fold the bottom corners of the diamond upwards to create a triangular boat shape. Gently pull the sides apart and press the base flat to form the hull of the speed boat. Adjust the folds to ensure the boat stands upright. Your paper speed boat is now ready to float on water or be used as a creative decoration!
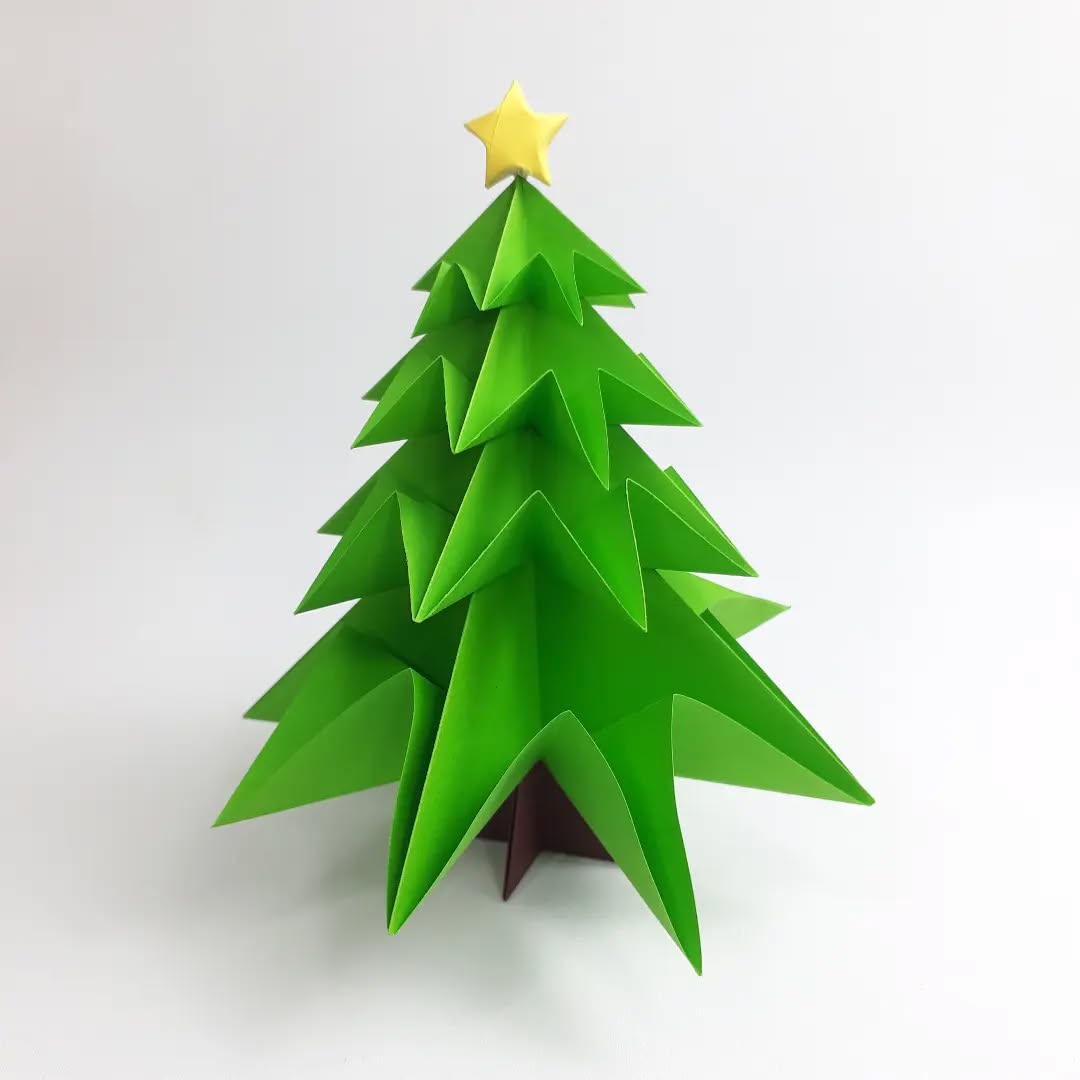
11. Christmas Tree
This craft is perfect for December. To make an X-mas tree you will need 4 square pieces of paper of progressive size i.e., small to big. Fold them specifically and, make sure it make a cone shape. Try to make a cone with crooked edges and then place the smaller cone above the bigger one.
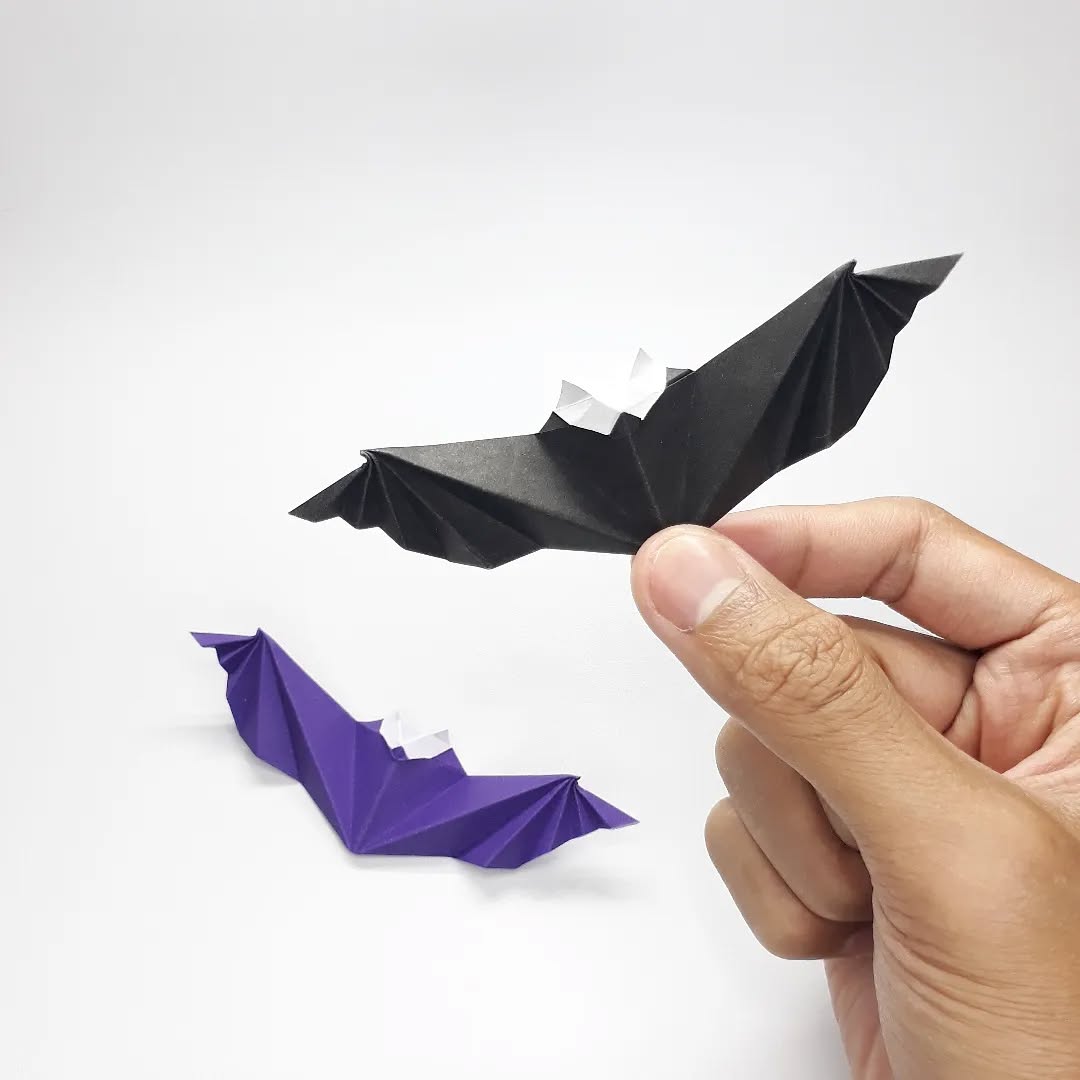
12. Bat
To make a paper bat, start with a square piece of black paper. First, fold the paper diagonally in both directions to create an “X” crease, then unfold it. Next, fold it in half horizontally and vertically to form additional creases. Collapse the paper along the creases into a triangle, known as a waterbomb base. Position the triangle with the pointed tip facing upward. Fold the bottom corners of the triangle upward at an angle to create the bat’s wings. Adjust the wings to give them a spread-out appearance. To form the head, fold the top tip of the triangle slightly downward, then fold two small triangles at the top to create ears. For a finishing touch, use a marker to draw eyes, a mouth, or fangs. Your paper bat is now complete and ready for decoration, making it perfect for Halloween or themed events!
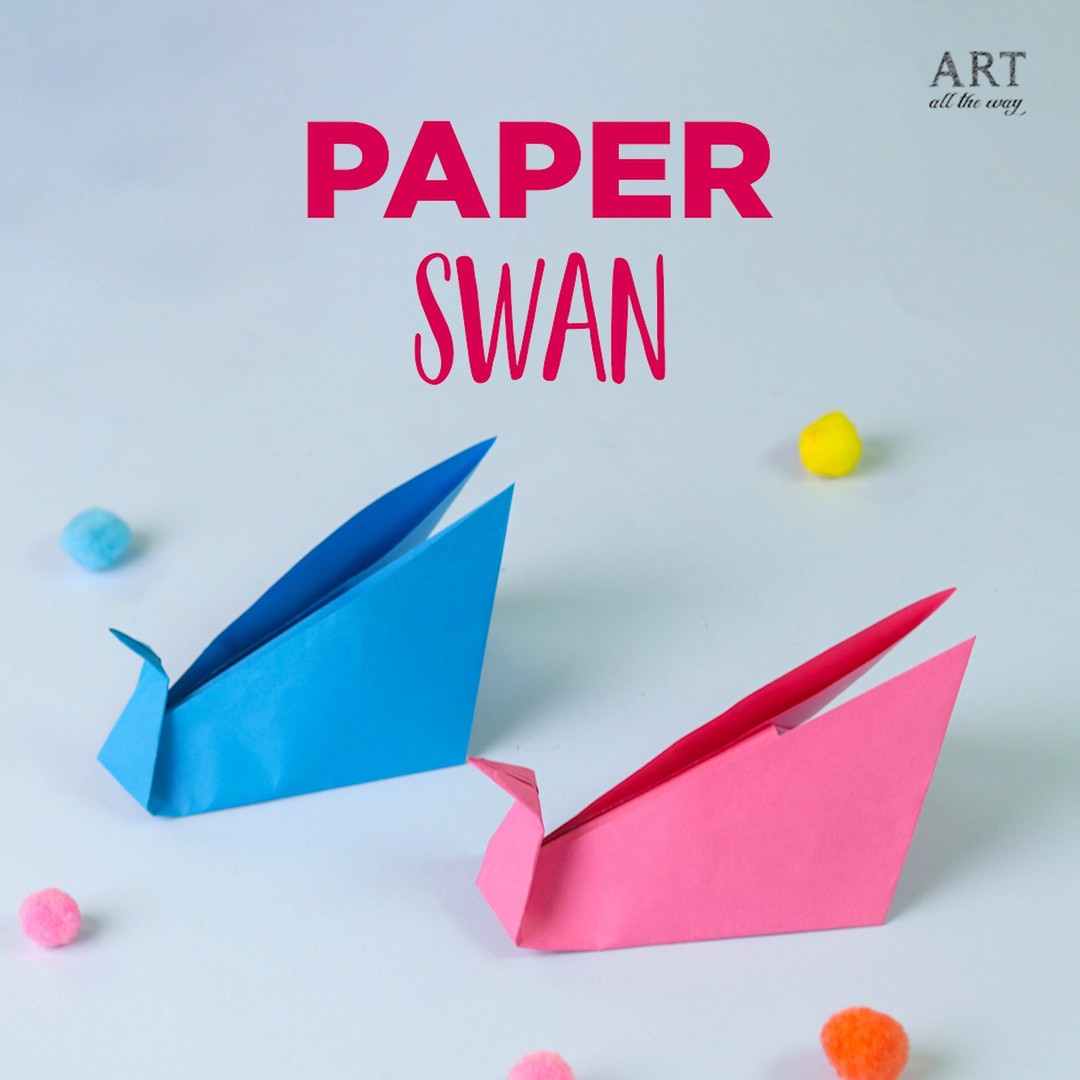
13. Paper Swan
To make a paper swan, start with a square sheet of origami paper, preferably white for a classic look. Begin by folding the paper diagonally in half to form a triangle. Next, fold the triangle in half again, bringing one pointed corner to the other to create a smaller triangle. Unfold the last fold to reveal a centre crease. Then, fold both sides of the triangle along the crease line, forming a diamond shape. Fold the top layer of one pointed end upward to create the swan’s neck. To make the head, fold the tip of the neck downwards. Adjust the neck to achieve a gentle curve. Finally, fold the body slightly in half to give the swan a more elegant posture. You can use a marker to add eyes for a finishing touch. This graceful paper swan is a beautiful craft, perfect for decorations, gifts, or as part of an origami collection.
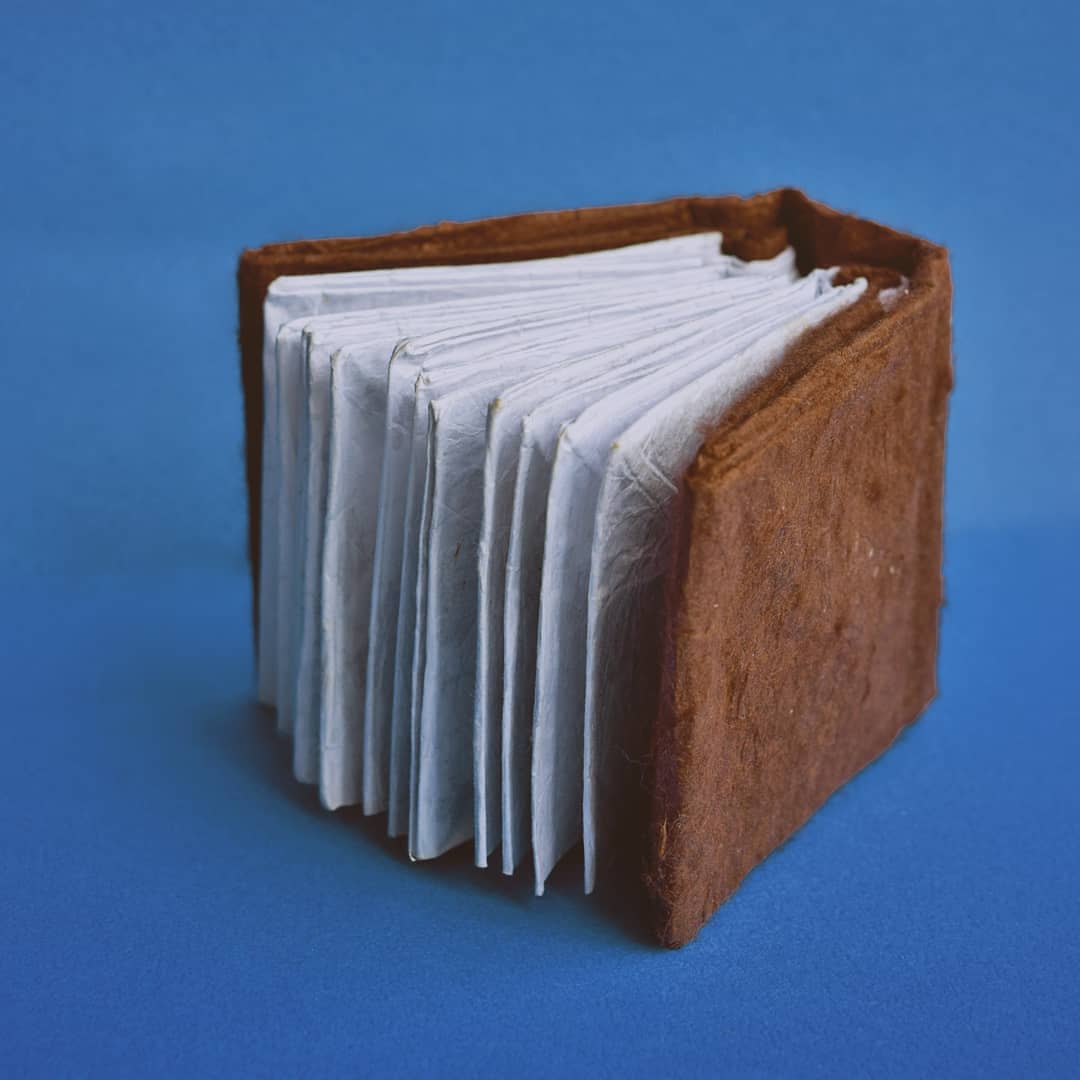
14. Diary
To make a diary, fold a long piece of paper multiple times to make the pages of a diary and then stick it to a hard board for the cover.
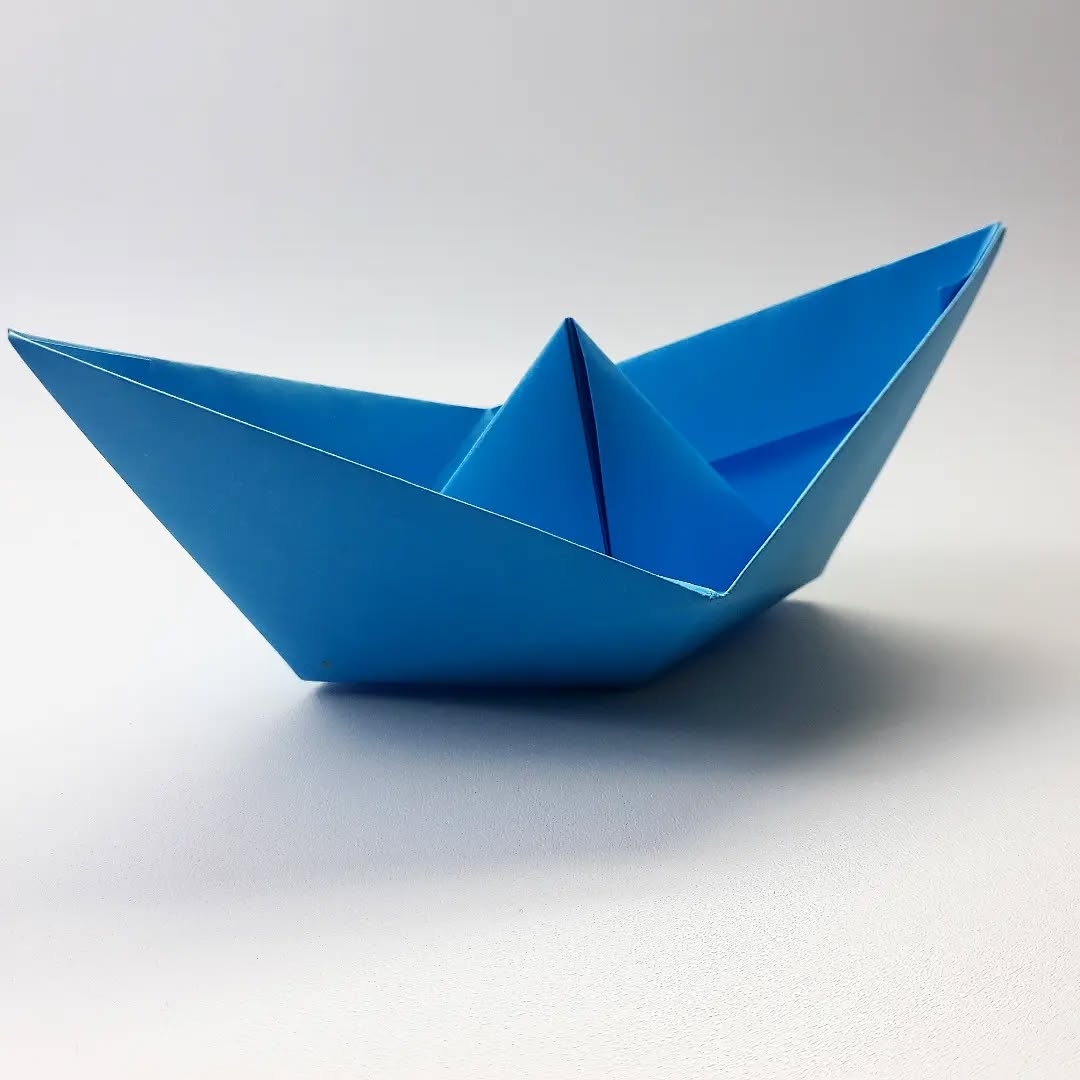
15. Simple Boat
We all have been playing with this in monsoons during our childhood. For making this boat, make sure to pick a rectangle paper instead of a square shape.
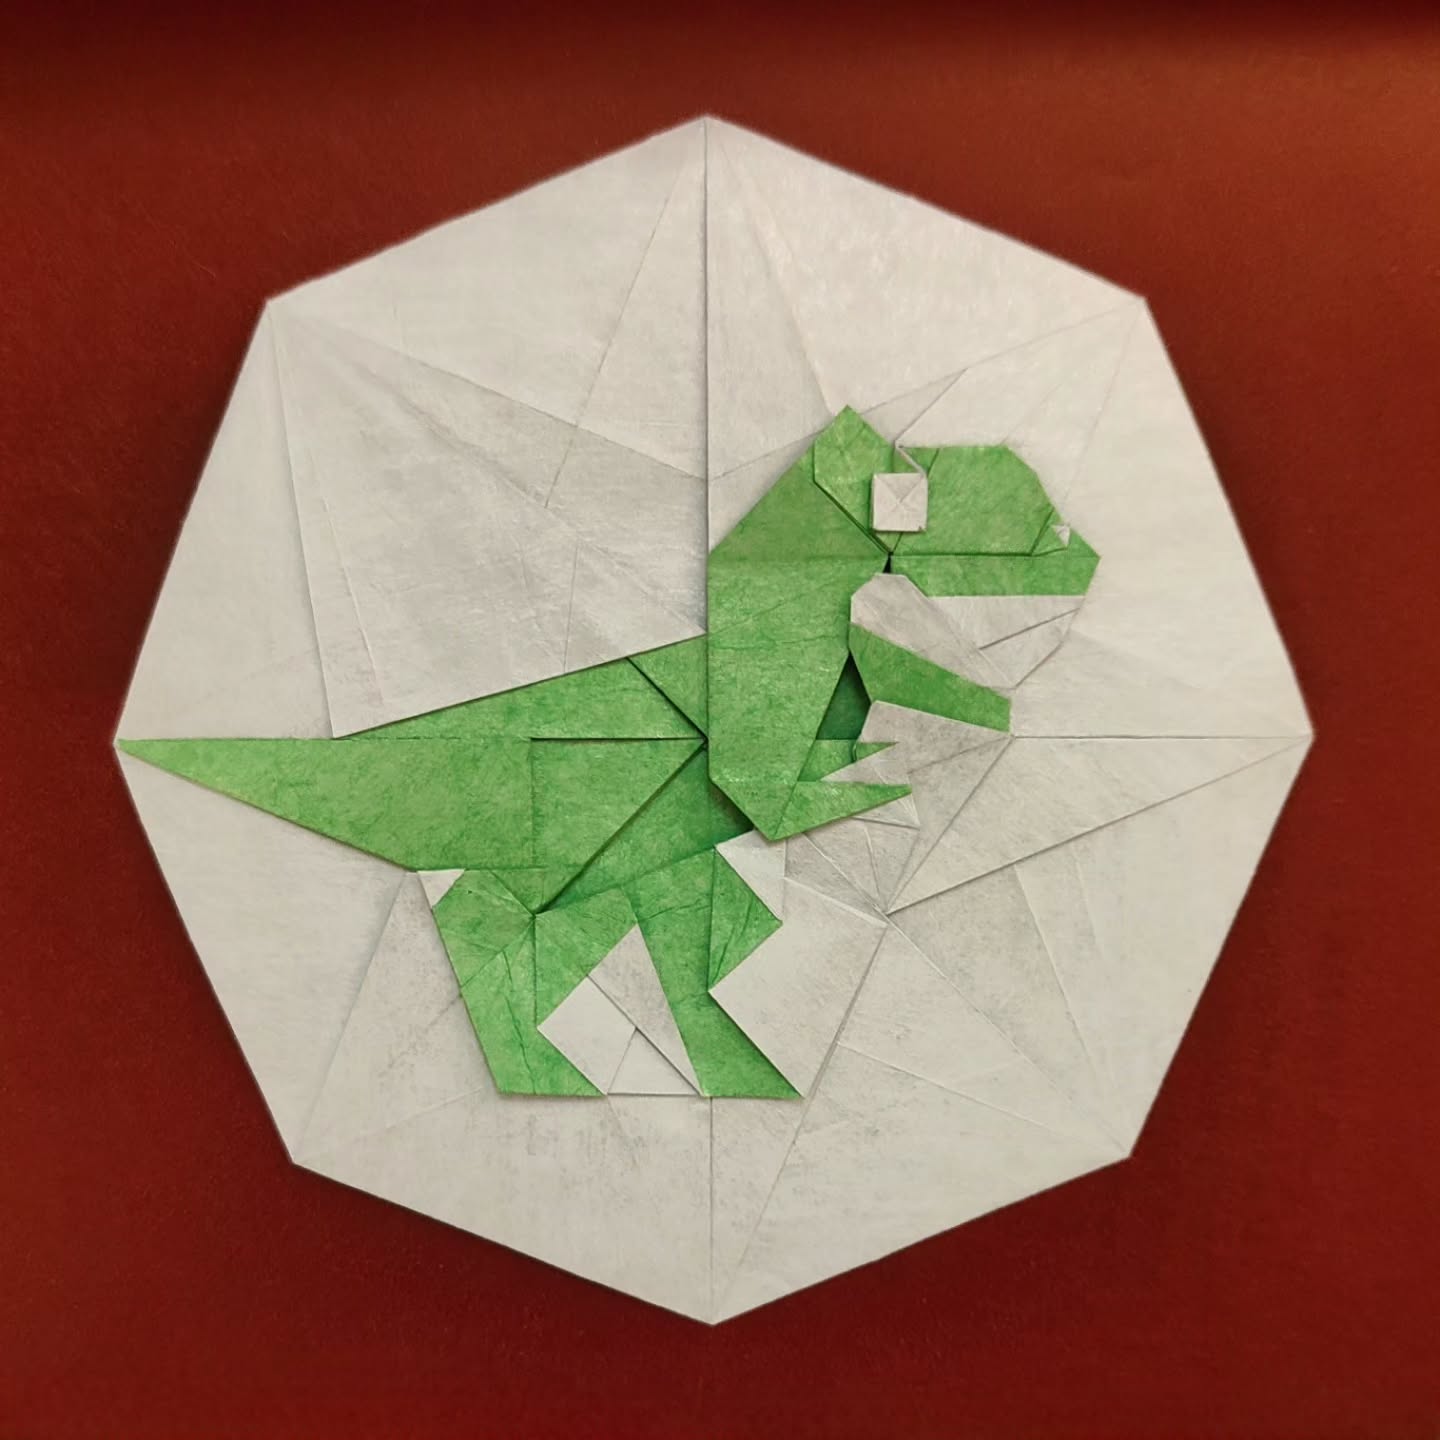
16. Dinosaur
To create a paper dinosaur, begin with a square piece of origami paper. First, fold the paper diagonally in both directions to form an “X” crease, then fold it horizontally and vertically to make a “+” crease. Using these folds, collapse the paper into a triangle, resulting in a square base. Next, lift one corner of the triangle upward to shape the dinosaur’s body. Form the legs and tail by folding the sides inward, giving it a slimmer appearance. For the head, select one of the pointed ends, fold it down slightly to create a snout, and adjust as needed. Finally, curve the tail upward or downward for a lifelike effect. You can also use a marker to draw eyes or other details. This simple origami craft is a fun and imaginative way to make your own paper dinosaur!
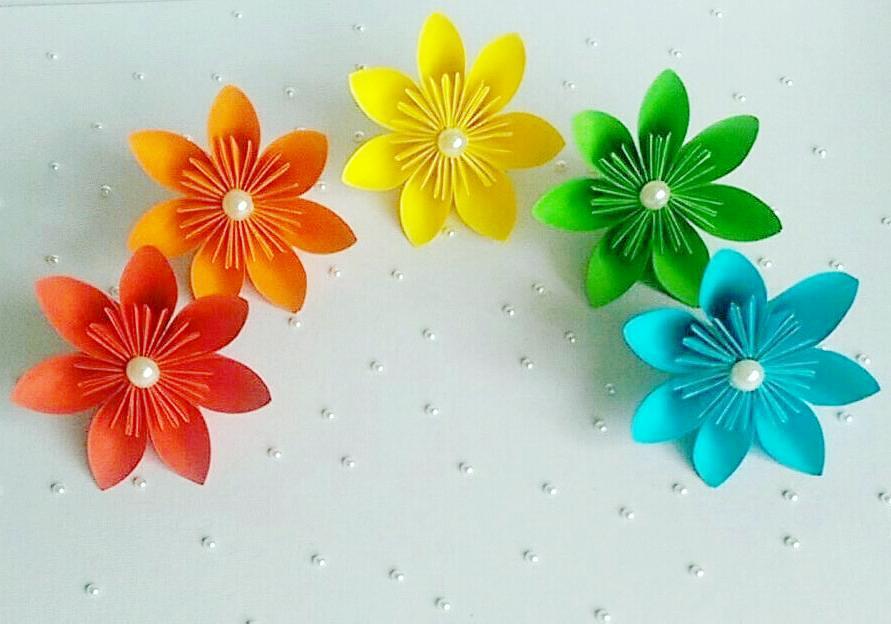
17. Flower with pearl
This is one of the simple origami crafts. Take bits and pieces of paper, fold them in the form of petals as shown, add one pearl in the middle and you are good to go.
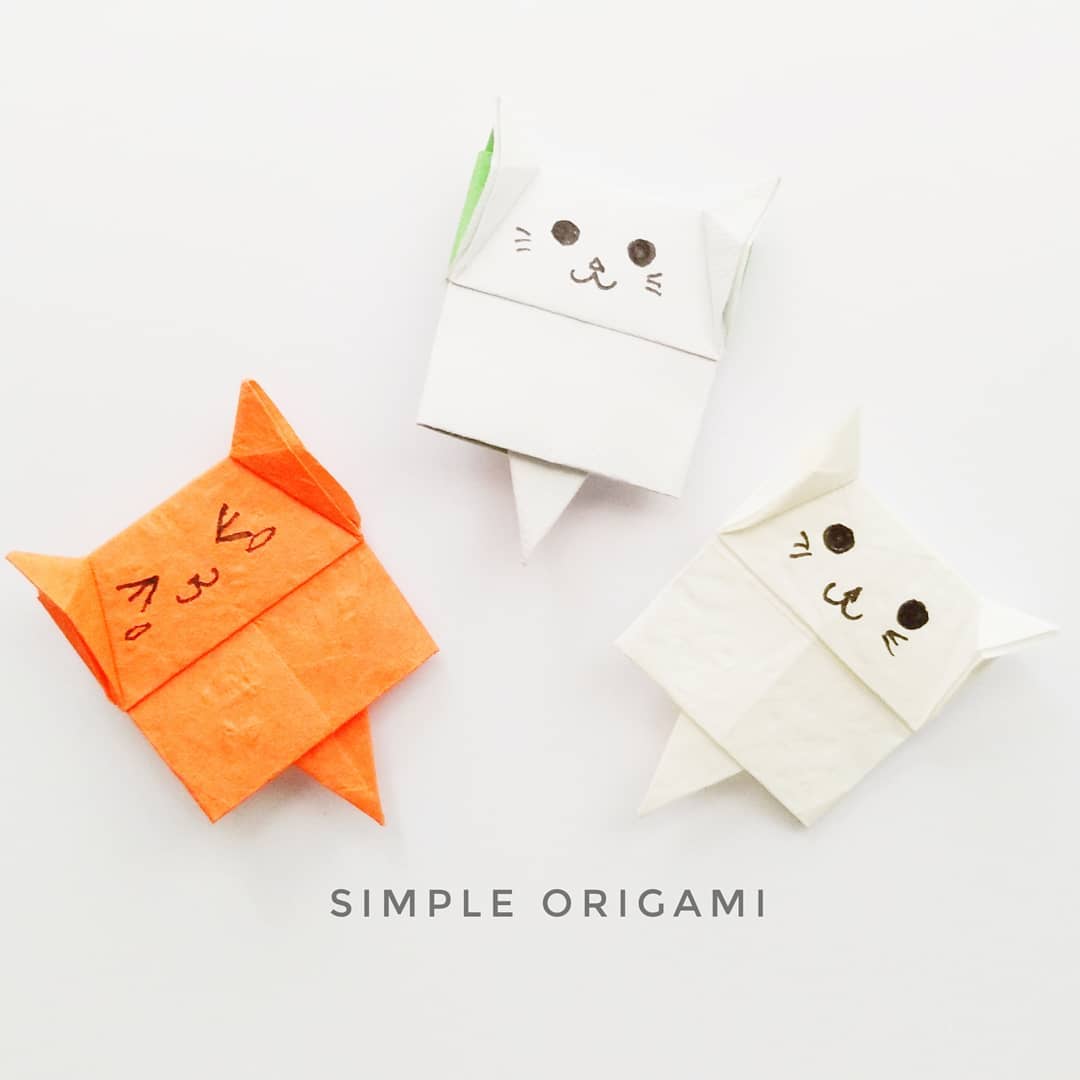
18. Cat Pins
To make cat pins, fold one piece of paper in the form of a pin and one piece of paper for the body. Attach the pinned paper with the body and draw the cat’s eyes and ears and the cat pin is ready.
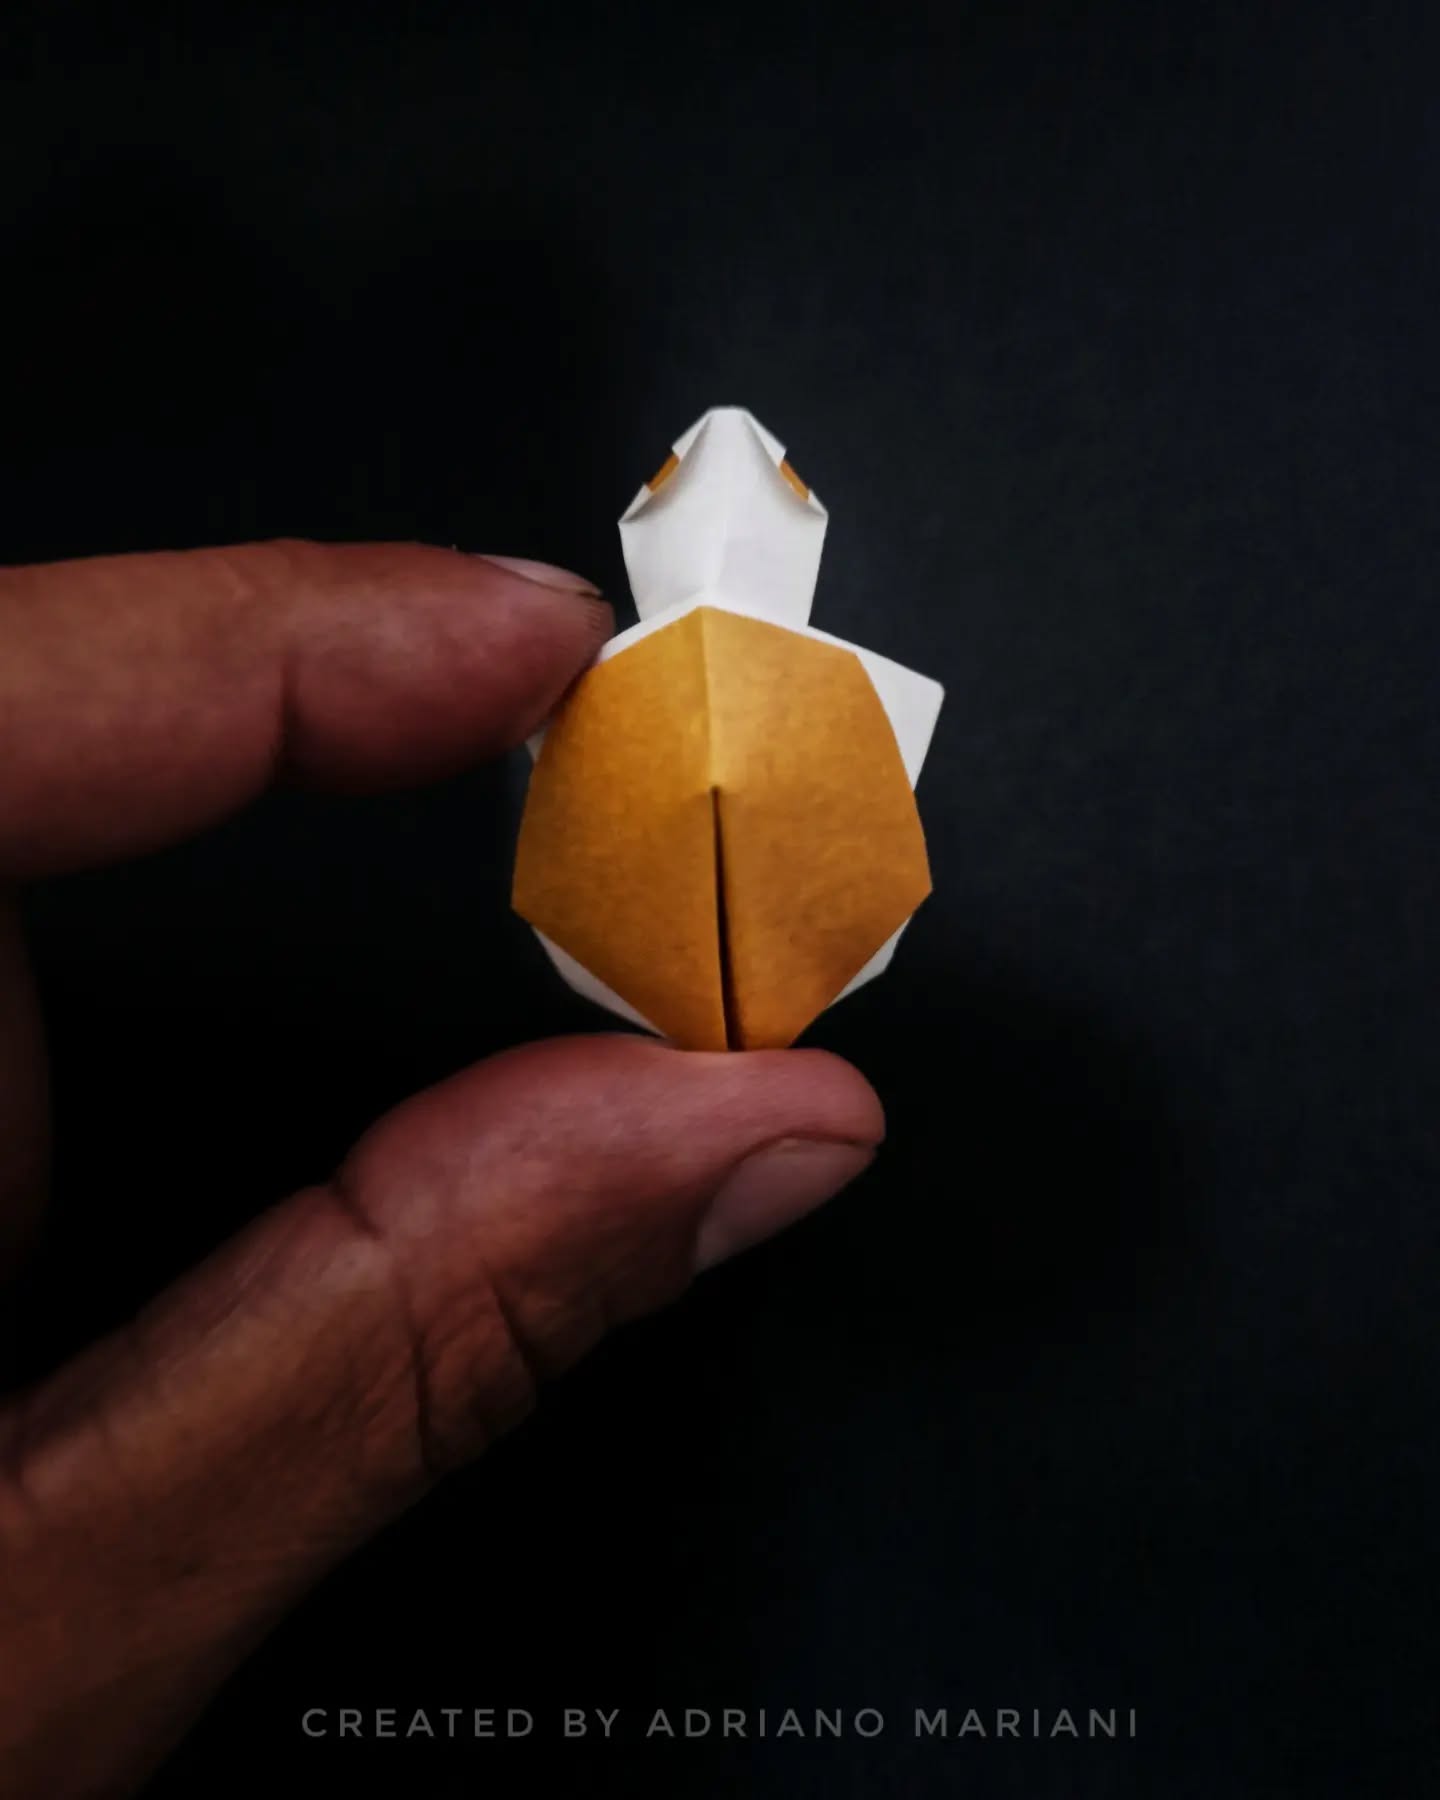
19. Turtle
To create a paper turtle, start with a square piece of origami paper, ideally green for a natural look. First, fold the paper diagonally to form a triangle, then unfold it and repeat the fold in the opposite direction to make clear creases. Fold it in half vertically and horizontally to add more crease lines. Next, bring all four corners toward the centre to form a smaller square. Then, fold these corners inward once more to shape a shell-like design. To make the head, pick one corner and fold it outward. For the legs and tail, fold the remaining corners outward and adjust their angles for a lifelike appearance. Finally, use a marker to draw details such as eyes or a shell pattern. This easy and enjoyable origami turtle is a perfect project for beginners!
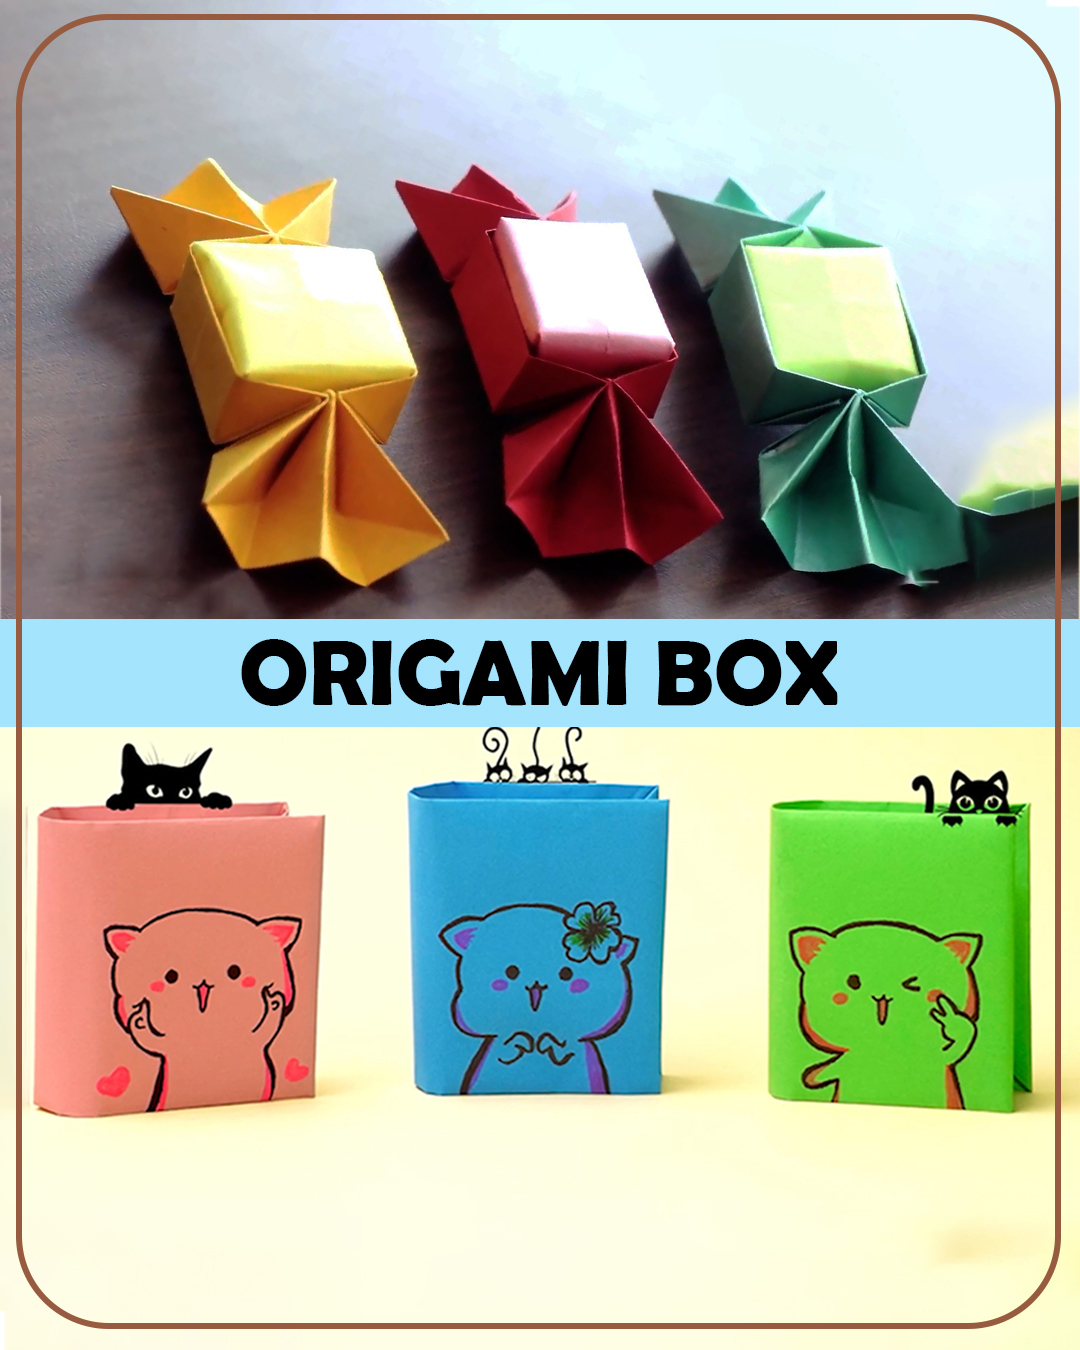
20. Origami Candy Box
To make an origami candy box, take a paper box and then wrap the paper around the box. Leave opposite sides and wrinkle them to give the shape of a candy. Before covering the box don’t forget to put some candy inside the box.
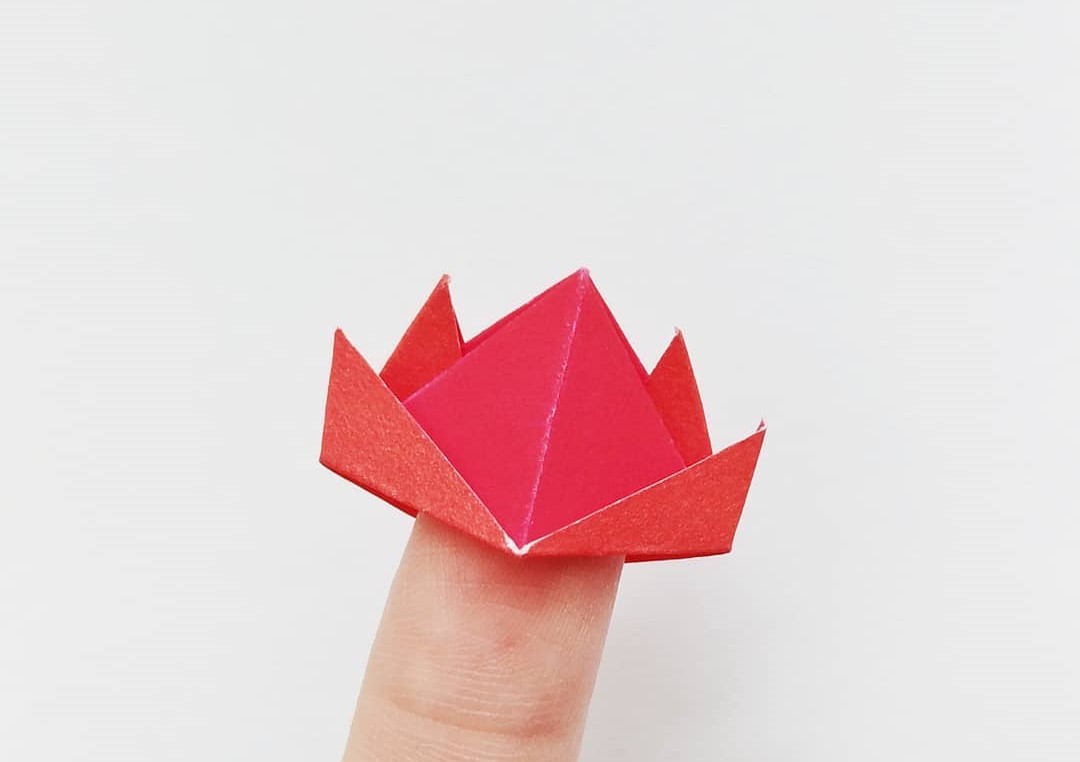
21. Cute Lotus
To make a paper lotus, start with a square sheet of origami paper, preferably pink or white for a traditional look. Begin by folding the paper diagonally in both directions to form an “X” crease, then unfold it. Next, fold all four corners of the paper towards the center, forming a smaller square. Repeat this step once more to create a more compact square. Flip the paper over and fold the corners to the center again. Carefully lift and pull out the petals by gently folding each flap upward, adjusting them to resemble a blooming lotus. Continue shaping the petals until your flower looks full and symmetrical.
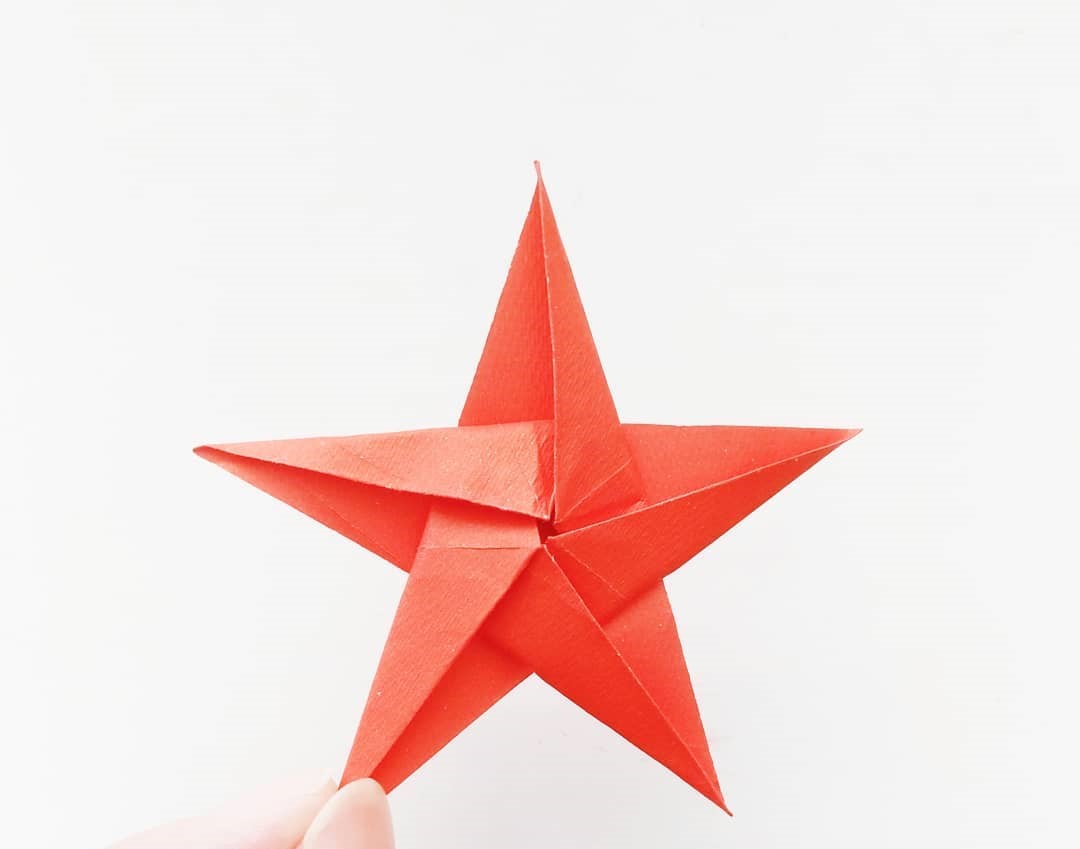
22. Cute Star
To make a cute paper star, start with a thin strip of paper, about 1 cm wide and 25 cm long. First, tie the strip into a small knot at one end, forming a pentagon shape. Gently flatten the knot and tuck the short end into the fold. Next, wrap the long end of the strip around the pentagon, following its edges. Keep wrapping until you reach the end of the strip, then tuck the remaining piece securely into the folds. Once the star is complete, use your fingers to pinch each corner of the pentagon, forming a puffed, three-dimensional star. You can make multiple stars using different colors and sizes for a vibrant, decorative display. These adorable paper stars are perfect for decorating jars, making garlands, or using as thoughtful gifts!
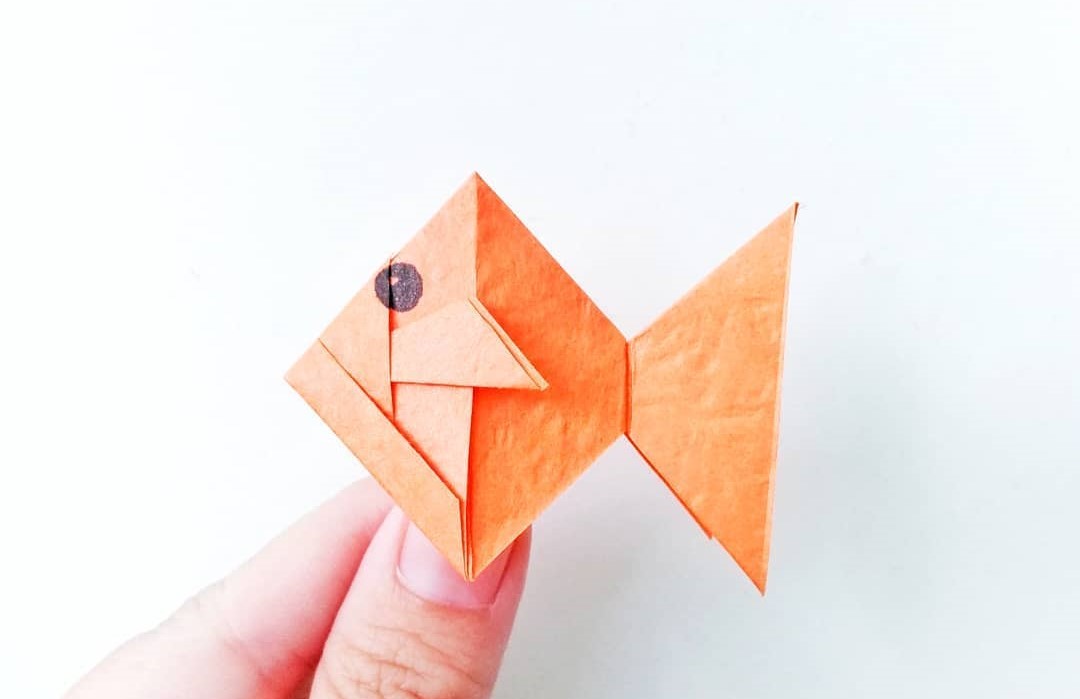
23. Cute Fish
To create a cute paper fish, start with a square piece of origami paper in a bright, cheerful color. First, fold the paper diagonally to form a triangle, then unfold it. Next, fold it in half both horizontally and vertically to create creases for guidance. Fold it diagonally once more, keeping it as a triangle. With the pointed end facing upward, bring the bottom corners of the triangle up to meet the top point, shaping the fish’s body and tail. Adjust the tail folds to make it symmetrical and well-defined. For a fun finishing touch, draw an eye with a marker or stick on a googly eye, and decorate the fish with colourful patterns or scales. This easy and adorable paper fish is a perfect activity for kids and makes a delightful addition to an underwater-themed craft project or decoration.
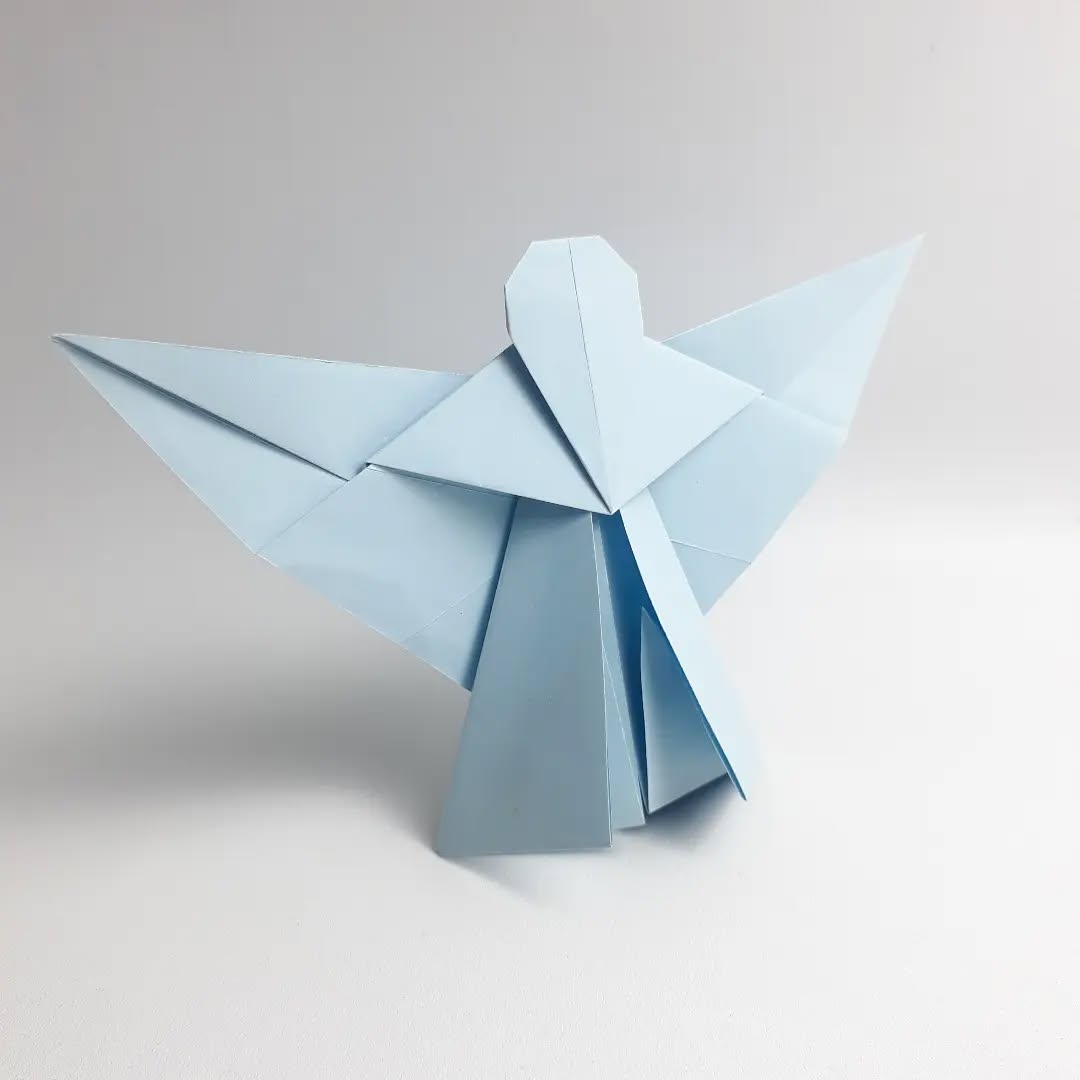
24. Greek God
The paper origami is fun, right? So what about trying to make creatures or Greek gods with it? This will be simple and fun. You will need 2 pieces of paper for this. One for the body and another for the head and arms. For base, you can try with a basic paper aeroplane.
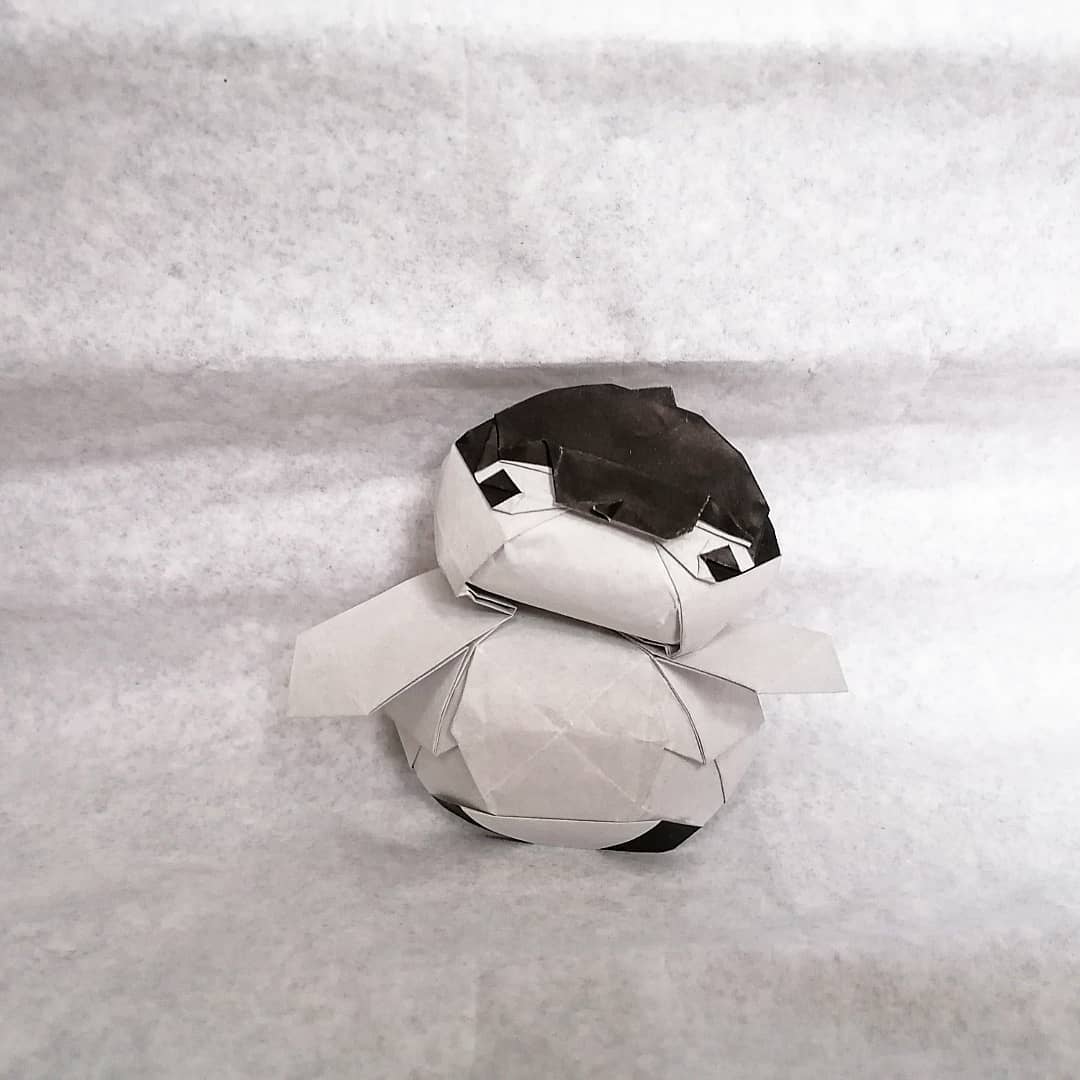
25. Cute Penguin
To make a paper penguin, start with a square sheet of origami paper, preferably black on one side and white on the other. Begin by folding the paper diagonally to form a triangle, then unfold it. Fold it in half vertically to create a center crease and unfold it again. Next, fold the top corner downwards to form the penguin’s head. Then, fold the left and right corners inwards along the centre crease to shape the body and wings. Adjust the folds to ensure the wings are even. Fold a small portion at the bottom upwards to create the penguin’s feet. Finally, use a marker to draw eyes and add a small orange triangle for the beak. Your adorable paper penguin is now complete and can be used as a cute decoration or a fun addition to a winter-themed project!
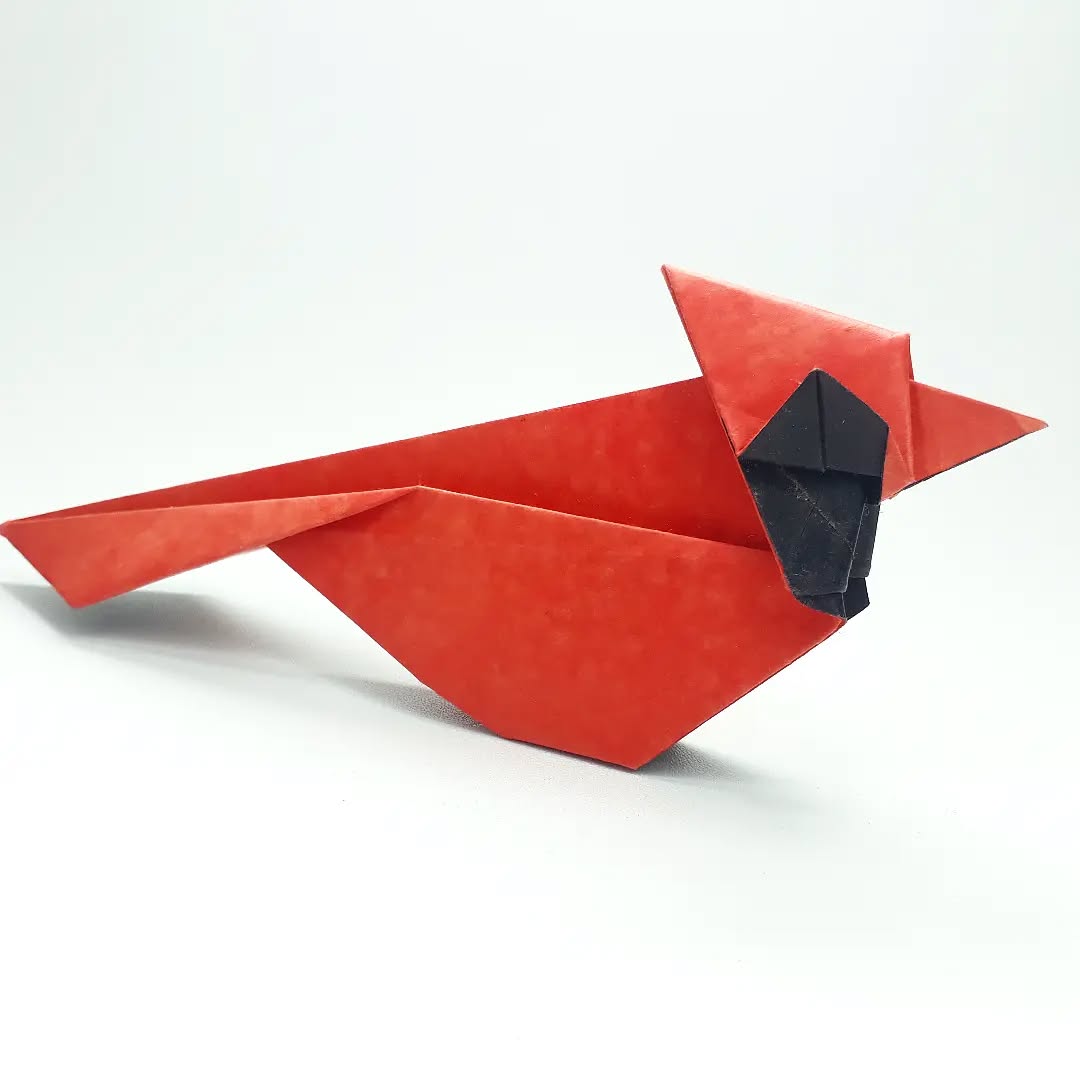
26. Cute Bird
To make a paper bird, start with a square sheet of origami paper, preferably in a colour of your choice. Begin by folding the paper diagonally in both directions to form an “X” crease, then unfold it. Next, fold the paper in half horizontally and vertically to create a “+” crease. Collapse the paper along the creases to form a square base by bringing the diagonal folds together. Fold the sides of the square base to the centre, creating a kite shape. Then, fold the top triangle down and unfold it, using the crease as a guide. Lift one layer of paper from the bottom and fold it upward along the creases to form the bird’s body. Shape the head by folding down a small section at the tip of the paper. For the wings, fold the sides down to give your bird a dynamic, flying pose.

27. Spider
To make this cute spider fold one black paper in 4 parts one over the other for the body. For the 8 legs, you have to attach folded paper separately and your spider is ready.

28. Chair
For this simple origami chair, fold a piece of paper in half, and then fold the corner edges from the centre which will give the shape of a triangle. Now fold again slightly to make two sides of a chair. Now attach a separate piece on the back and for the seat.
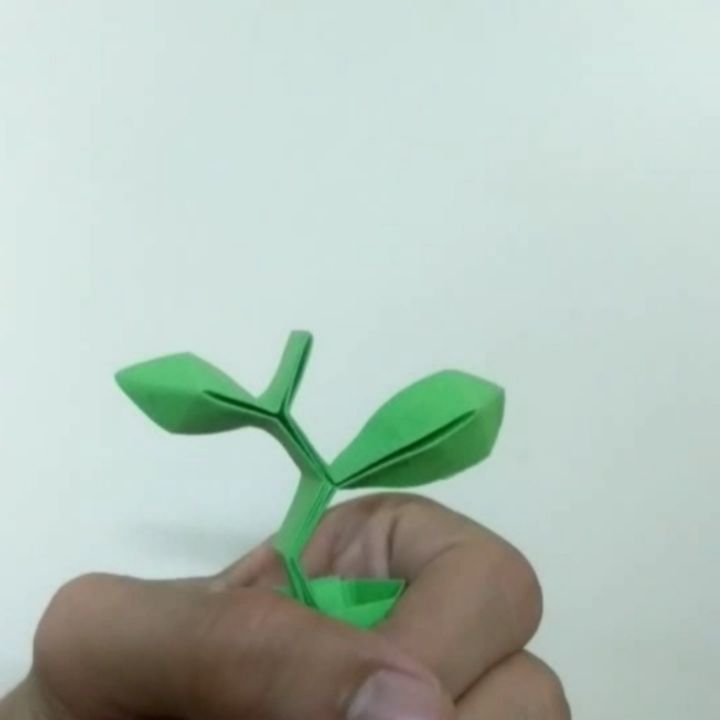
29. Small Plant
An easy way of making small plants using paper is to fold a green paper like a thing pen. And then fold it like shown in the picture. For making the leaves section just unfold the portion of the paper and cut properly to give a cute leaf shape.
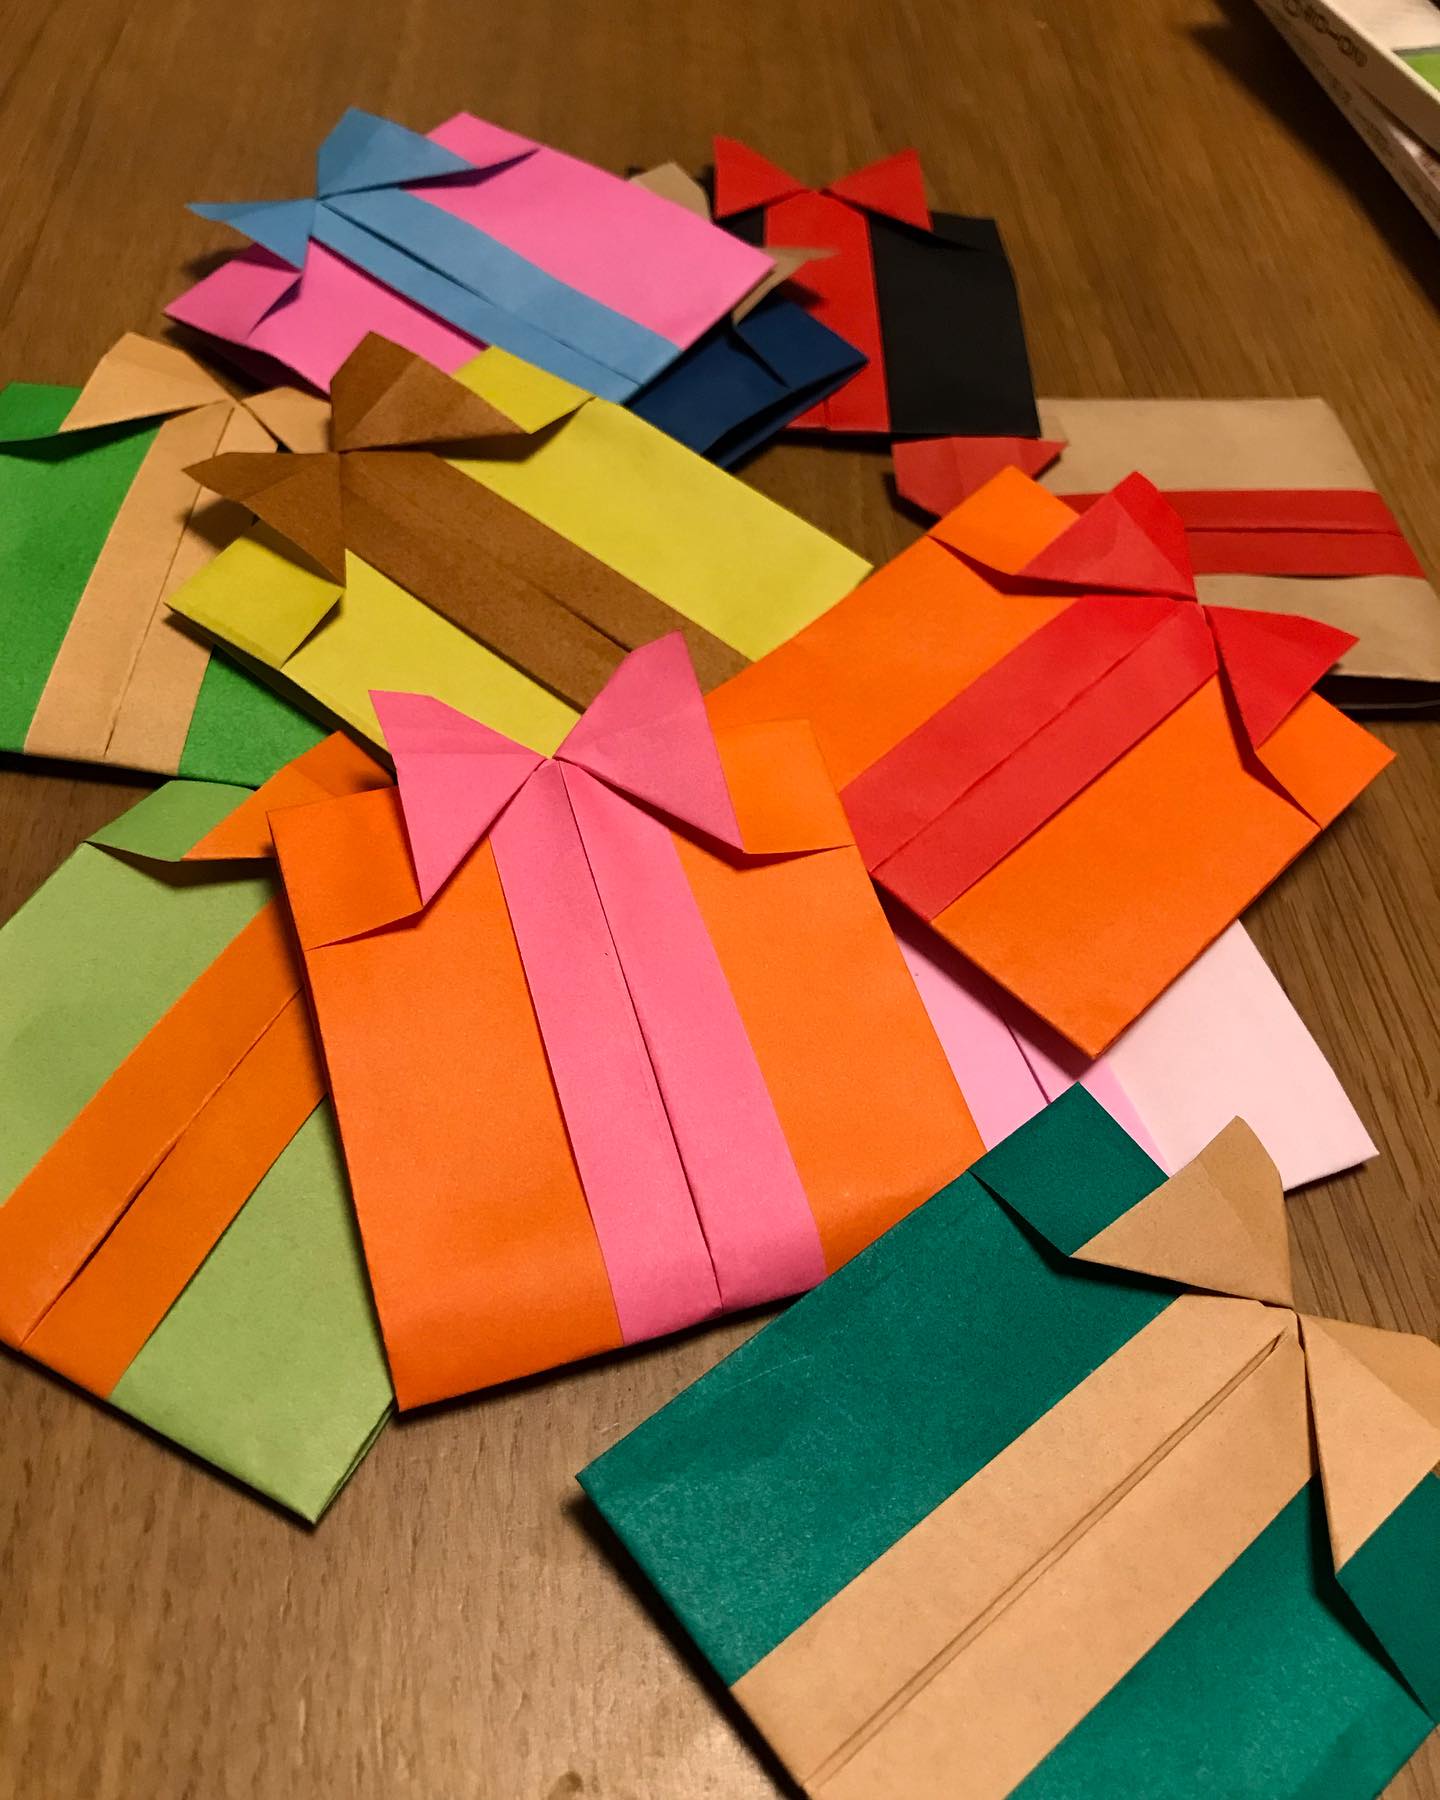
30. Gift Box
To make a paper gift box, start with two square sheets of paper — one for the base and one for the lid. Choose decorative or colourful paper for a festive look. Begin by folding one sheet in half horizontally and vertically to create crease lines that divide the paper into four equal squares. Next, fold each corner towards the center, forming a smaller square. Then, fold the edges of the square towards the middle, creating the sides of the box. Unfold these sides partially, tuck in the corners, and refold the sides to form a sturdy base. For the lid, repeat the same steps using the second sheet of paper, but fold slightly smaller to ensure it fits snugly over the base. Once assembled, you can decorate the box with ribbons, stickers, or personalized notes. This simple yet elegant paper gift box is perfect for holding small treats, jewellery, or heartfelt surprises!
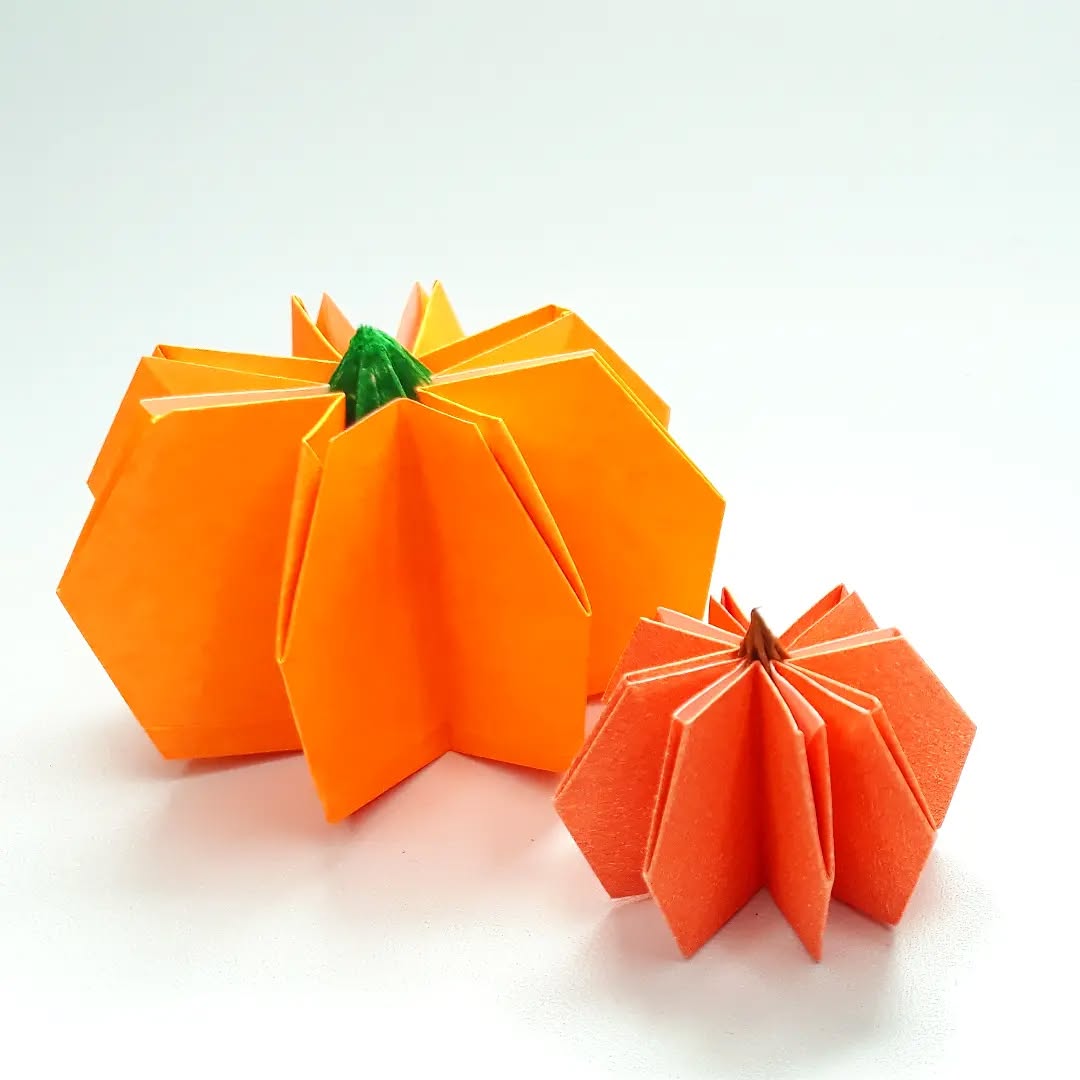
31. Pumpkin
To create a paper pumpkin, begin with a square sheet of orange origami paper. Fold it in half horizontally and vertically to make creases, then unfold it. Next, bring each corner toward the centre to form a smaller square. Flip the paper over and repeat the process, folding the corners to the centre again. To achieve the classic round pumpkin shape, gently curve the edges by folding them slightly inward. For the stem, cut a small strip of green paper, roll it up, and attach it to the top using glue. You can also add green paper leaves or vines for extra decoration. If you want to make it a jack-o’-lantern, simply draw a fun or spooky face with a marker. This easy and festive paper pumpkin is ideal for Halloween decor, fall-themed crafts, or a creative seasonal project!
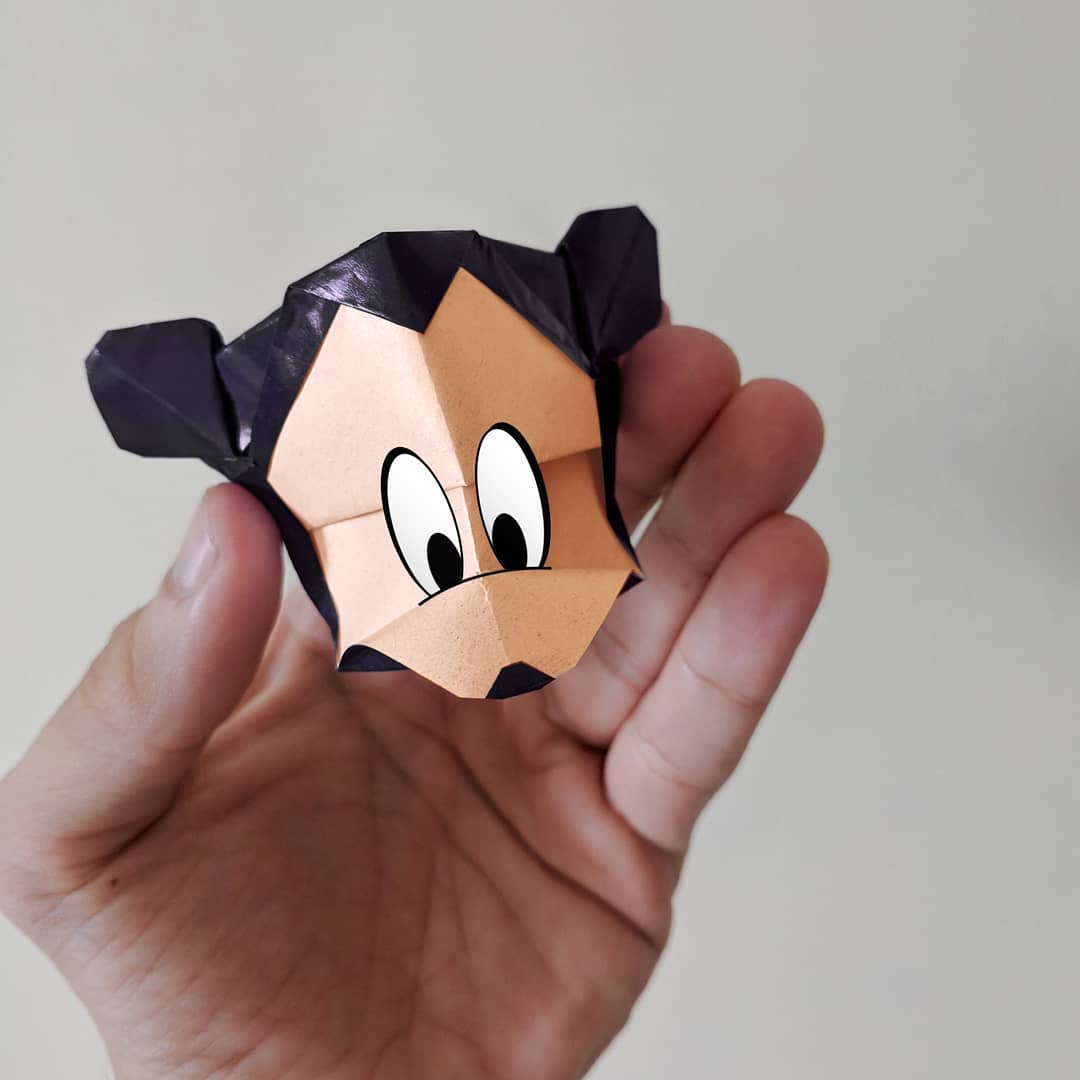
32. Micky Mouse
To make a Mickey Mouse face with paper, start by gathering black, white, and red construction paper. First, cut out a large black circle for Mickey’s head and two smaller black circles for the ears. Attach the ears to the top of the head using glue. Next, cut an oval shape from white paper to create Mickey’s face and glue it in the lower half of the head. For the eyes, cut two small oval shapes from white paper and draw black pupils using a marker. Cut a small black oval for the nose and glue it just below the eyes. To make Mickey’s signature smile, cut a curved shape from black paper and attach it to the face.
33. Ghost
To make a paper ghost, start with a white square sheet of paper. First, fold the paper in half diagonally to form a triangle. Then, fold the triangle in half once more to create a smaller triangle. Next, unfold the last fold to reveal the centre crease. Fold the two top corners downwards towards the centre crease, giving the ghost a rounded head shape. For the bottom part, curve or trim the paper with scissors to create a wavy, floating effect. To add personality, draw two oval eyes and a small, round mouth using a black marker. You can make the ghost look spooky or silly depending on how you design the face. This simple paper ghost is perfect for Halloween decorations, fun crafts, or as part of a festive garland.


