
Have some cardboard lying around at home? Now’s the perfect time to put it to good use! Let your kids try out these fun and budget-friendly cardboard crafts that are sure to spark your creativity!
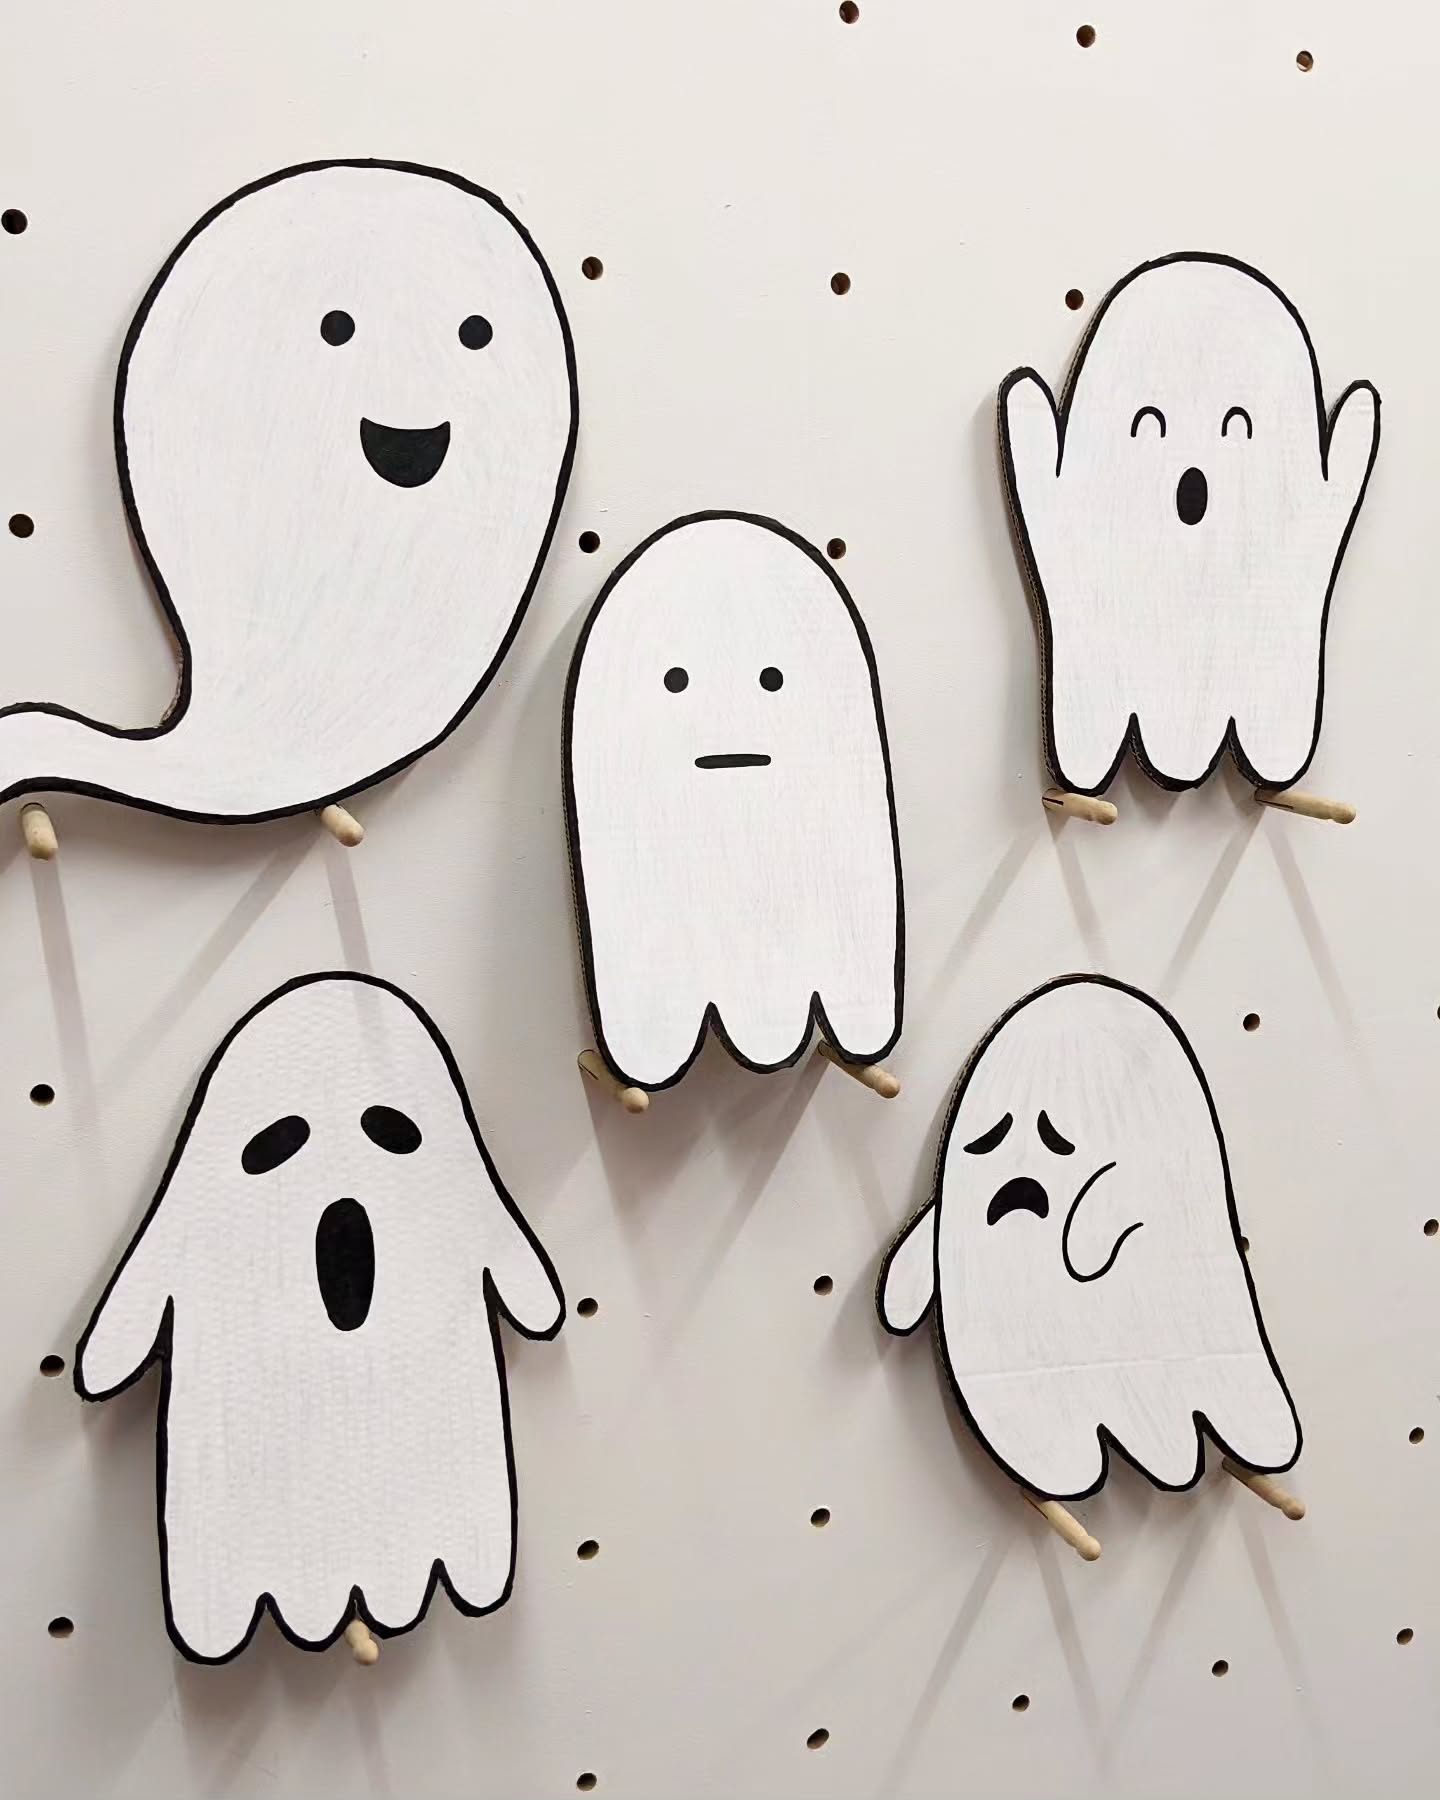
1. Ghost
To create cardboard ghosts you will be needing few plain cardboard. Paint them white or cover then with white chart paper. Then outline the borders with black and draw eyes , mouth , hands as wished. You ghost is ready.
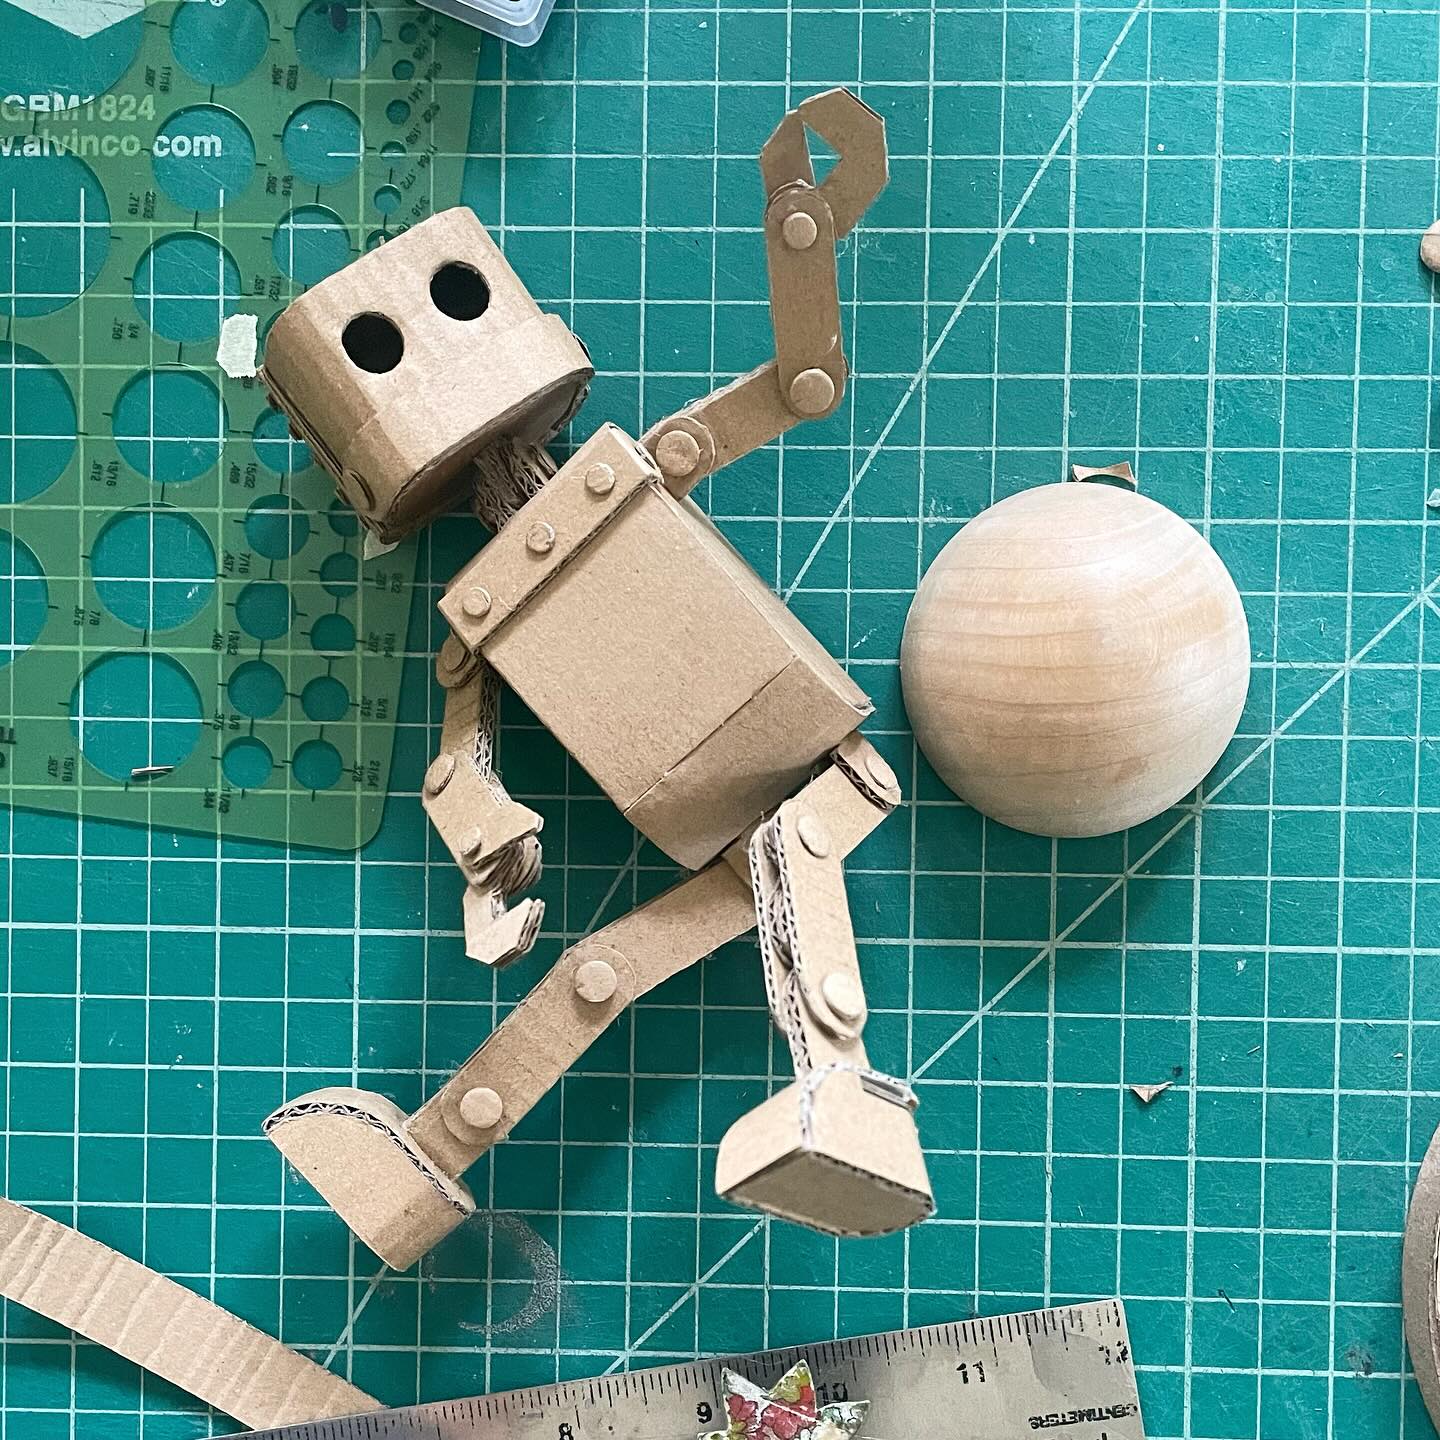
2. Robot
To create a cardboard robot, collect several cardboard boxes of varying sizes—one large box for the body, a smaller one for the head, and additional ones for the arms and legs. Attach the head to the top of the body using glue or tape. For the limbs, cut long rectangles or roll cardboard into tubes and secure them to the sides and bottom of the main box. Add smaller cutouts to form features like eyes, buttons, and antennas to give your robot character.
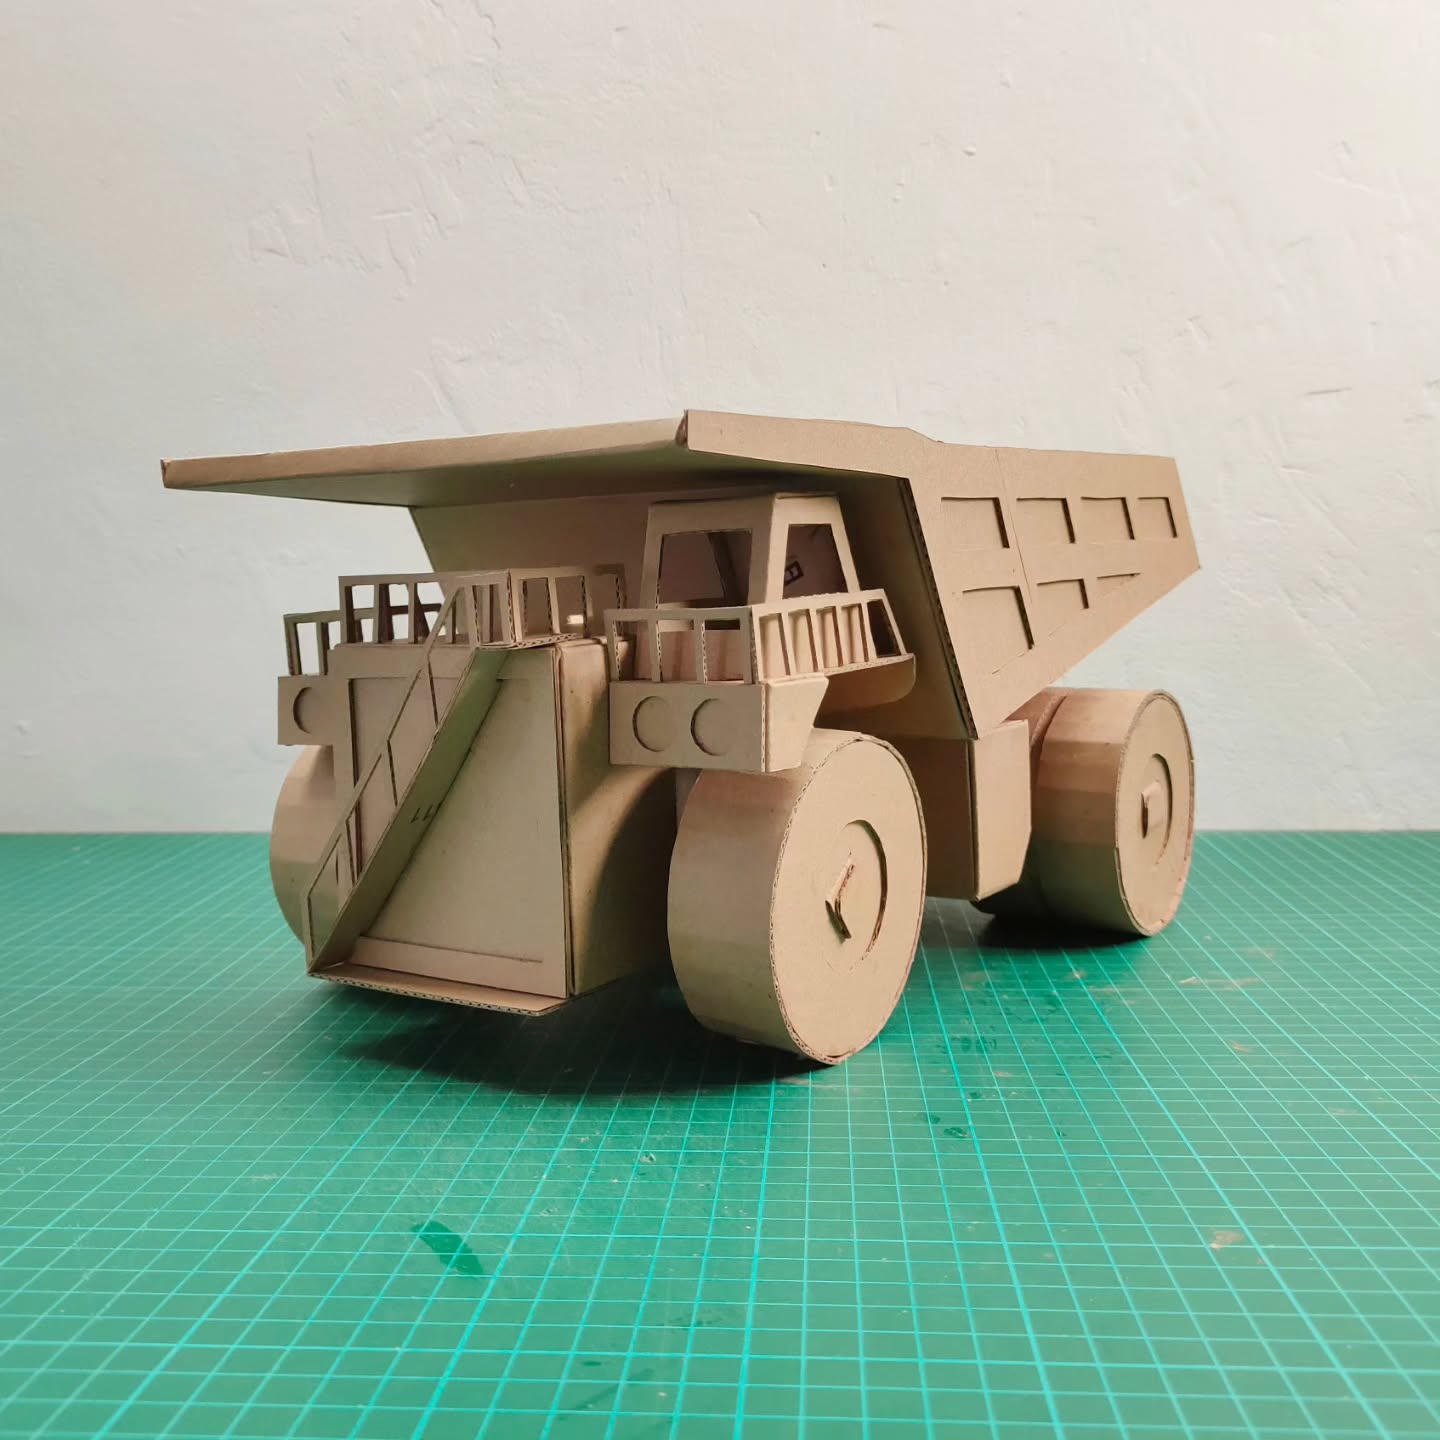
3. Truck
To build a cardboard truck, begin with a strong rectangular cardboard box to serve as the truck’s main body. Create a smaller box for the front cab and attach it using tape or glue. For the wheels, cut out cardboard circles or use bottle caps, then fix them to the sides. Add features like windows, headlights, and a front grill by drawing them on or using paint and colored paper. You can also make a truck bed or trailer by attaching a flat cardboard piece to the back. After decorating and putting everything together, your cardboard truck will be ready for imaginative adventures!
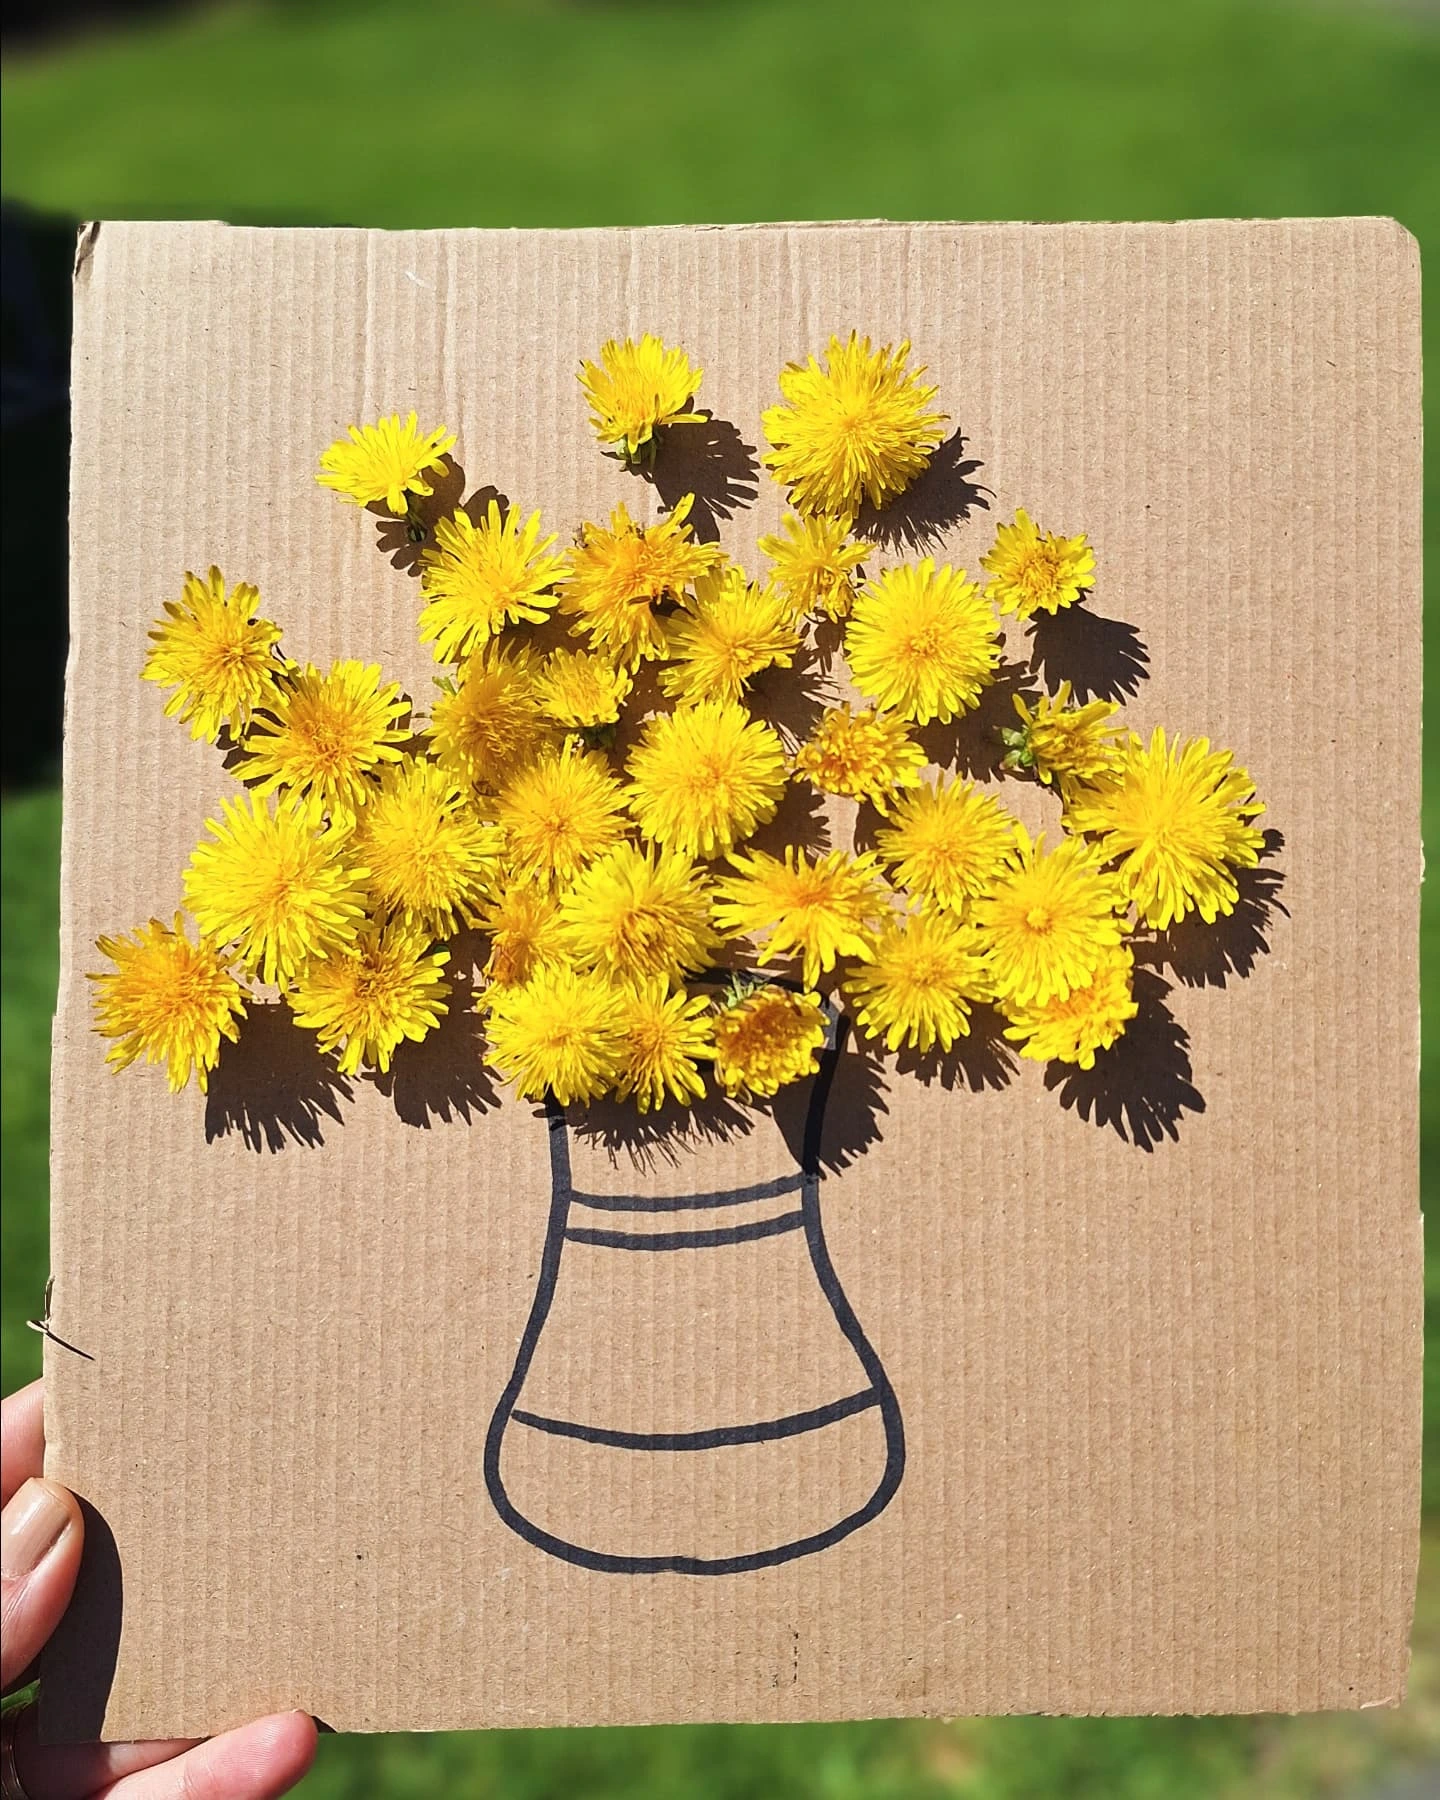
4. Flower Frame
To make this flower frame take a plain piece of cardboard, draw a vase and make a large hole just above the base. Now stick some paper made flowers your flower frame is ready. You can hang this in your living room or anywhere you wish.
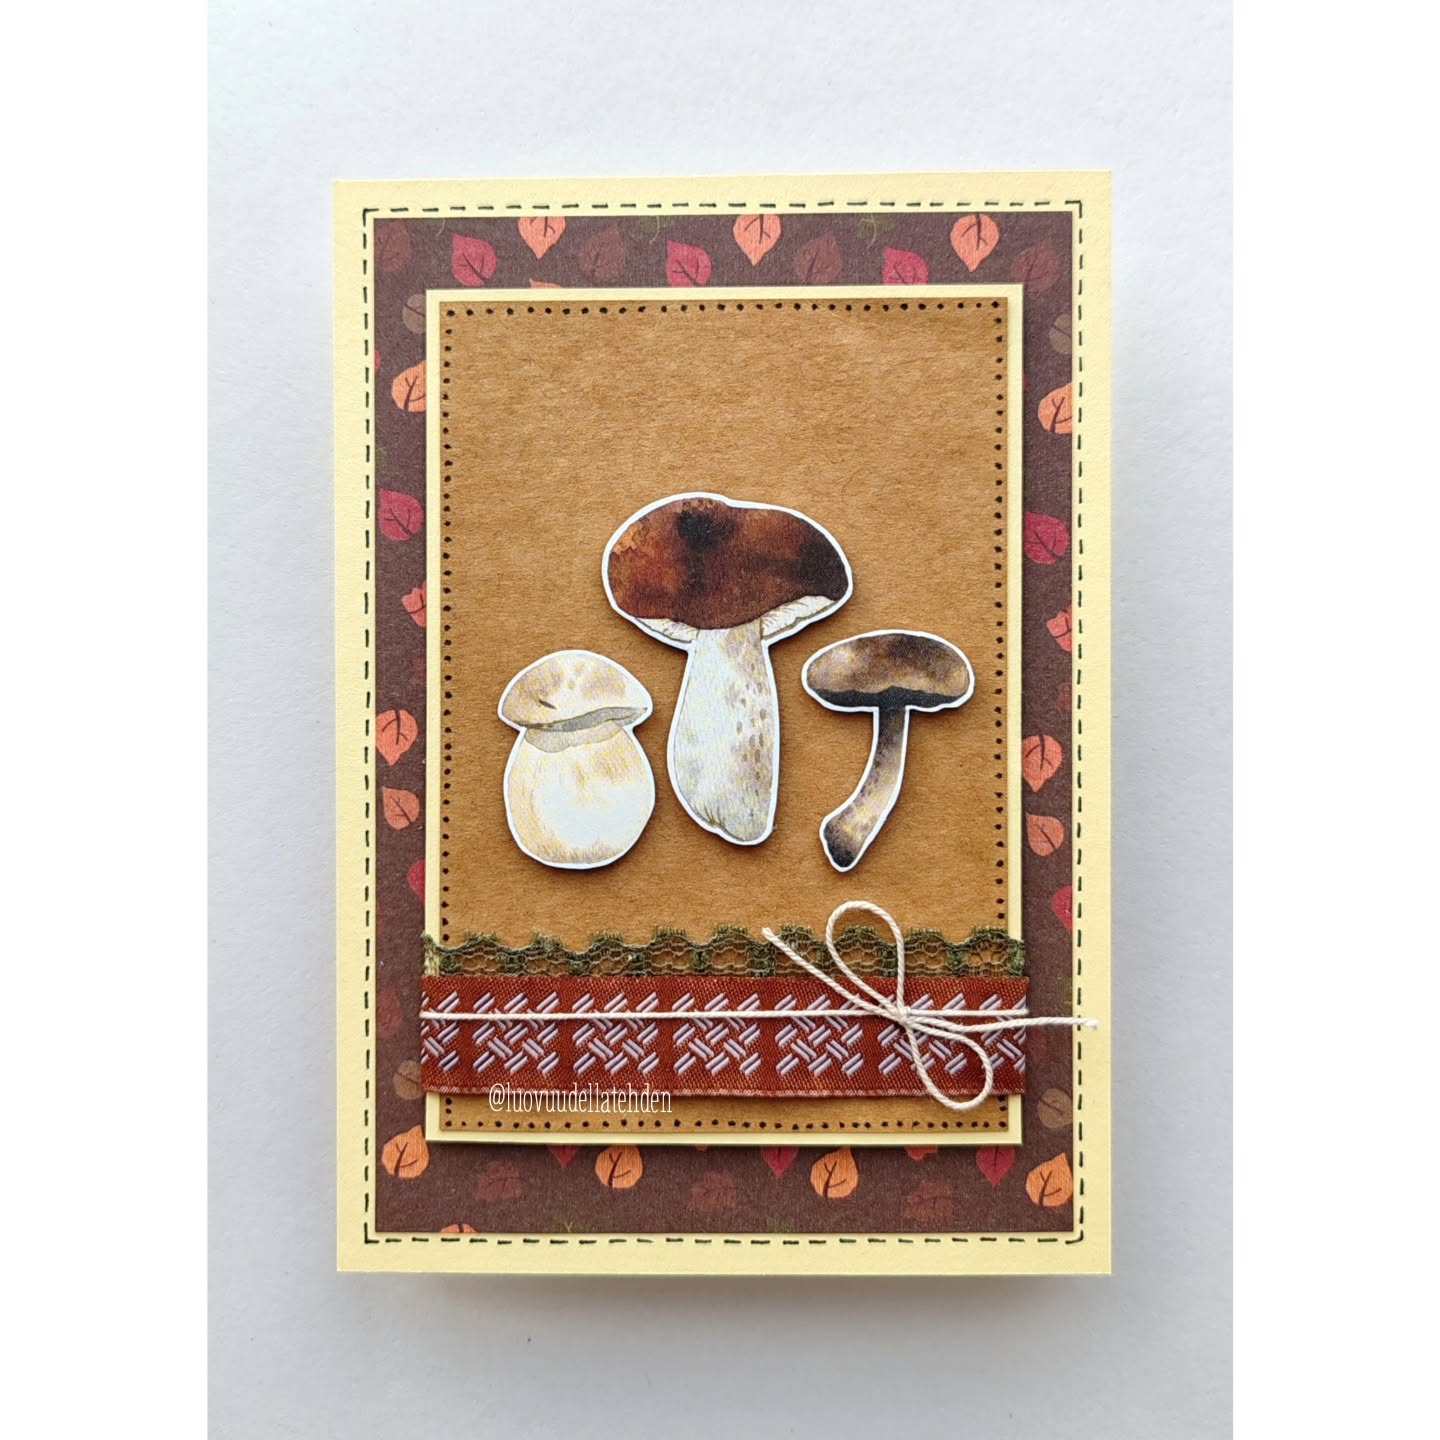
5. Card Craft
We all love cards and we use it to wish someone on a very special occasion. To make this card you will be needing various print of paper or you can draw in on your own. MAke some cartoons or mushrooms as shown above and stick it. Try to use 3-4 patterns and pieces of paper and stick one above other. It will give a 3D look.

6. Cardboard Flowers
To make these cardboard flowers, you can take cardboard tools of tissue paper. Then cut on edge into multiple thin fringes as shown in the image. Your cardboard flower is ready.
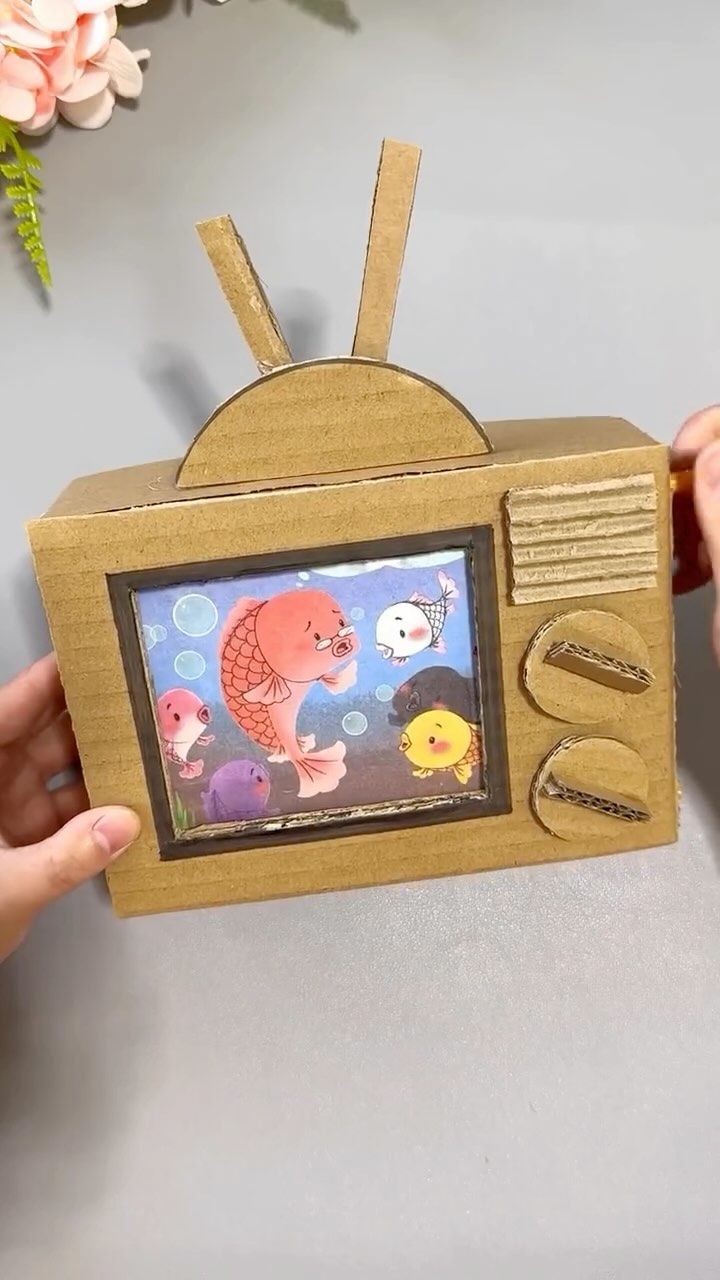
7. Cardboard Television Set
To create a cardboard television, begin with a medium or small cardboard box and cut out a big rectangle on one side to act as the screen, leaving a wide border to look like a TV frame. Use extra cardboard to craft small shapes for buttons or knobs and glue them onto the front. For added detail, you can draw or paint a scene inside the screen area, or place a printed image behind the cutout. Decorate the rest of the box with markers or paint to give it the appearance of a real television. To make it even more fun, consider adding a cardboard stand or a pretend remote. Your homemade cardboard TV is now ready for imaginative play!
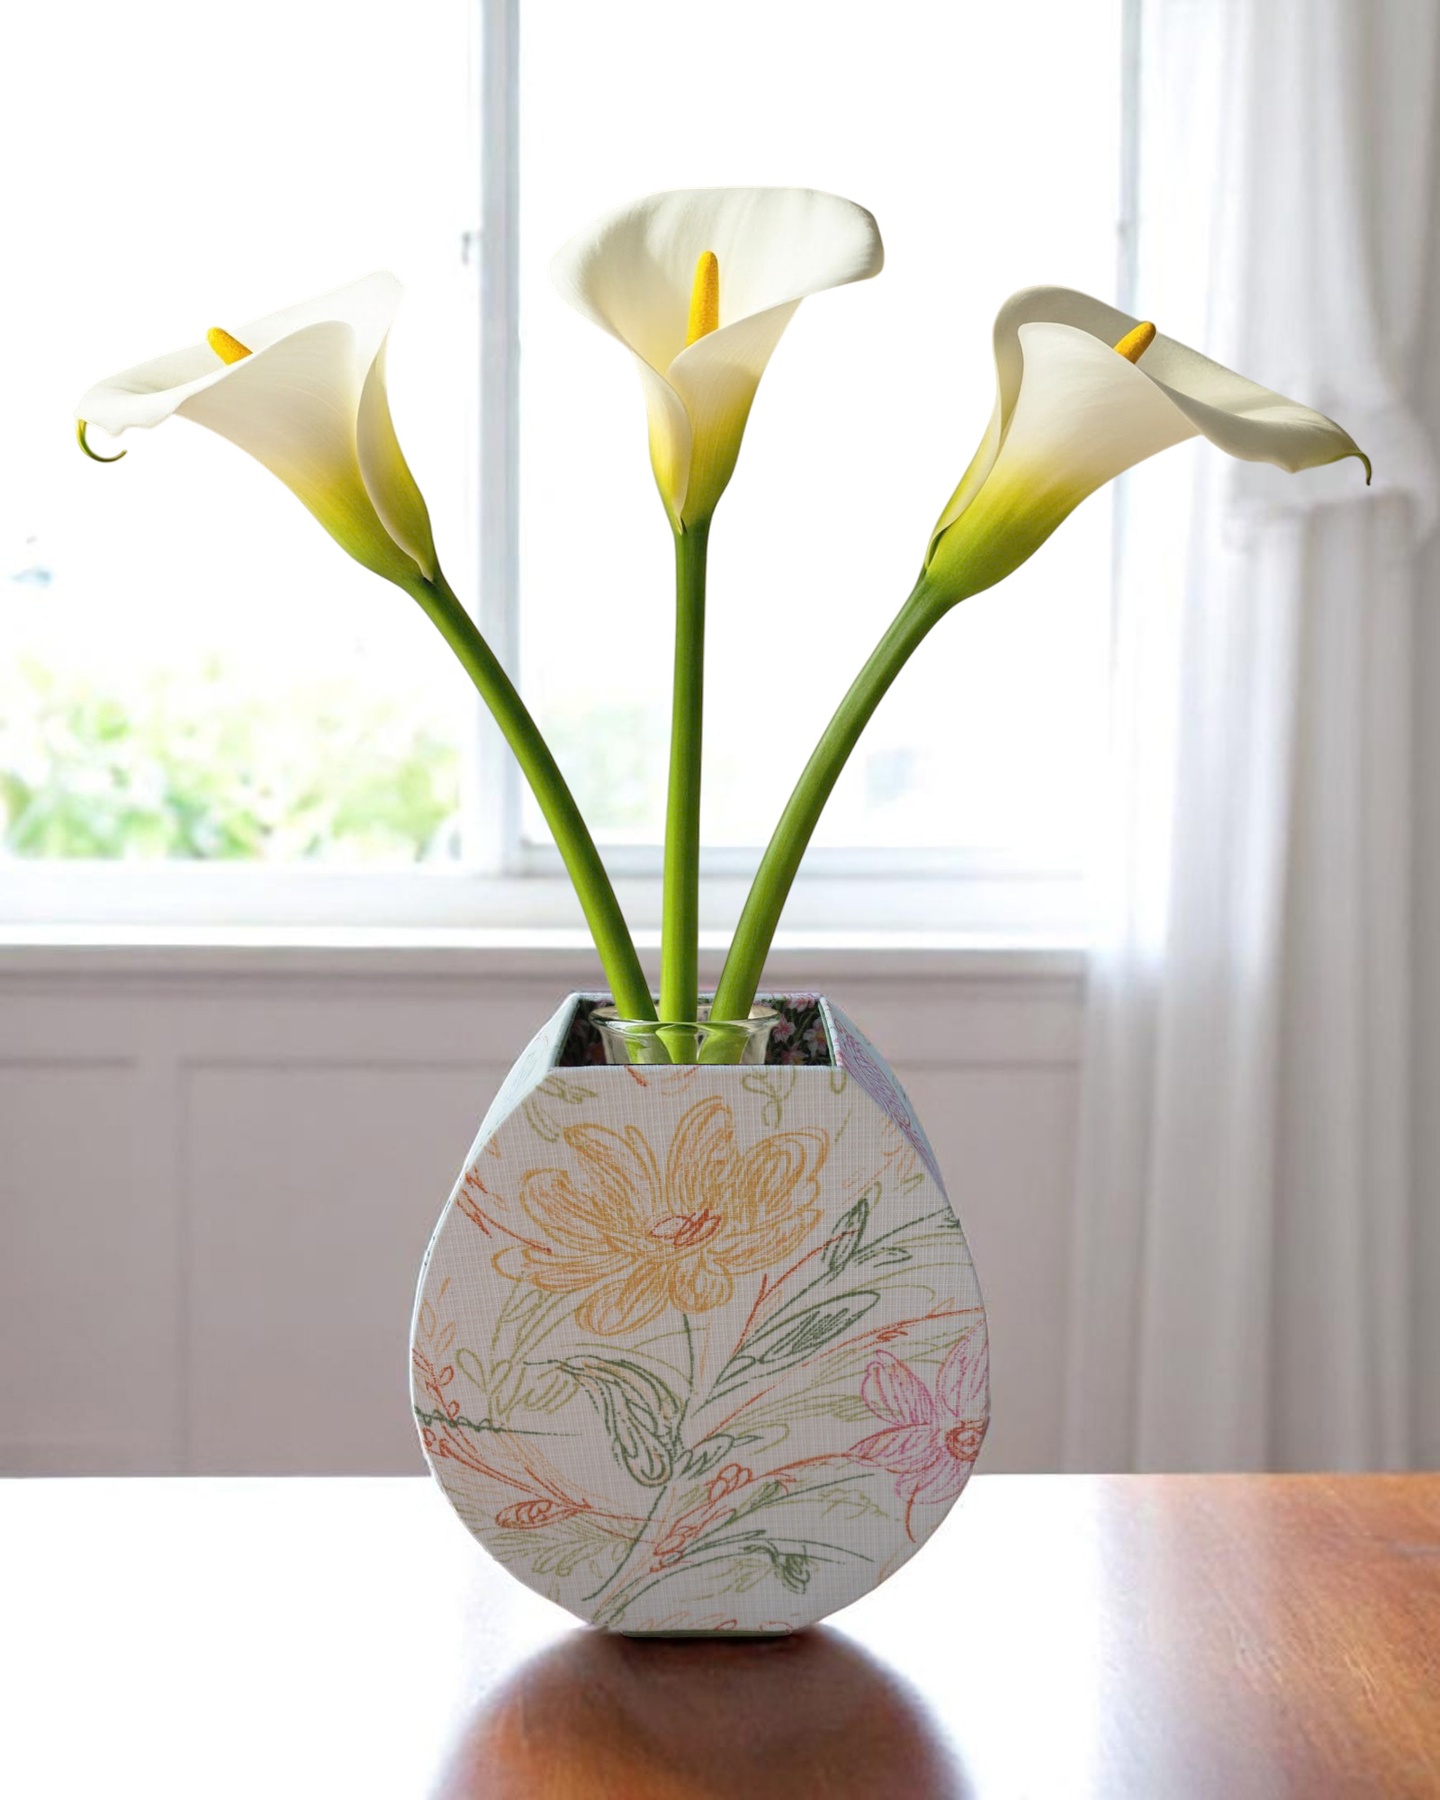
8. Cardboard Vase
To create a flower vase from cardboard, begin by cutting a large rectangle to form the body of the vase. Roll the rectangle into a cylinder and secure the edges with glue or tape. Cut a circular piece of cardboard for the top opening and glue it onto the cylinder. To make the vase more stable, add a flat circular piece to the bottom. Personalize the vase by painting it, wrapping it with colorful paper, or drawing designs with markers. For extra decoration, you can glue small cardboard shapes like flowers or leaves onto the vase. Once finished, your cardboard flower vase is ready to hold your favorite flowers, whether real or artificial!
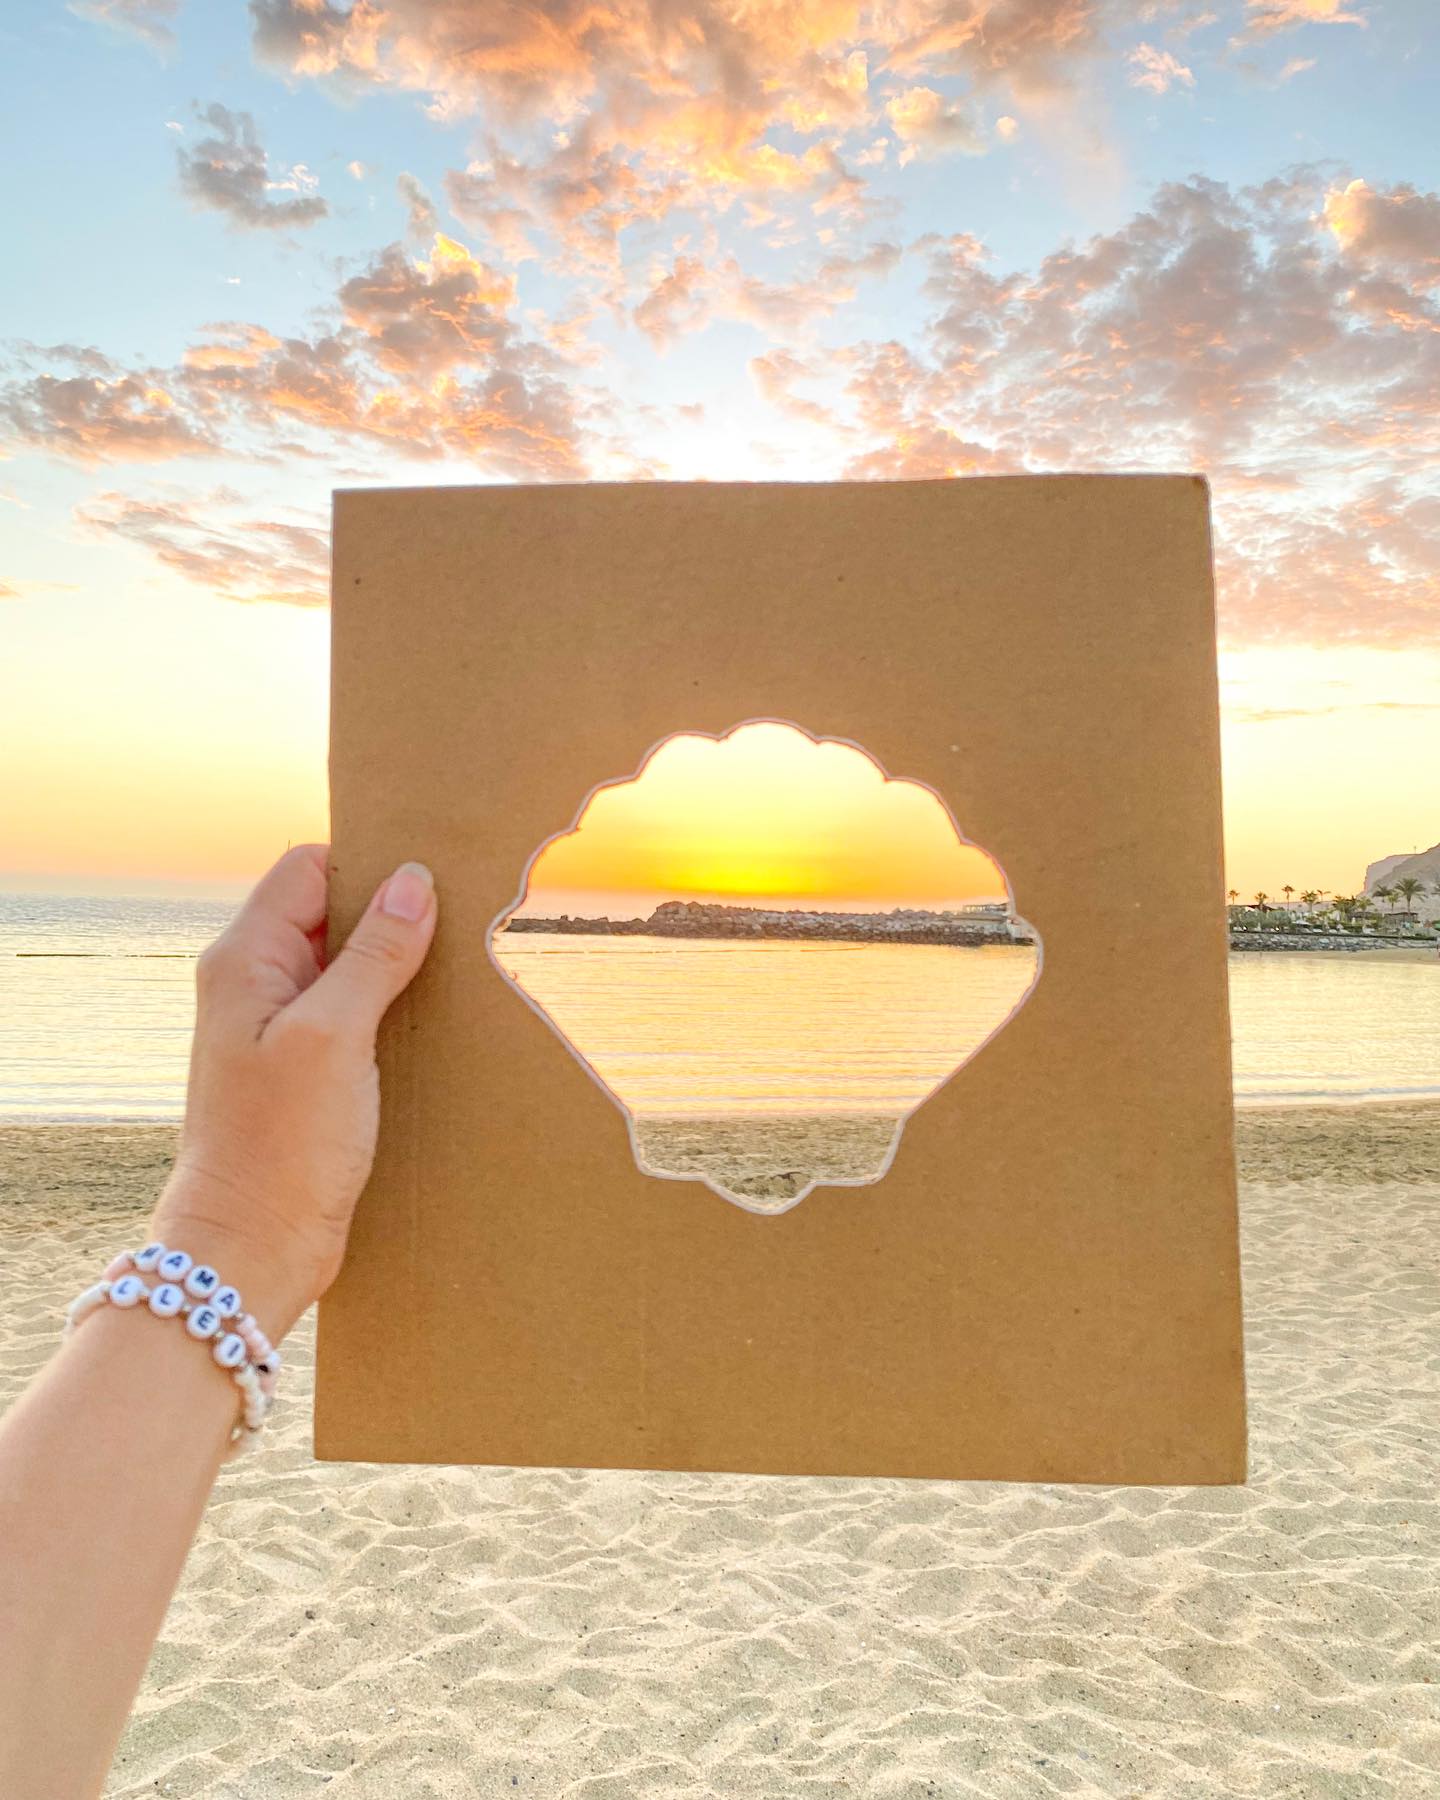
9. SunCatcher
A happy throwback to your fun in the sun/set with one of the favourite quick and easy spy boards .Really simple to make, first pre cut a seashell shape into some saved cardboard, then outlined it to finish it off.
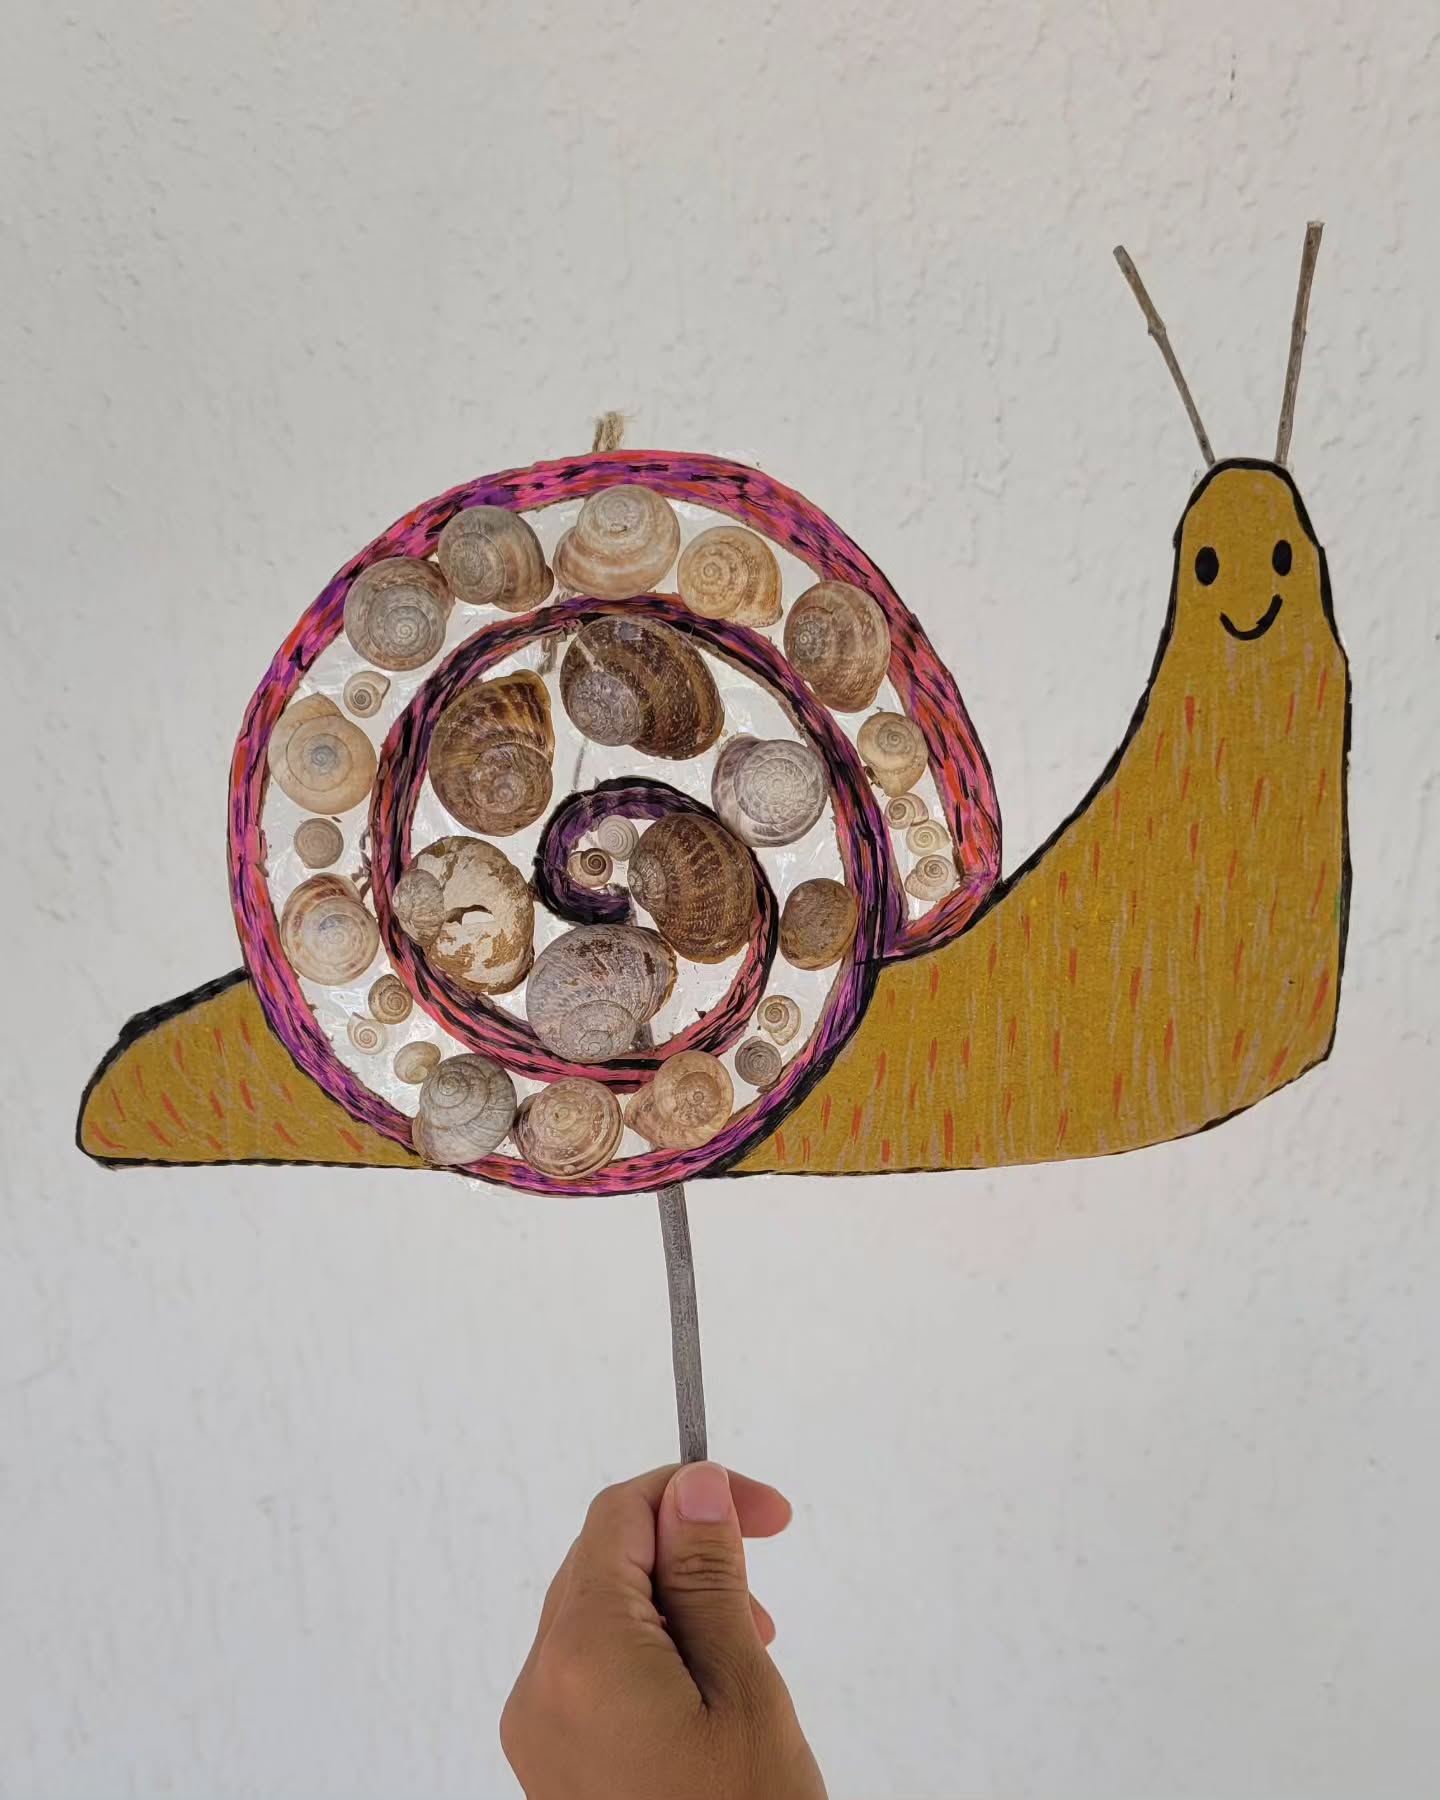
10. Cardboard Snail
To make this snail collect some sea shells, some rope and a cardboard piece. First outline a big snail on the cardboard piece(size depends upon how big you want and how many shells you have). Cut out the outlined snail from the board and then cut the shell of the snail in the pattern of a coil. Stick some ropes in the pattern of the coil to the piece where cardboard is present for a posihed look. Attach a white paper from background an dstick the wheels one by one in the coiling pattern. Draw a cute face and attach 2 toothpick on head. So a cute creative snail is ready.
11. Cardboard Submarine
To make a submarine out of cardboard, begin by finding a large cardboard box that can act as the main structure. Shape a curved front section to form the submarine’s nose and attach it securely with glue or tape. For the periscope, roll a piece of cardboard into a tube and fix it on top of the box. Cut out small circles along the sides to mimic portholes, and craft a tail fin from flat cardboard to stick on the back. Decorate your submarine with colorful paint, and enhance it with creative touches like stripes, logos, or control panels using markers or paper. After it dries, your cardboard submarine is ready for some imaginative deep-sea fun!
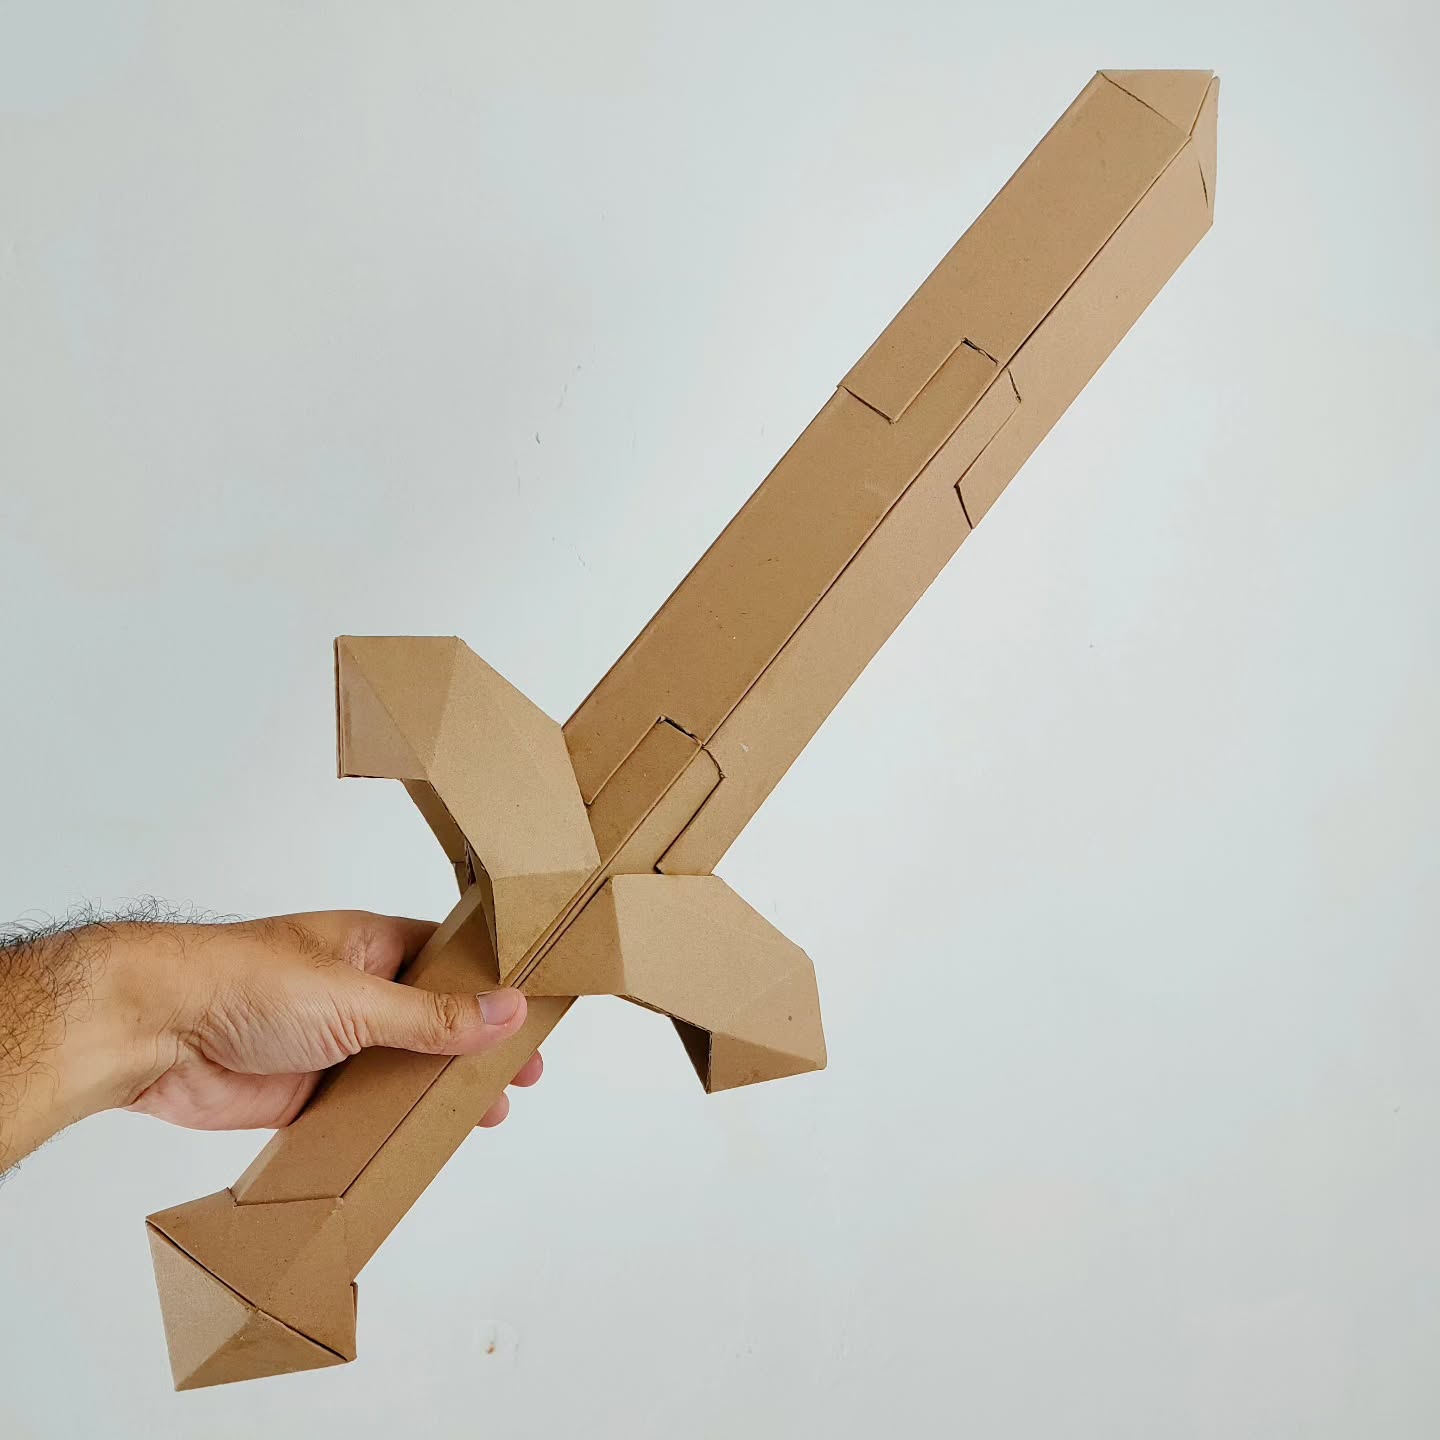
12. Cardboard Sword
To make a sword out of cardboard, start by drawing the shape of a sword—blade, hilt, and handle—on a sturdy piece of cardboard, then carefully cut it out. For added strength, cut out two or three identical sword shapes and glue them together. You can wrap the handle with tape, yarn, or fabric to make it easier to grip and more comfortable to hold. Use markers, paint, or foil to decorate the blade and hilt, giving your sword a realistic or fantasy-inspired look. Once it’s dry and secure, your cardboard sword is ready for epic pretend battles and imaginative play!
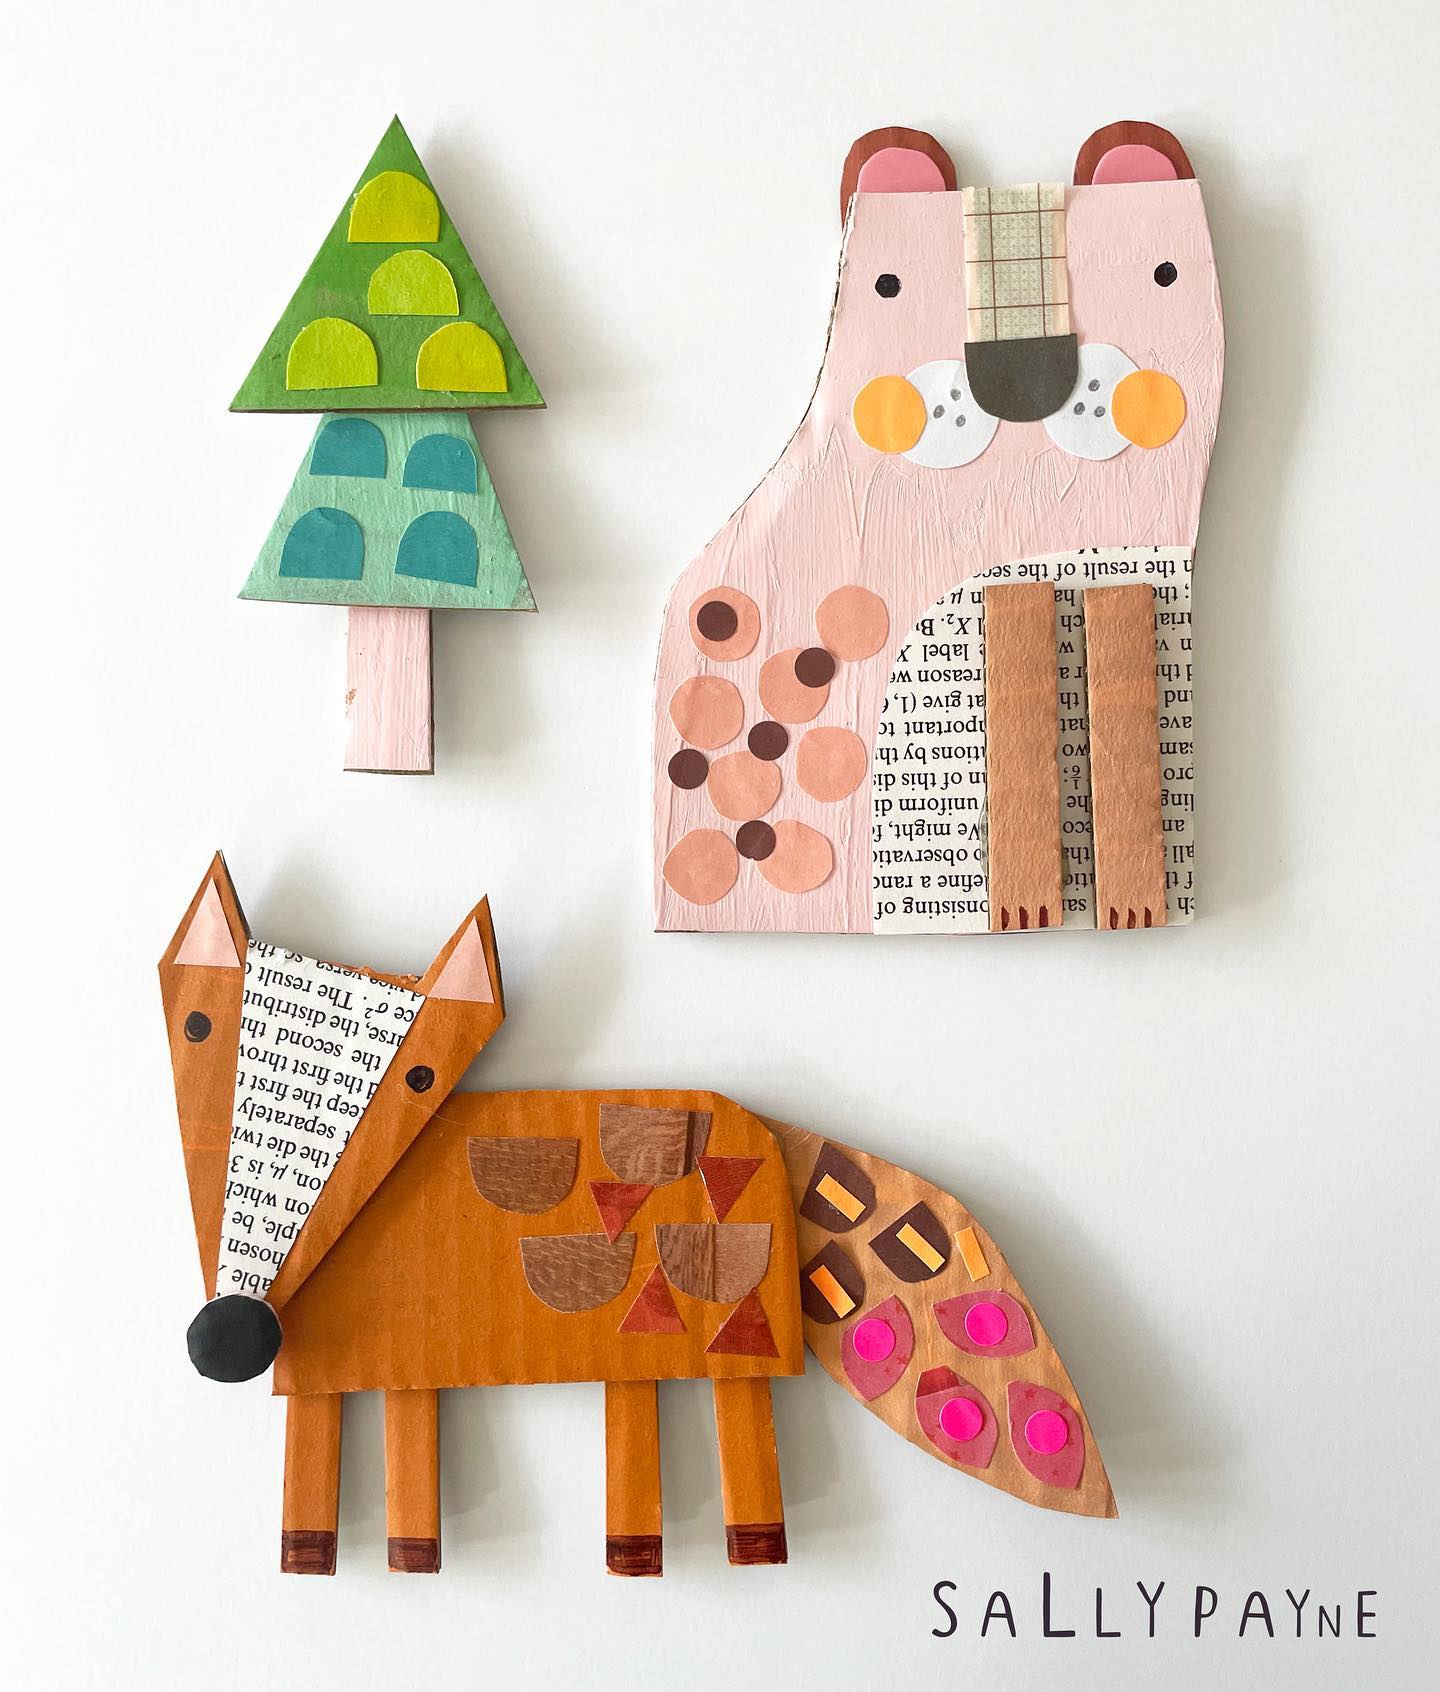
13. Cardboard Animals
To create cardboard animals, begin by picking the animal you want to make and sketching its basic outline on a piece of cardboard. Cut out the main parts like the head, body, legs, and tail. For animals with additional features, like ears, wings, or fins, cut extra shapes and attach them to the body with glue or tape. You can use small cardboard circles for eyes and enhance the animal’s look by drawing or painting on details like fur, scales, or feathers. To make it more lifelike, add colour using markers or colored paper. Once everything is glued and decorated, your cardboard animal is ready for display or play!

14. Cardboard Leaves
This is again very easy to make! You just need a white paper flat and some thin foldable cardboard pieces of the average length of 6-8 cm. Then fold the paper pieces in half and stick the other edge. Now, just half-open the leaf to make a hollow space. Your leaf is ready. Like this, make multiple hollow pieces to make an entire leaf branch.
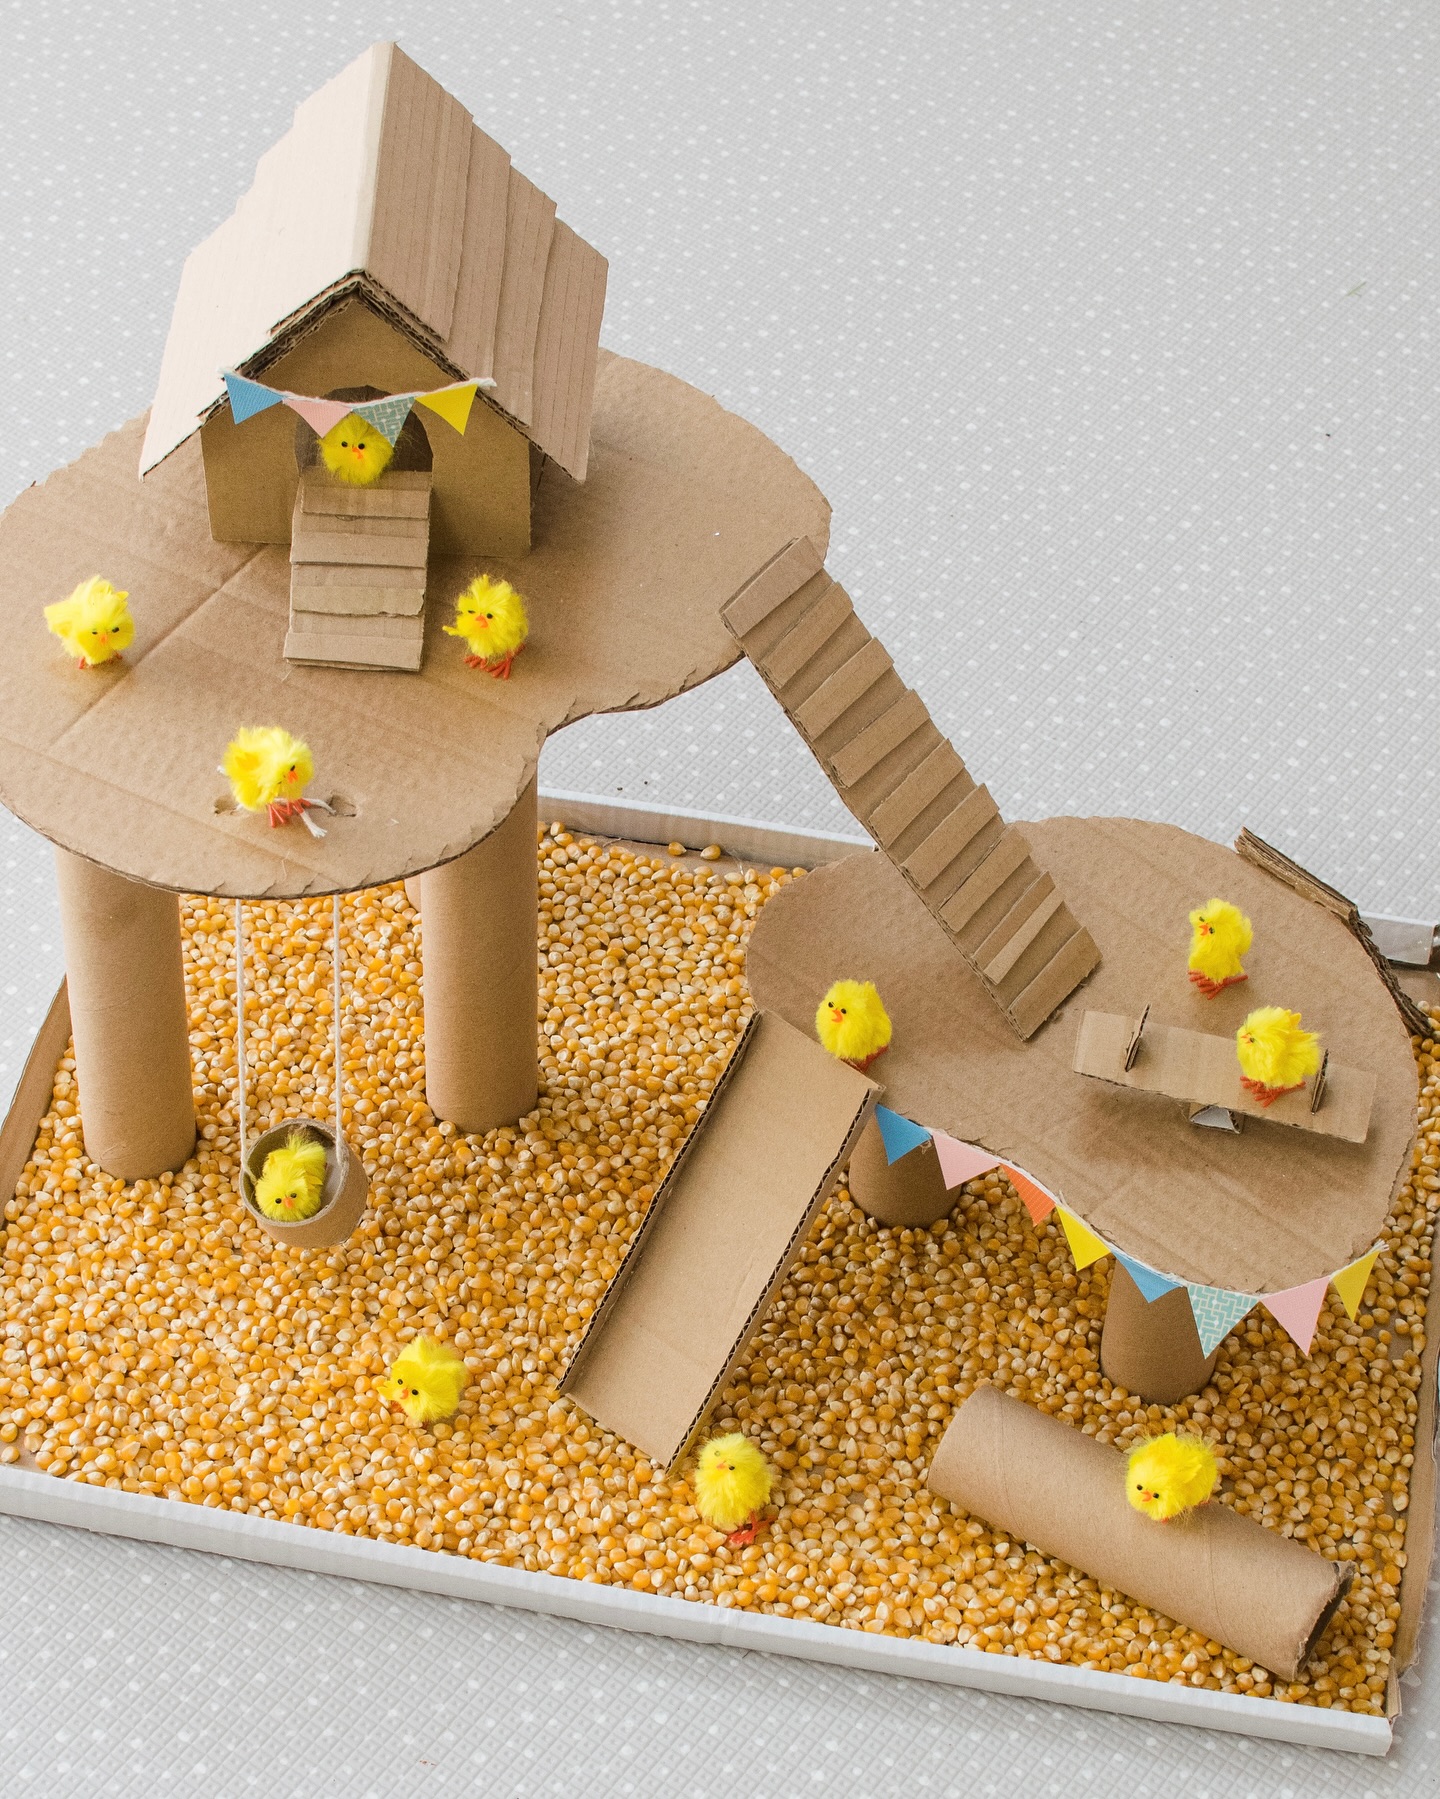
15. Cardboard Play House
This cardboard playhouse can be your next project idea. All you need is some cardboard, corn, cute chick toys, scissors, glue and some decoration items. This is one of the easiest yet complicated-looking projects. Start by collecting some cylindrical cardboard for pillars. Then make the house, flat base and some staircase. Then decorate it. Glue the corn on the lower base and lay the chick toys.


