Crafting isn’t just an enjoyable pastime for toddlers—it’s also packed with valuable benefits! It encourages creativity, builds confidence, and supports the development of fine motor skills. Even better, it’s a wonderful way for families to bond and create lasting memories together. Curious about some fun and easy craft ideas for your child? Keep reading to find out more!
1. Colourful Craft
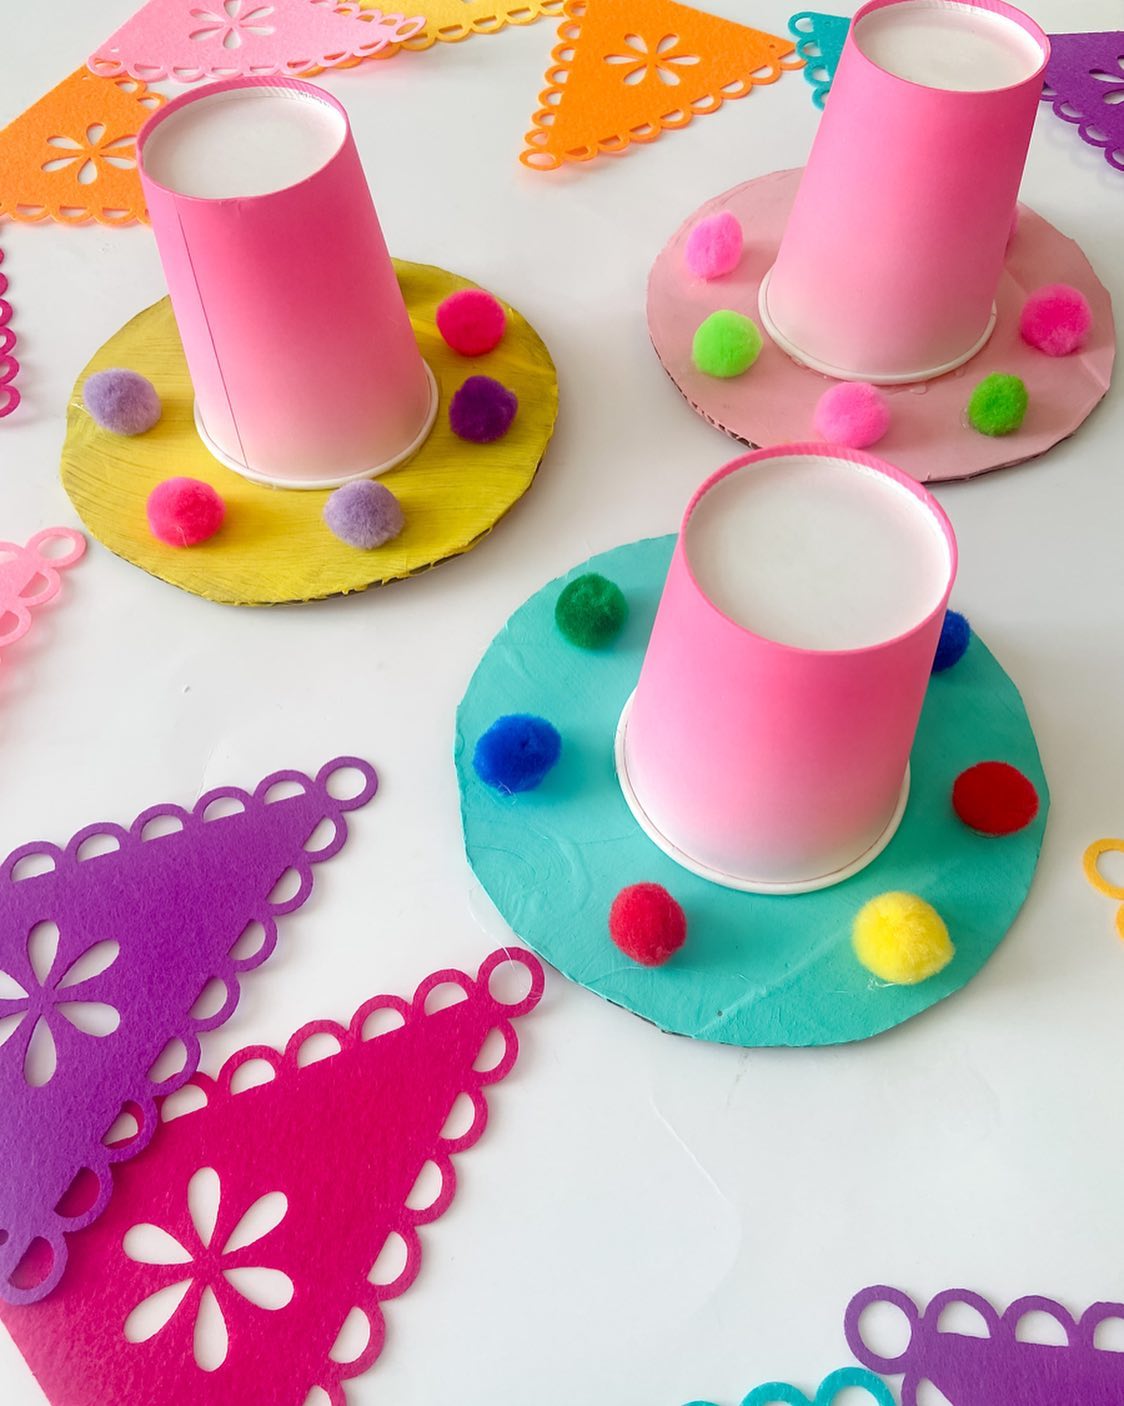
These festive mini sombreros are a colorful and fun craft perfect for parties or cultural celebrations! To make them, start with a small paper cup for each hat. Flip the cup upside down and glue it onto a round base cut from cardboard—this will be the brim of the sombrero. Paint both the cup and the cardboard base in bright, cheerful colors like pink, turquoise, or yellow. Once the paint is dry, decorate the brim by gluing on small colorful pom-poms all around the edge. Let everything dry completely before displaying or using them. These cute sombreros add a playful and decorative touch to any fiesta-themed setup!
2. Craft with Rice
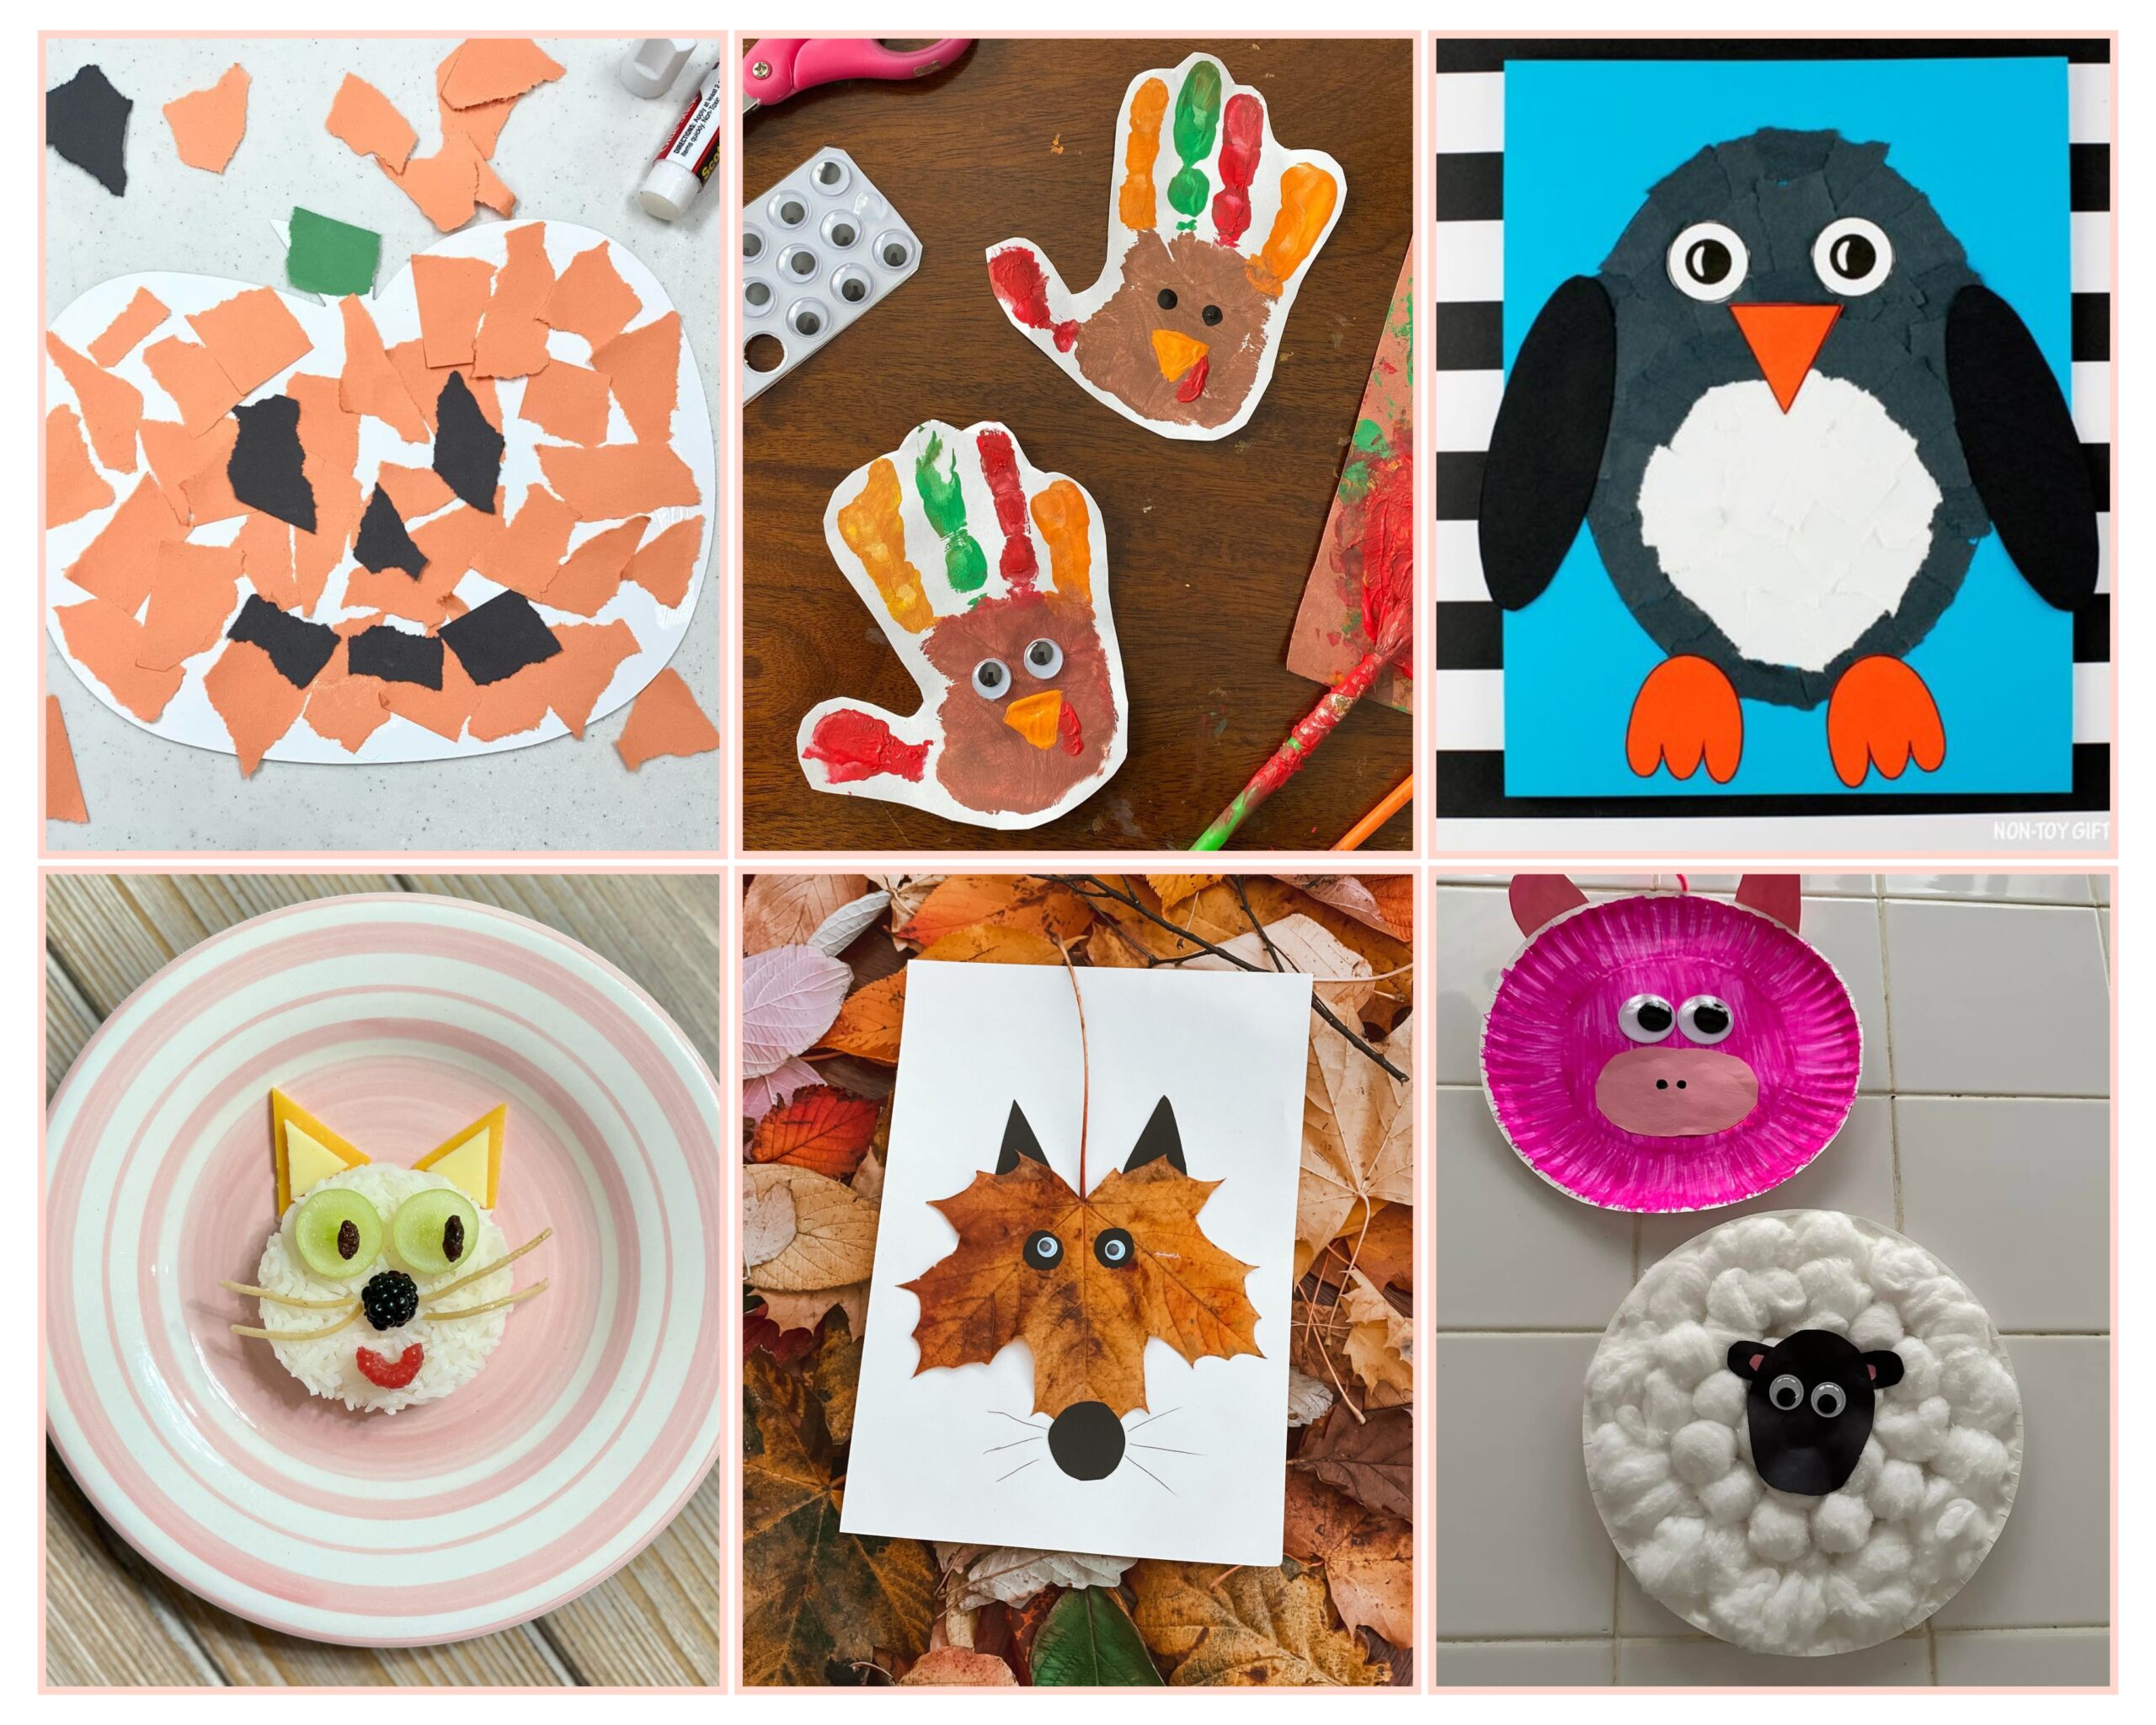
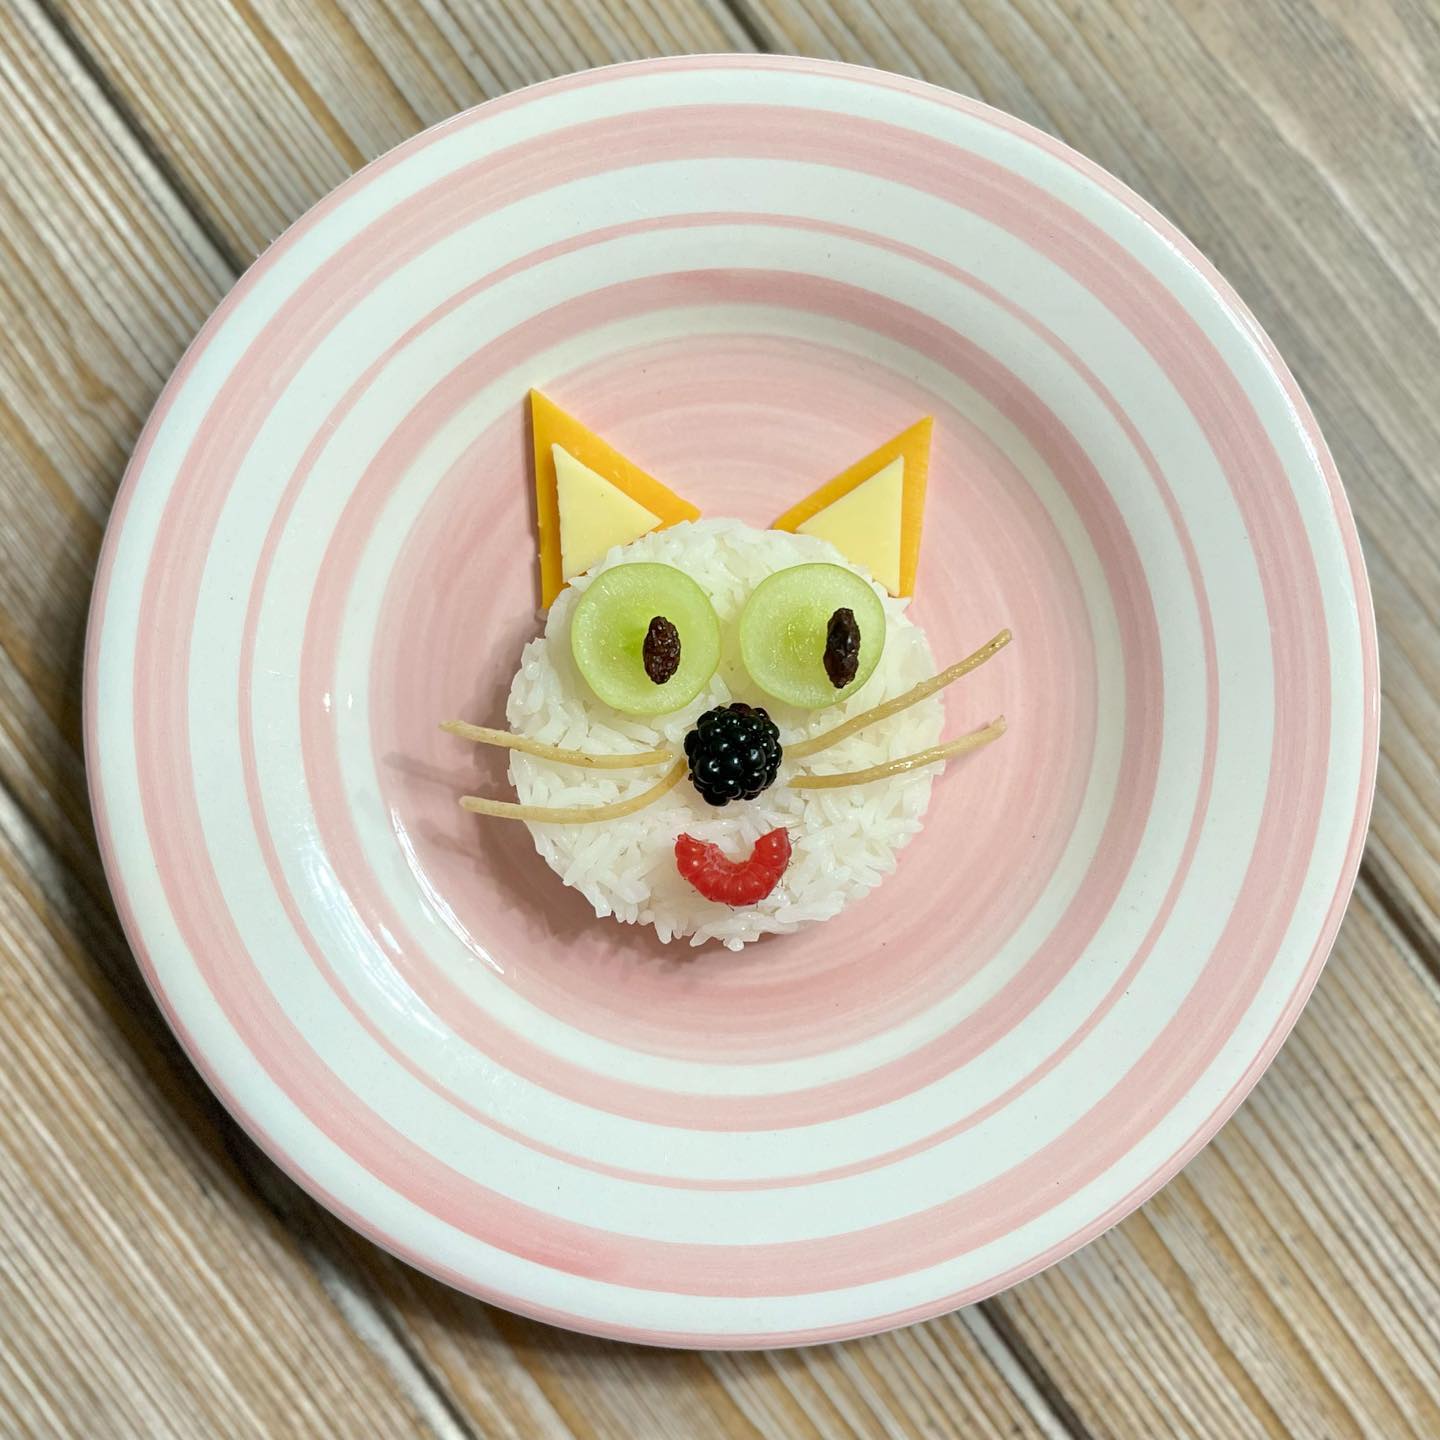
This adorable cat-themed food art is a fun and creative way to make mealtime exciting for kids! To make it, start by shaping cooked white rice into a compact circle to form the cat’s face. Slice two pieces of cheese and triangle-shaped pieces of another cheese type to create the ears, placing them at the top of the rice circle. For the eyes, use slices of green grapes with small raisins or cranberries in the center. A small blackberry works perfectly as the nose, and a slice of red gummy candy or fruit can be used for the mouth. Lastly, break thin spaghetti strands or use pretzel sticks for the whiskers. Arrange everything on a plate, and you’ve got a cute and edible cat face that’s sure to delight little ones!
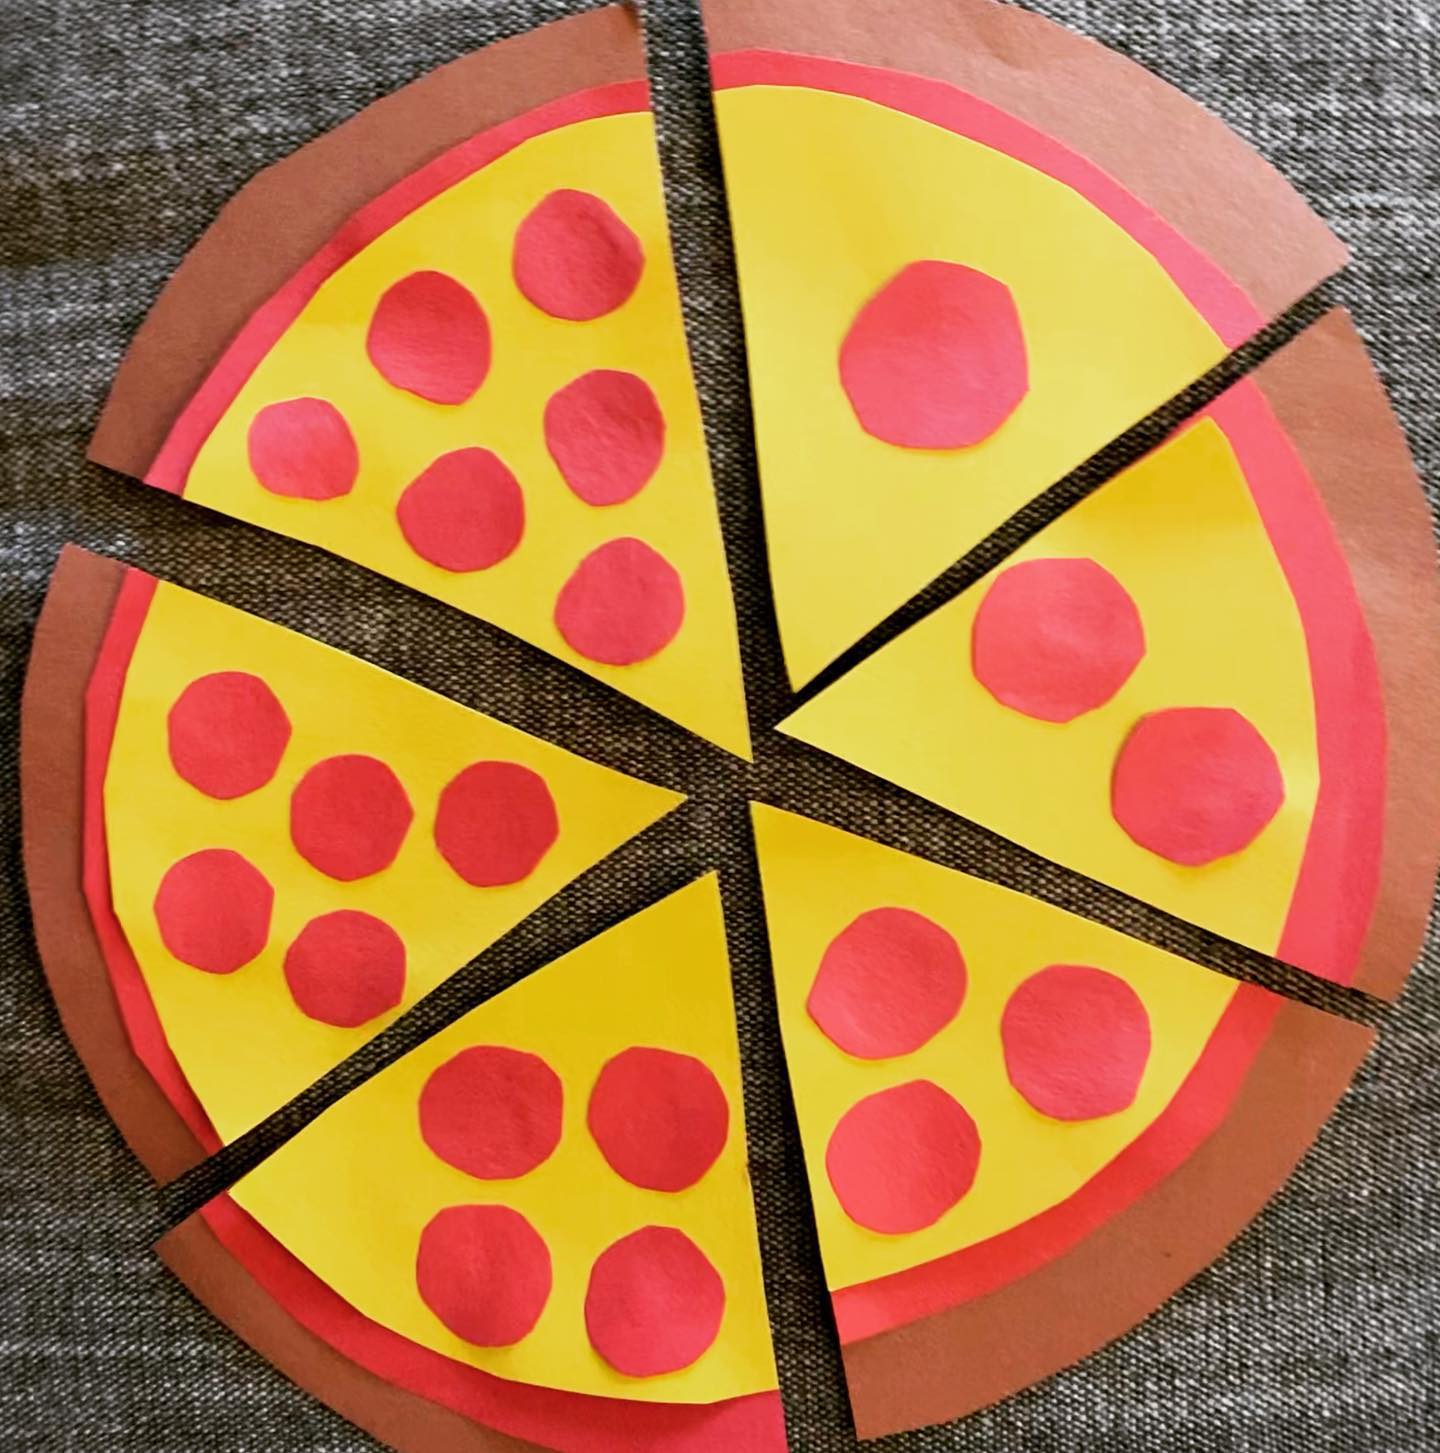
3. Pizza
To make this paper pizza you will need different colourful papers. To make the toppings cut out circles out of red paper and keep in on top of yellow paper.
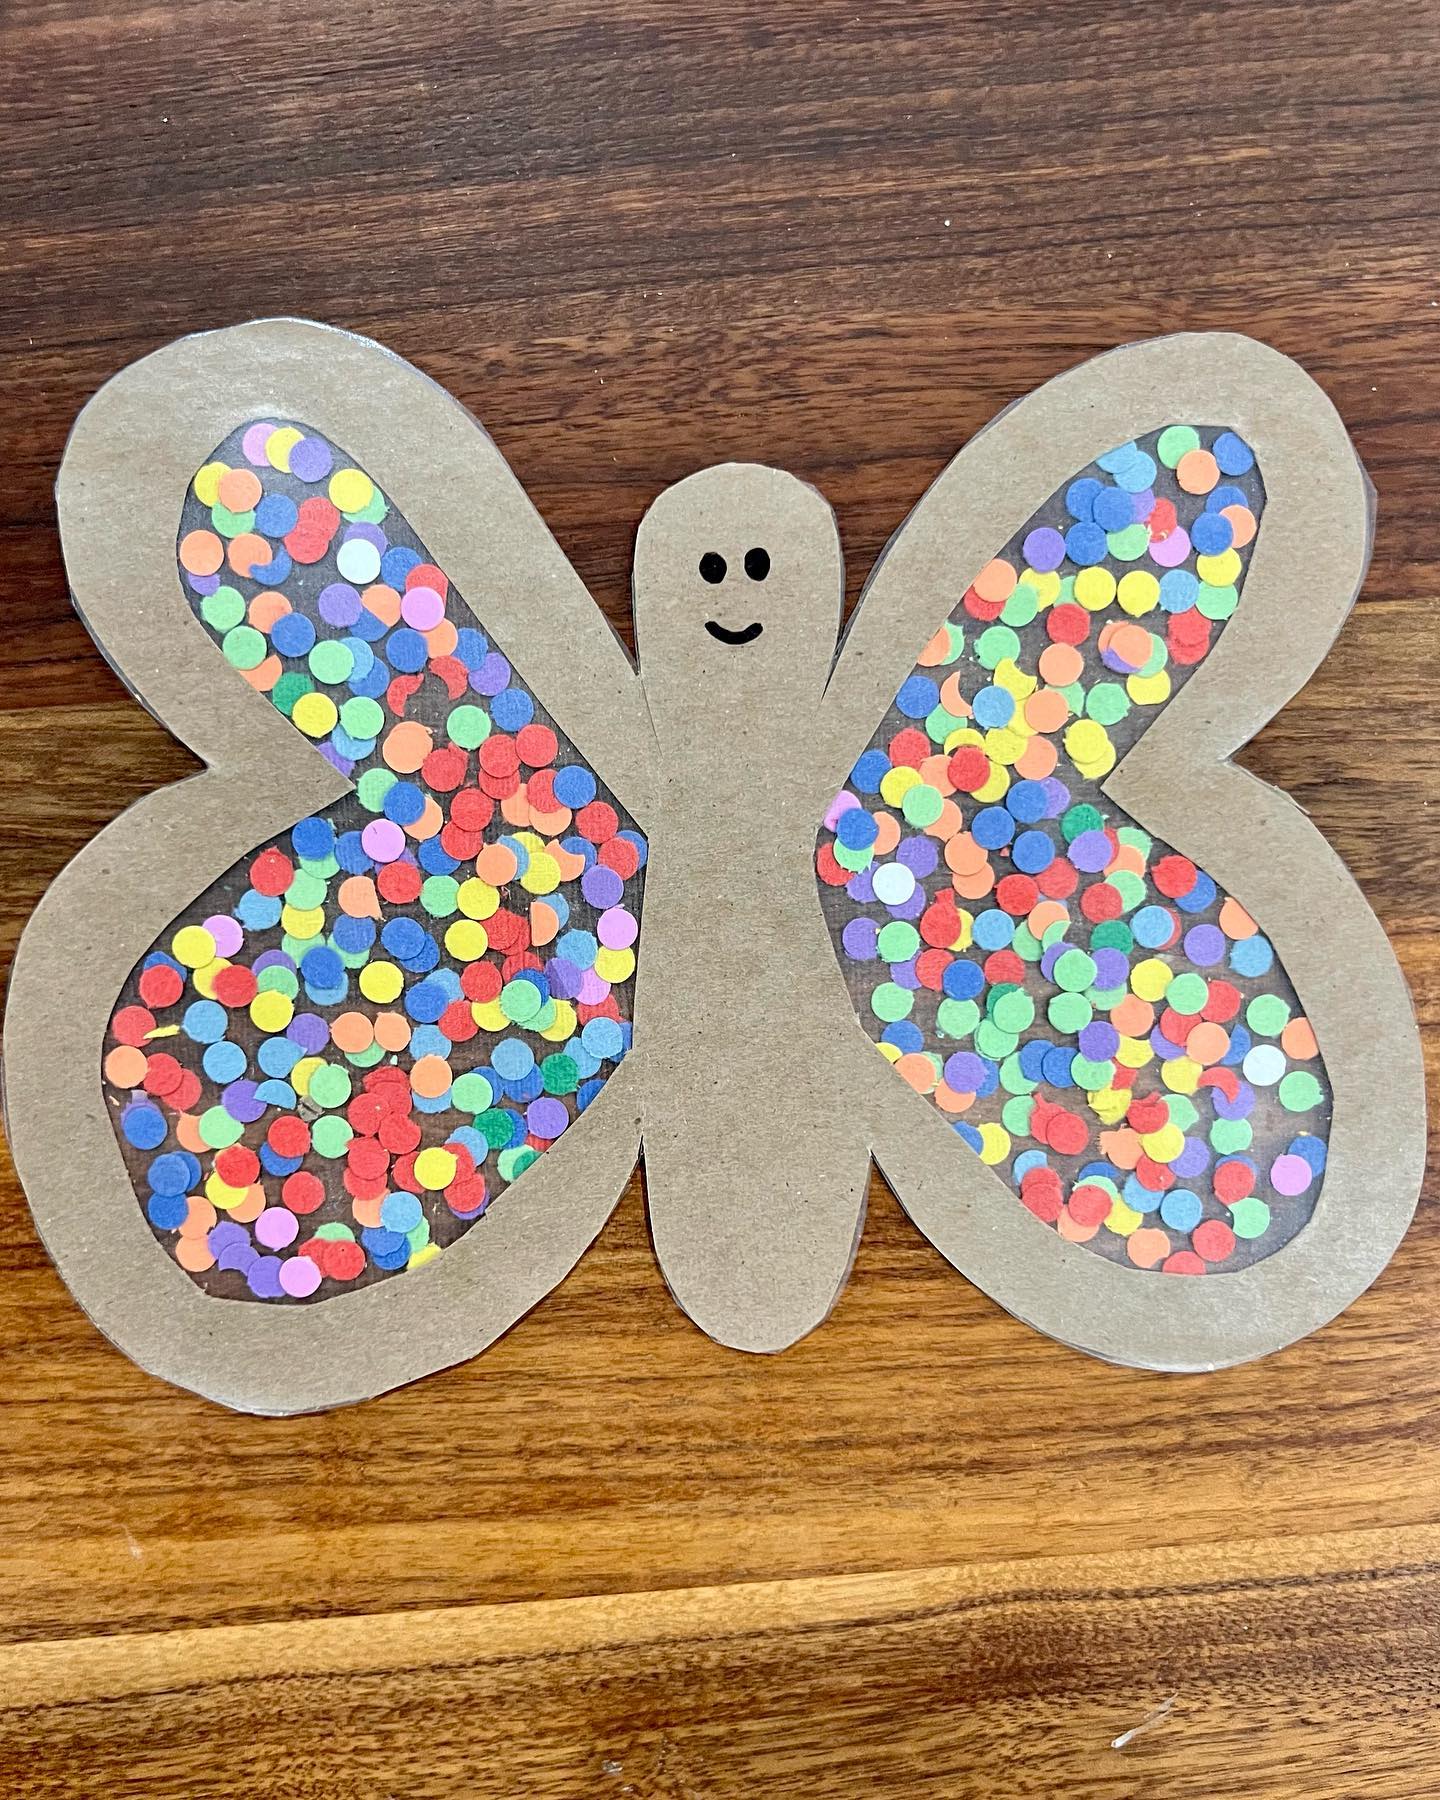
4. Butterfly
To make this colourful butterfly user cardboard and multiple paper pieces for design. You can also use sequins for the wings.
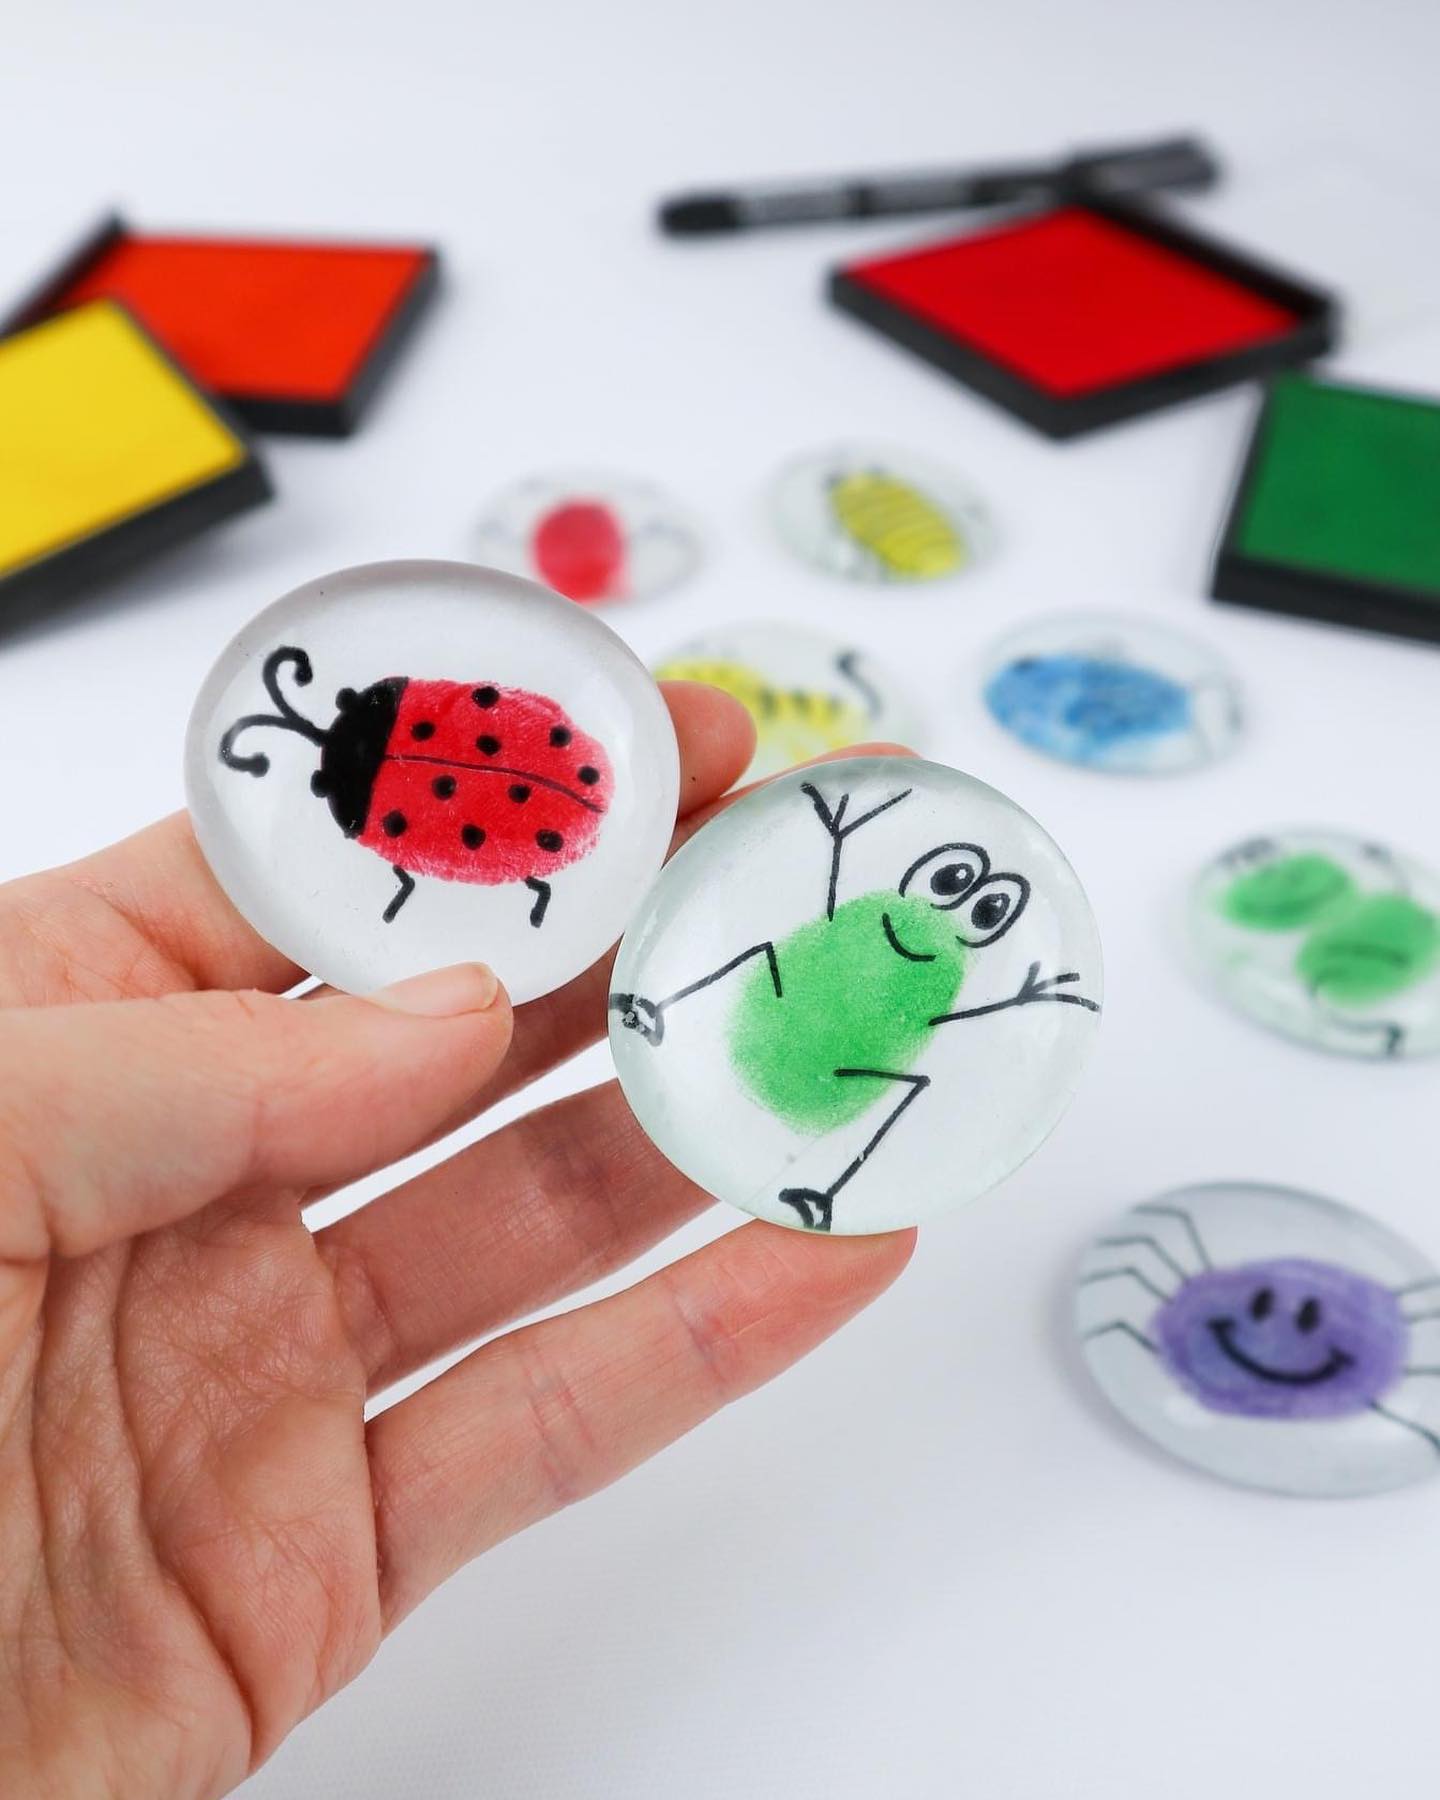
5. Insects
These adorable fingerprint bug magnets or paperweights are a delightful craft that’s easy and fun for kids! To make them, start by pressing your fingertip into a colorful ink pad and then stamping it onto a small piece of white paper. Let the ink dry, then use a fine-tip black marker to draw cute bug features—like legs, antennae, wings, and smiling faces—turning your fingerprint into ladybugs, frogs, spiders, and more. Once finished, cut the paper to fit the size of a clear glass gem (flat on one side), and glue the paper face-up to the flat side of the gem using clear-drying glue. When dry, you can attach a magnet to the back or leave it as a fun desk decoration. These make charming keepsakes and gifts!
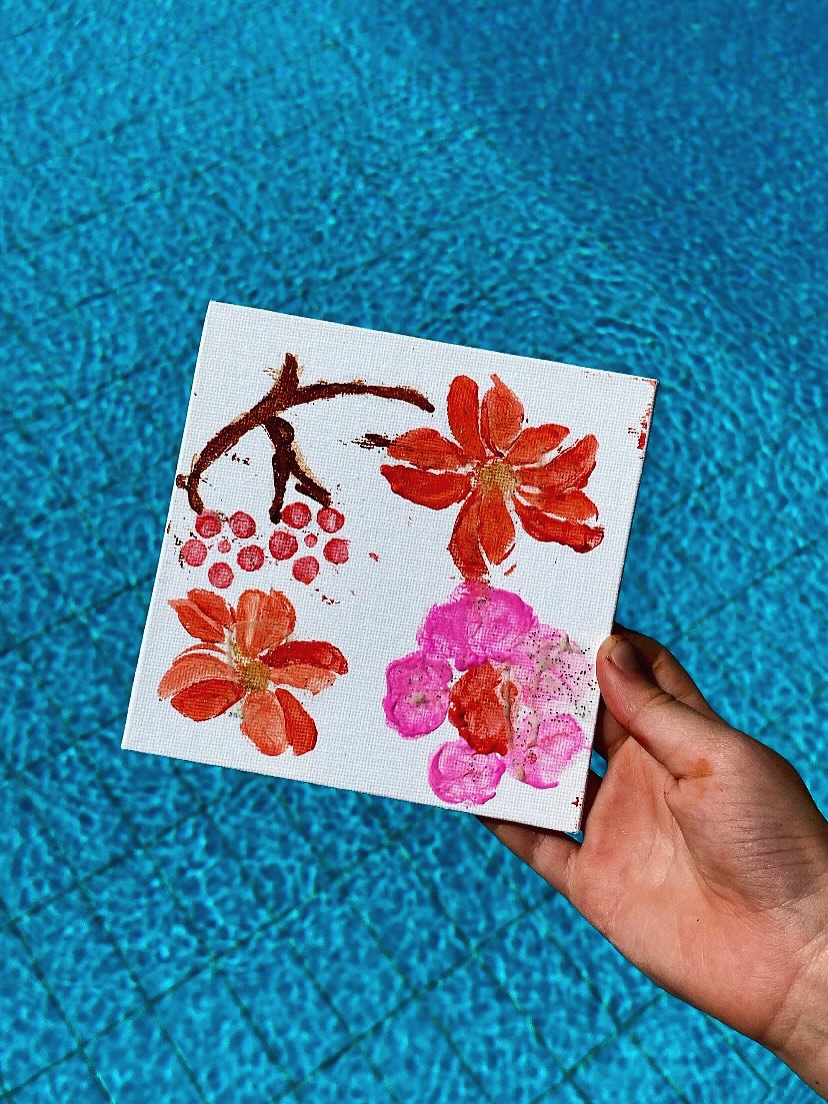
6. Painting with Thumb
To make this thumb painting , put colours on thumb and stamp on the canvas. To form a flower you can first draw with pencil and then stamp the colours.
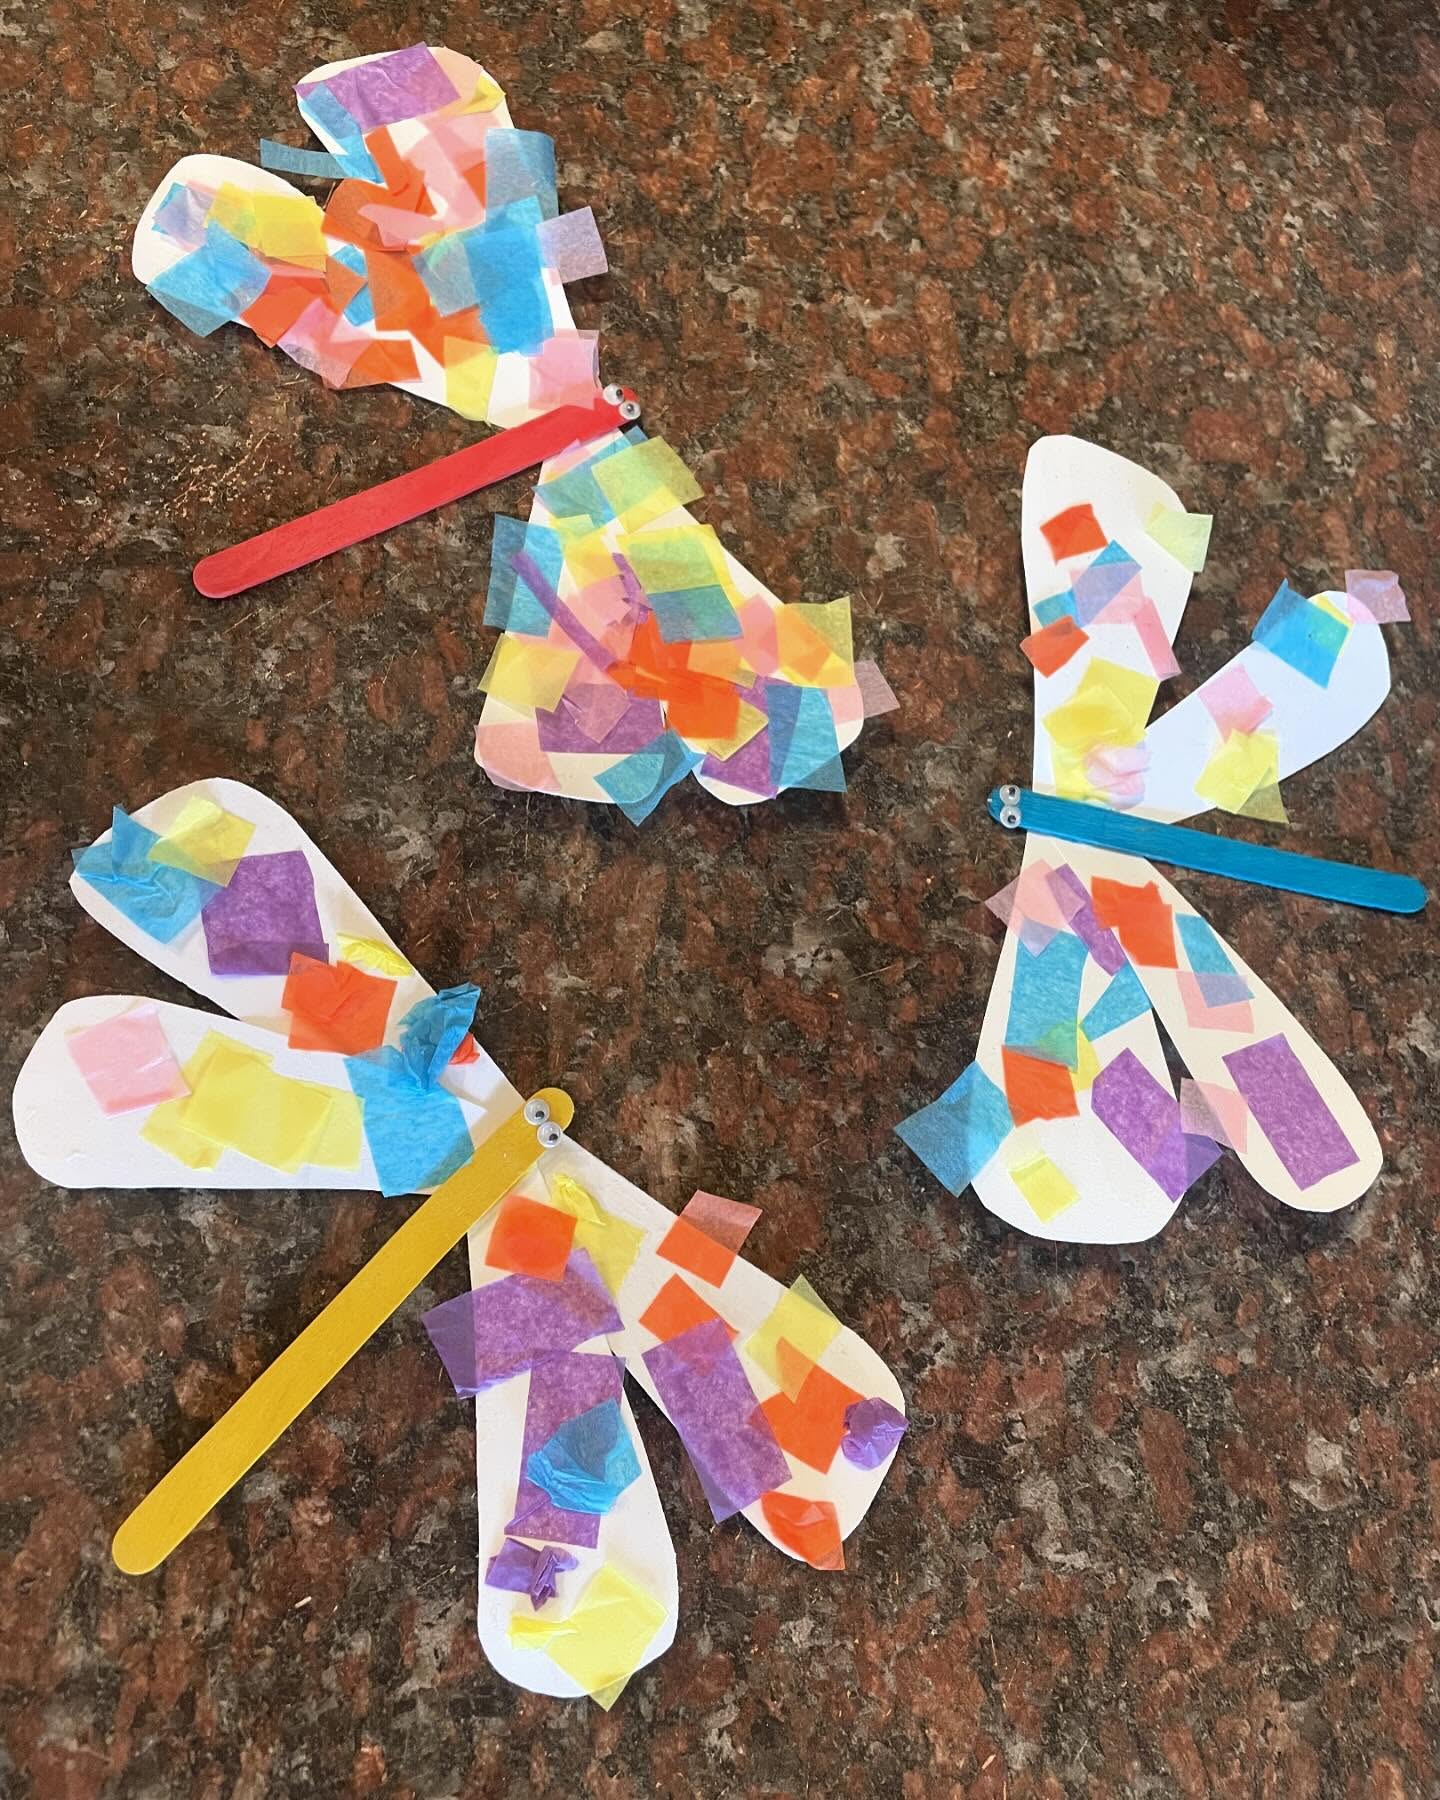
7. DragonFlies
These colorful dragonfly crafts are fun and easy to make using simple materials! To start, cut out dragonfly wing shapes from white cardstock or thick paper. Next, prepare small squares or pieces of colorful tissue paper. Let children glue the tissue paper onto the wings to create a vibrant mosaic effect. Then, attach a colored craft stick to the center of the wings to form the dragonfly’s body. Add a pair of googly eyes near the top of the stick for a playful touch. Once everything is dry, your cheerful tissue paper dragonflies are ready to display or hang as decorations. This is a great craft for kids to explore colors and develop fine motor skills!
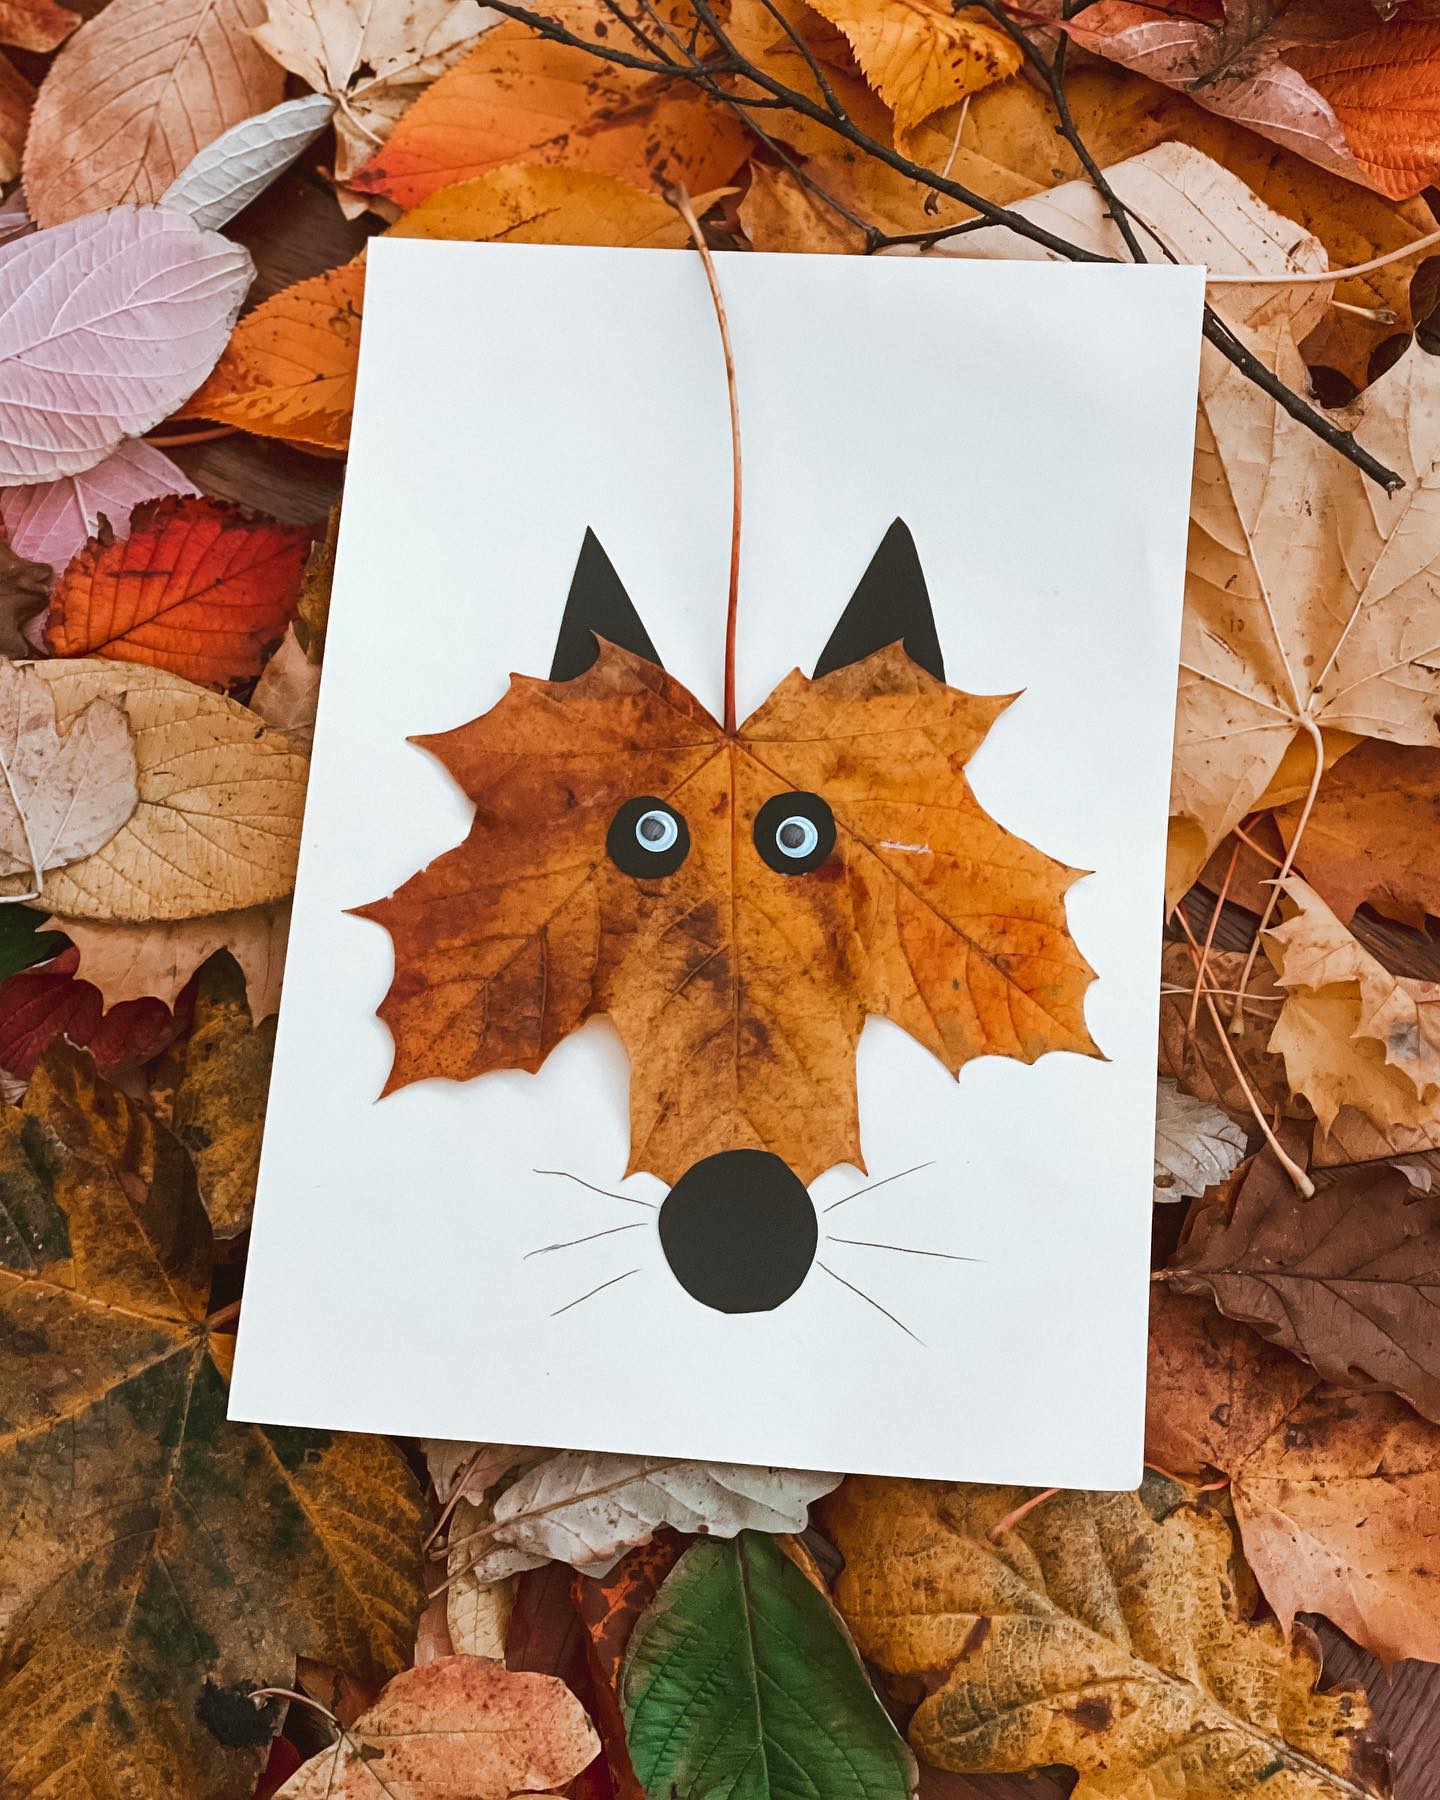
8. Dried Leaves
To make this adorable leaf fox craft, start by collecting a couple of large, flat autumn leaves—preferably maple leaves, as their shape resembles a fox’s face. Glue the leaves onto a piece of white paper so that the points face outward, forming the shape of the fox’s head and cheeks. Cut out two black triangles from construction paper and glue them above the leaves as ears. Add two googly eyes or cut-out paper eyes near the center of the leaves. Then, cut a black circle for the nose and glue it at the bottom center of the leaves. Finally, draw a few whiskers on each side of the nose using a black marker. This nature-inspired craft is perfect for fall and encourages creativity and outdoor exploration.
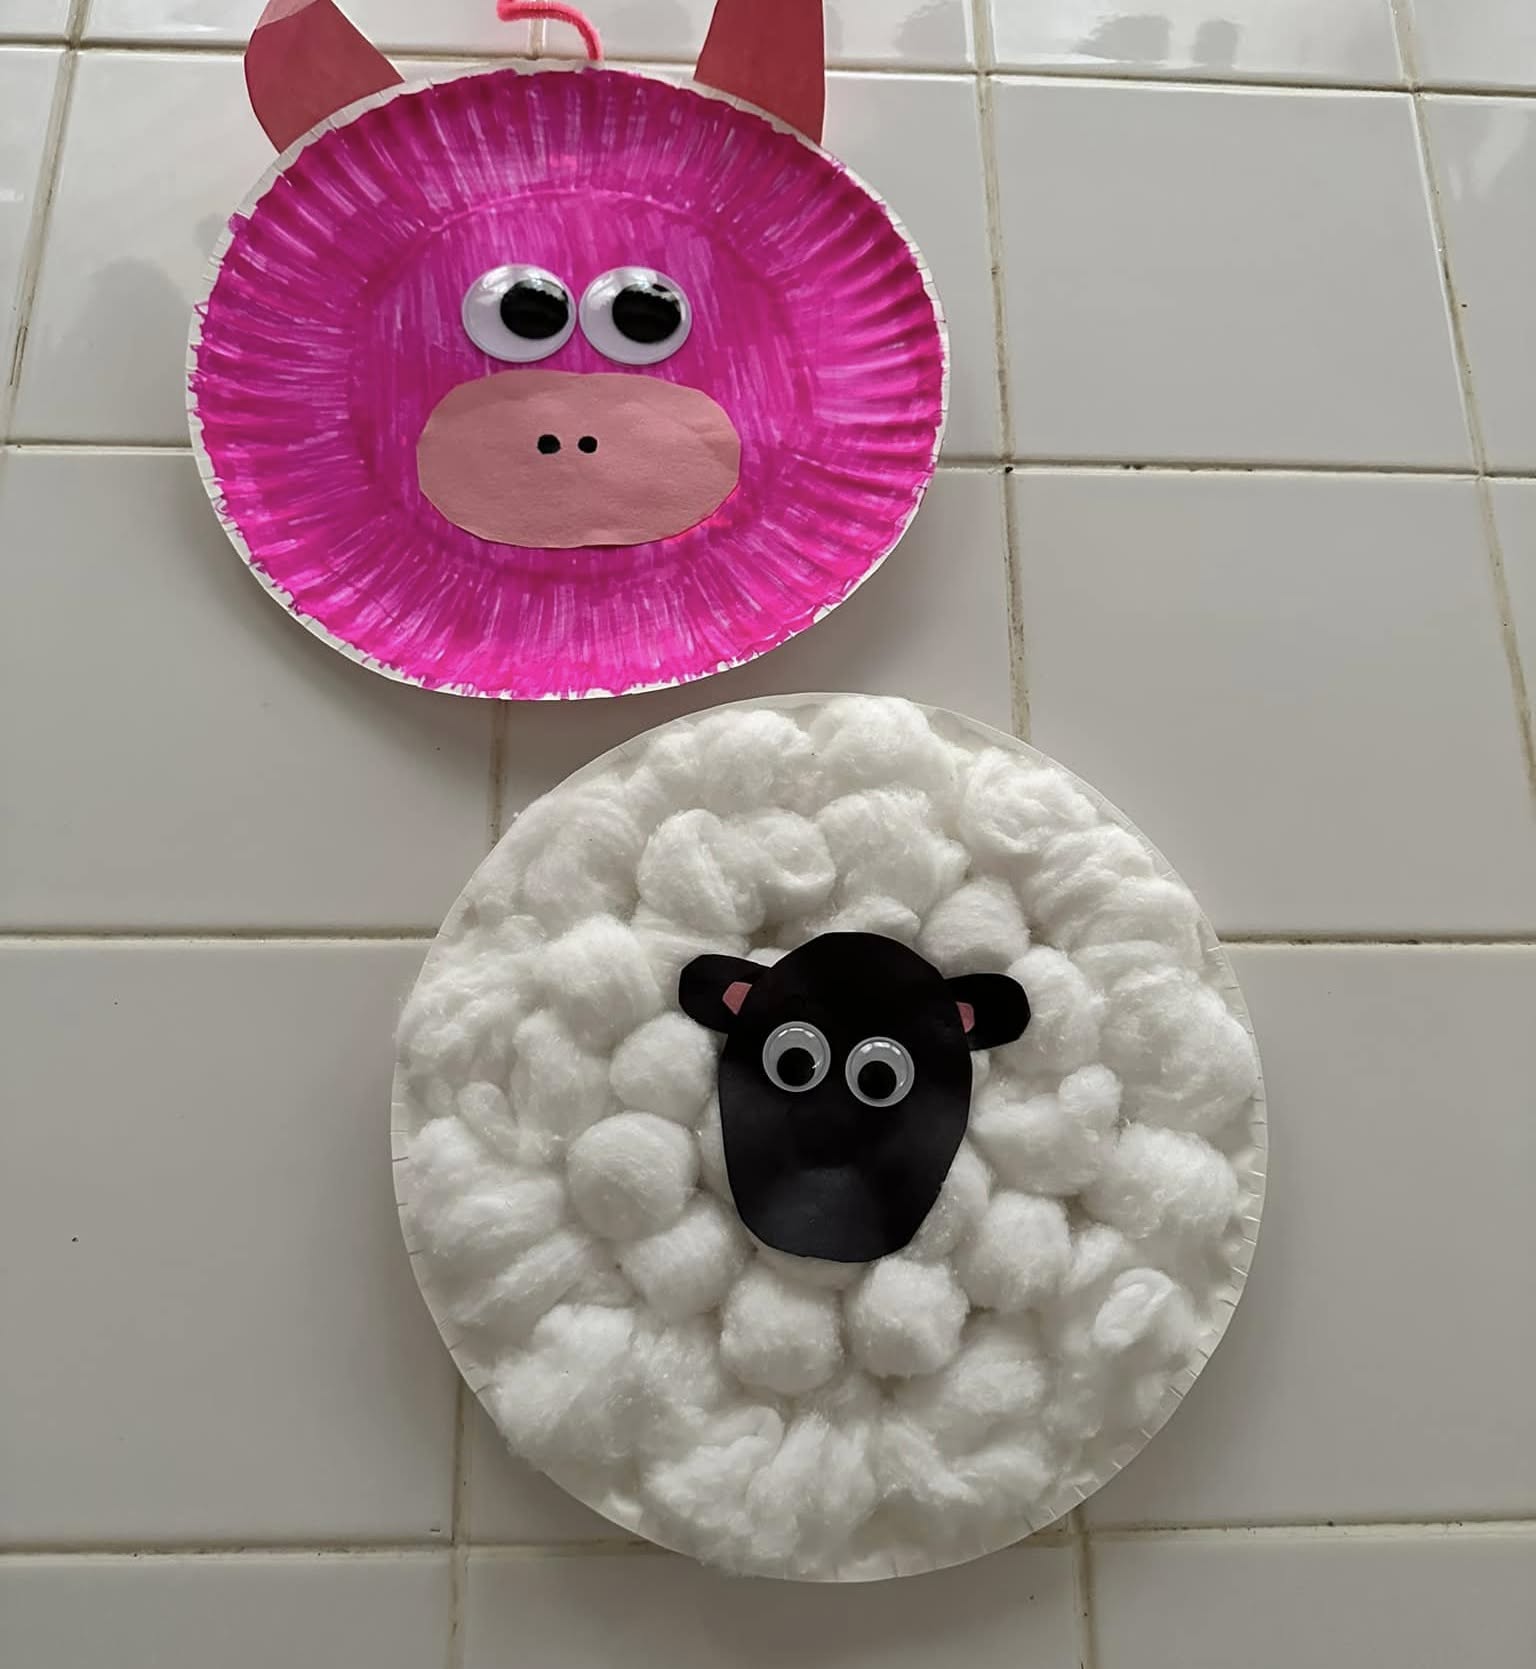
9. Craft with Plates
These adorable farm animal crafts made from paper plates are perfect for a fun and easy kids’ activity! To make the pig, paint a paper plate pink and let it dry. Cut out two ear shapes from pink and darker pink paper, and a rounded snout from light pink paper. Glue the ears to the back and the snout to the front. Add two large googly eyes and draw two nostrils on the snout to complete the face. For the sheep, cover a paper plate with white cotton balls using glue to give a fluffy wool texture. Then, cut out a black oval or rounded shape for the sheep’s face and small ear shapes from black and pink paper. Attach the face and ears to the center of the plate and add googly eyes. These crafts are not only fun but also help develop creativity and fine motor skills!
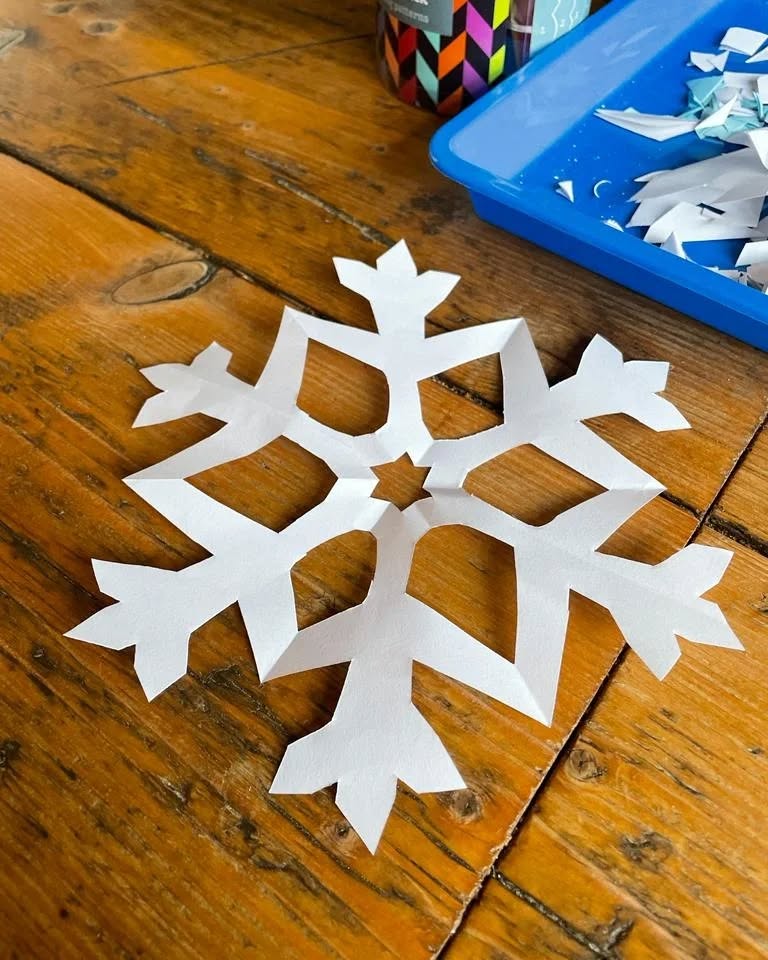
10. PaperCraft
To make a snow crystal with paper, start by taking a square sheet of white paper and folding it in half diagonally to form a triangle. Fold the triangle in half again to make a smaller triangle, and then fold it into thirds, overlapping the sides so it forms a cone shape with a pointed tip. Trim the top edge so it’s even, and then use scissors to carefully cut small shapes along the sides—triangles, curves, or diamonds. Be creative with your cutouts, but don’t cut all the way through the folded edges. Once you’re done cutting, gently unfold the paper to reveal a beautiful, symmetrical snowflake. You can hang it as a decoration or use it in winter-themed crafts.
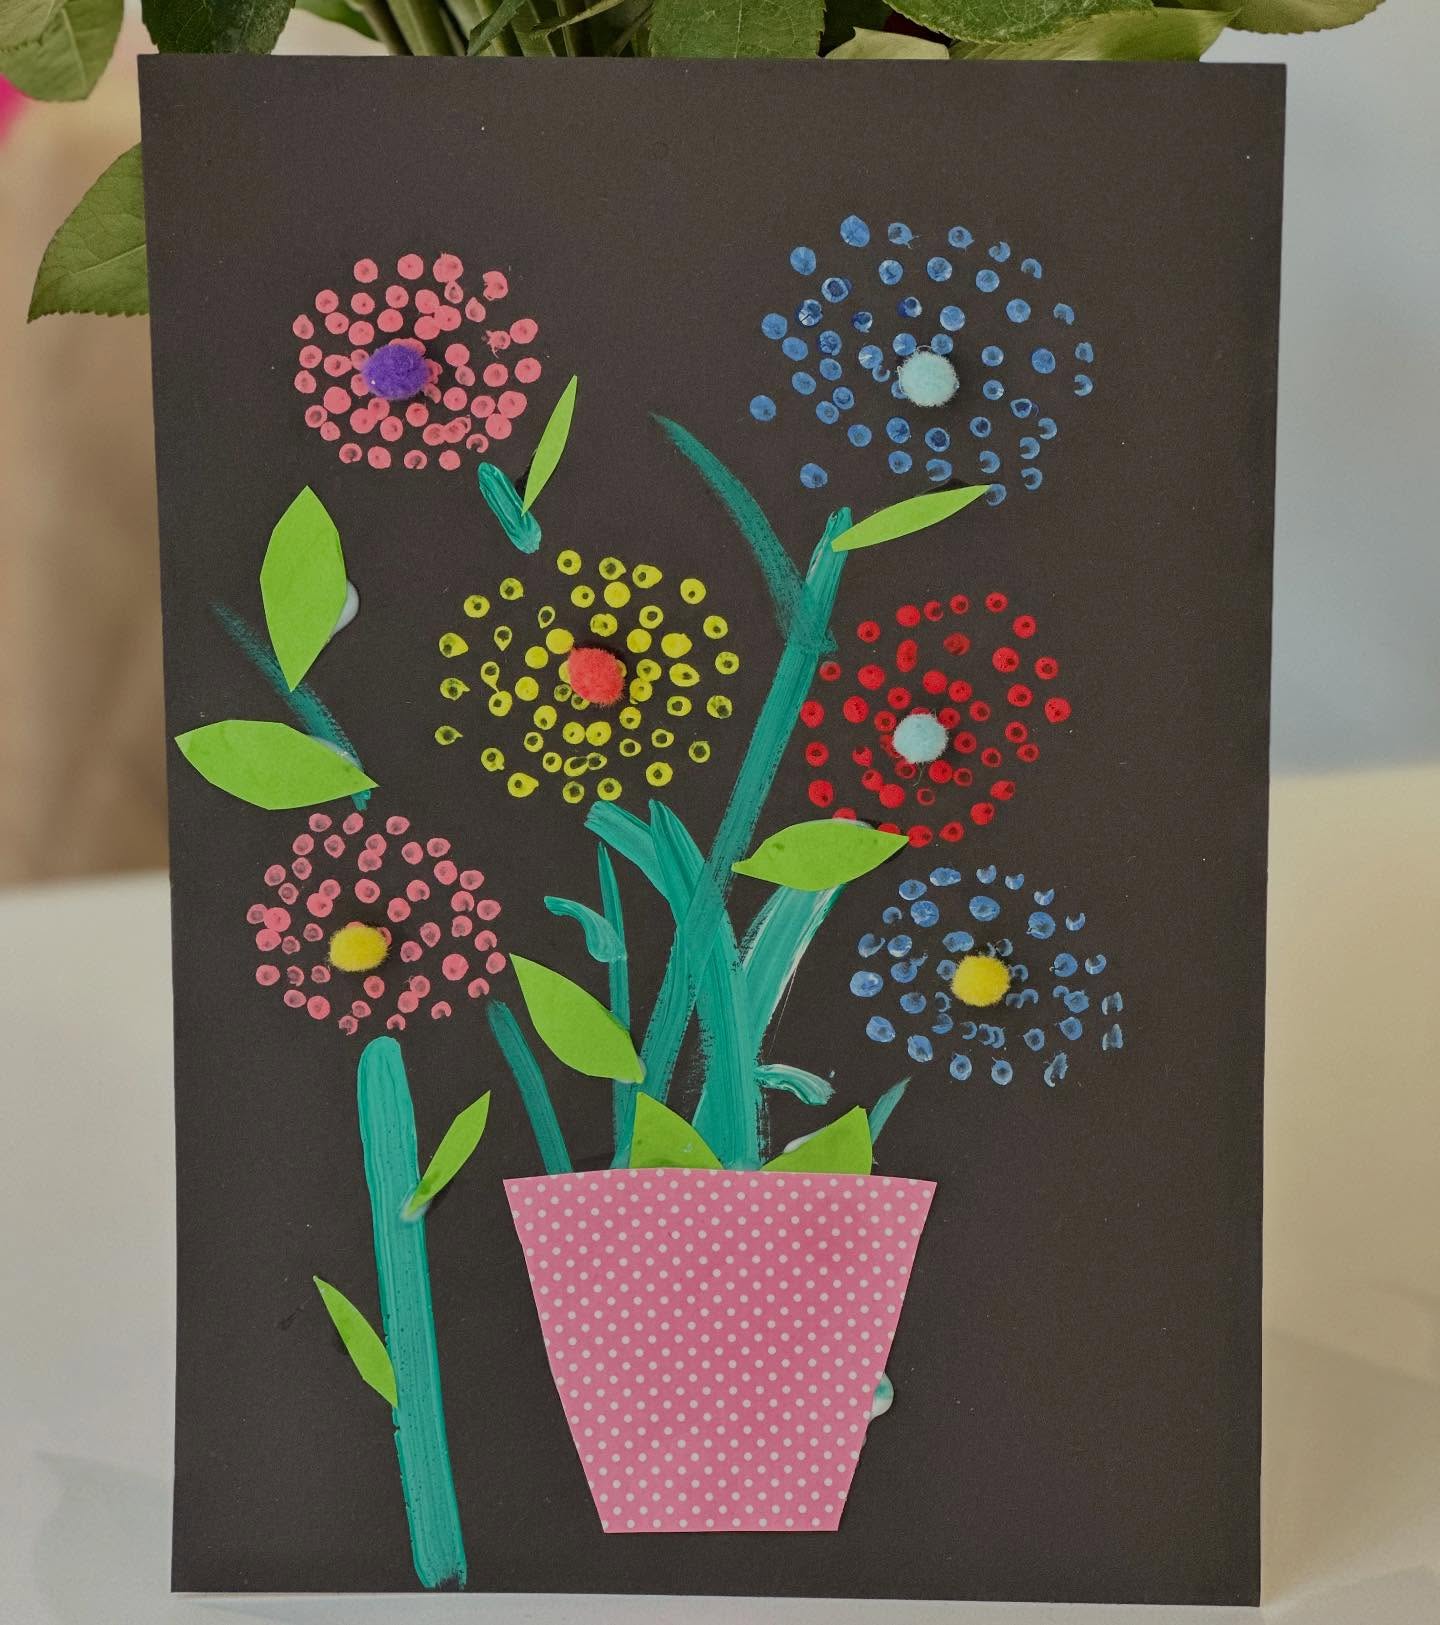
11. Plant Pot
This adorable cat-themed food art is a fun and creative way to make mealtime exciting for kids! To make it, start by shaping cooked white rice into a compact circle to form the cat’s face. Slice two pieces of cheese and triangle-shaped pieces of another cheese type to create the ears, placing them at the top of the rice circle. For the eyes, use slices of green grapes with small raisins or cranberries in the center. A small blackberry works perfectly as the nose, and a slice of red gummy candy or fruit can be used for the mouth. Lastly, break thin spaghetti strands or use pretzel sticks for the whiskers. Arrange everything on a plate, and you’ve got a cute and edible cat face that’s sure to delight little ones!
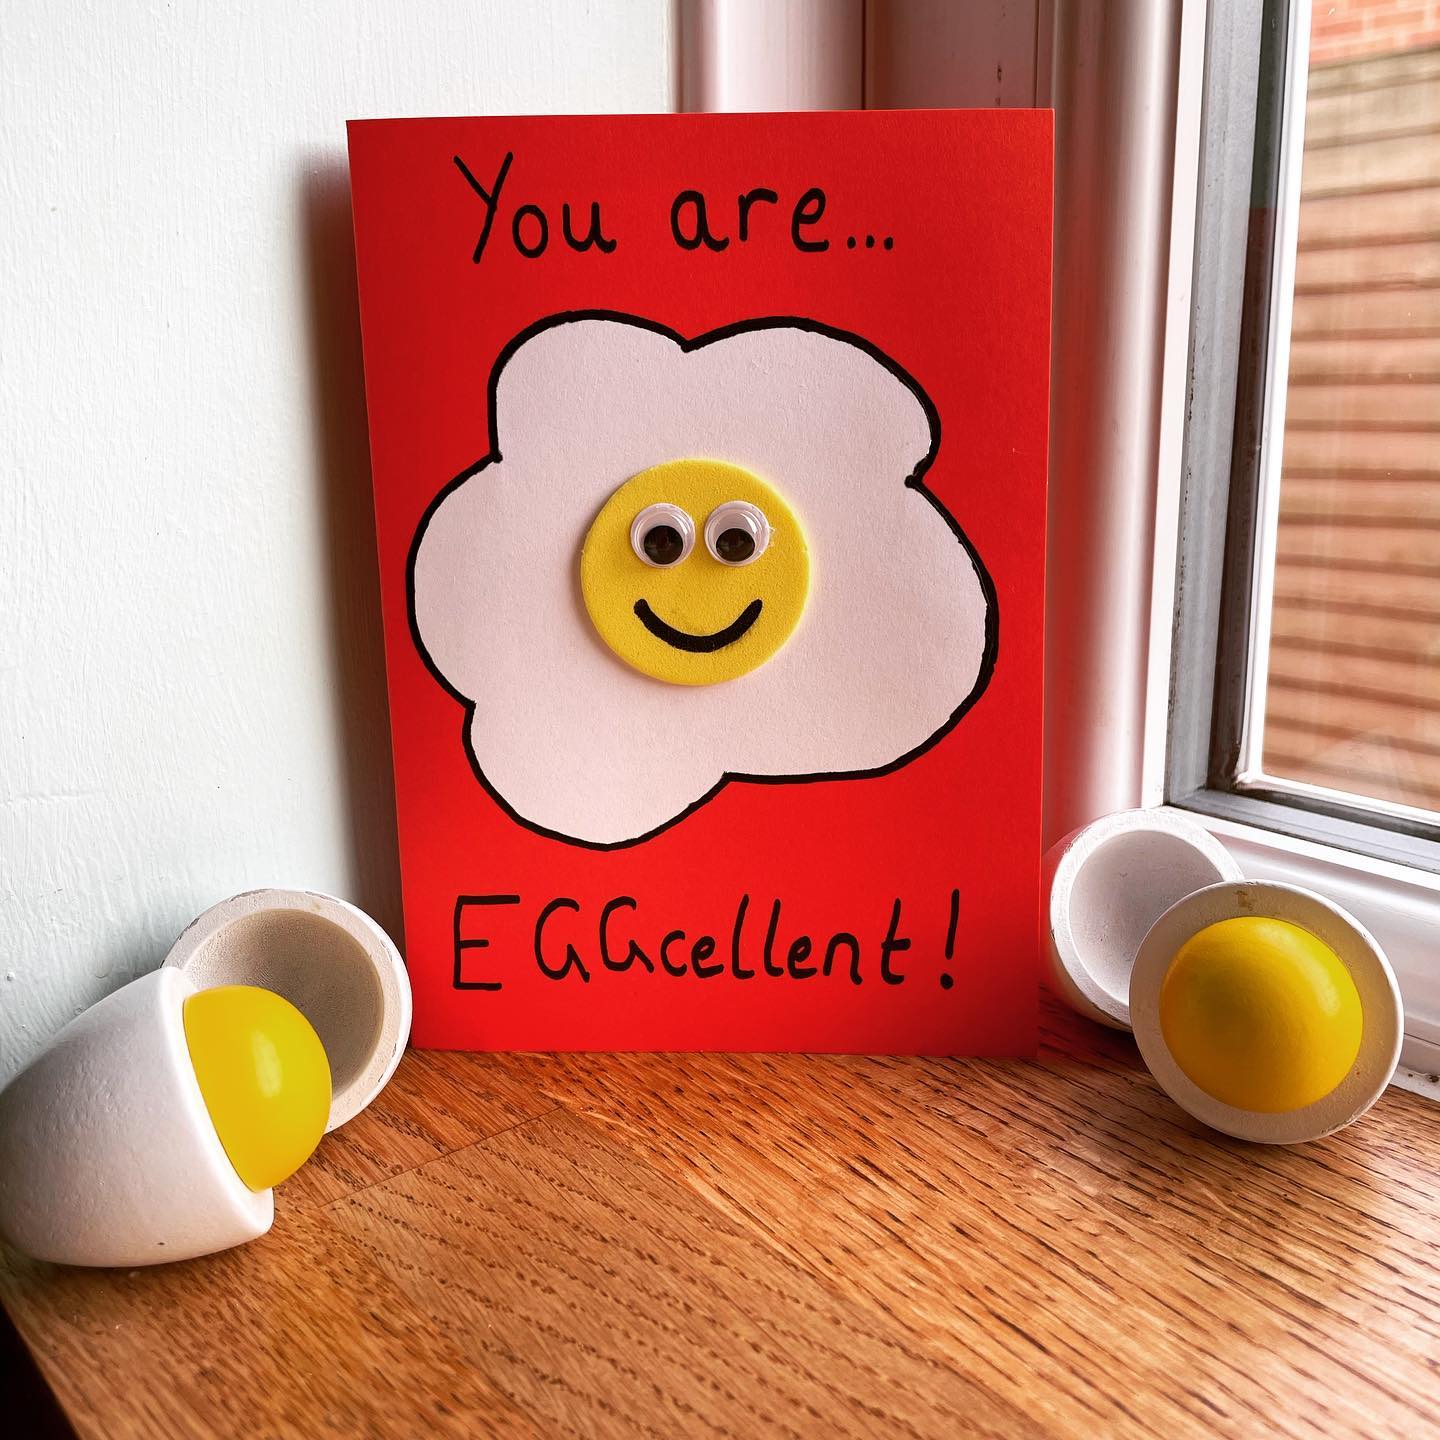
12. Greeting Card
This is a greeting card with egg theme. You can take a colourful card and design it according to your wish using colours and markers.
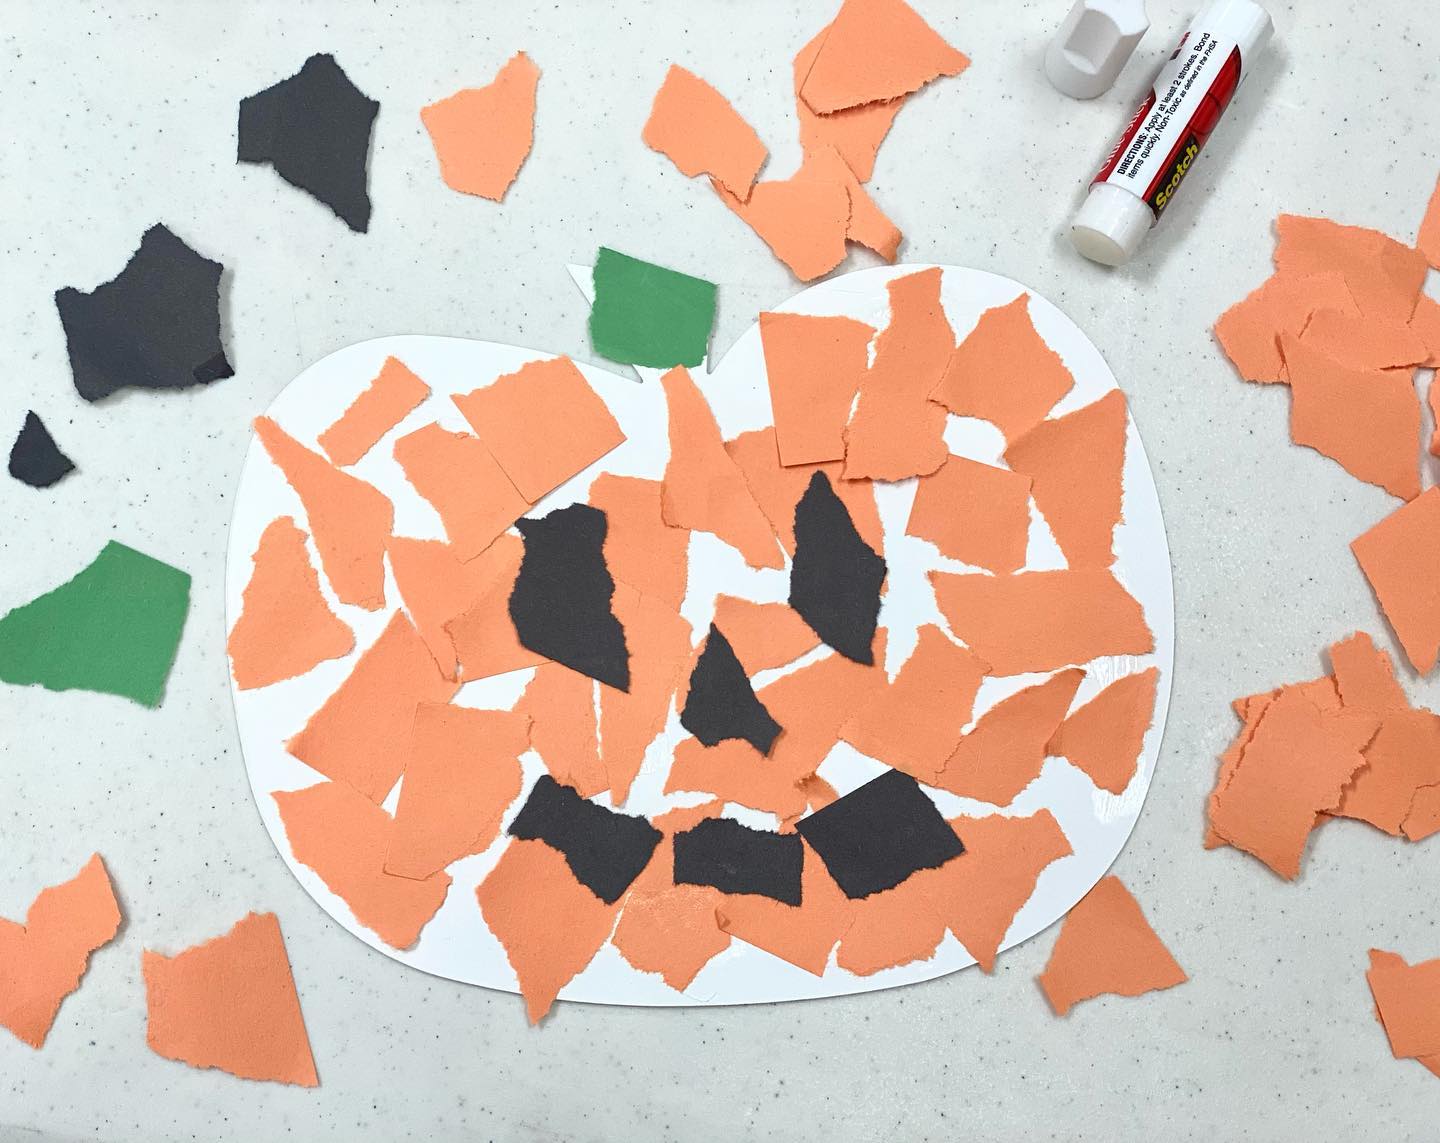
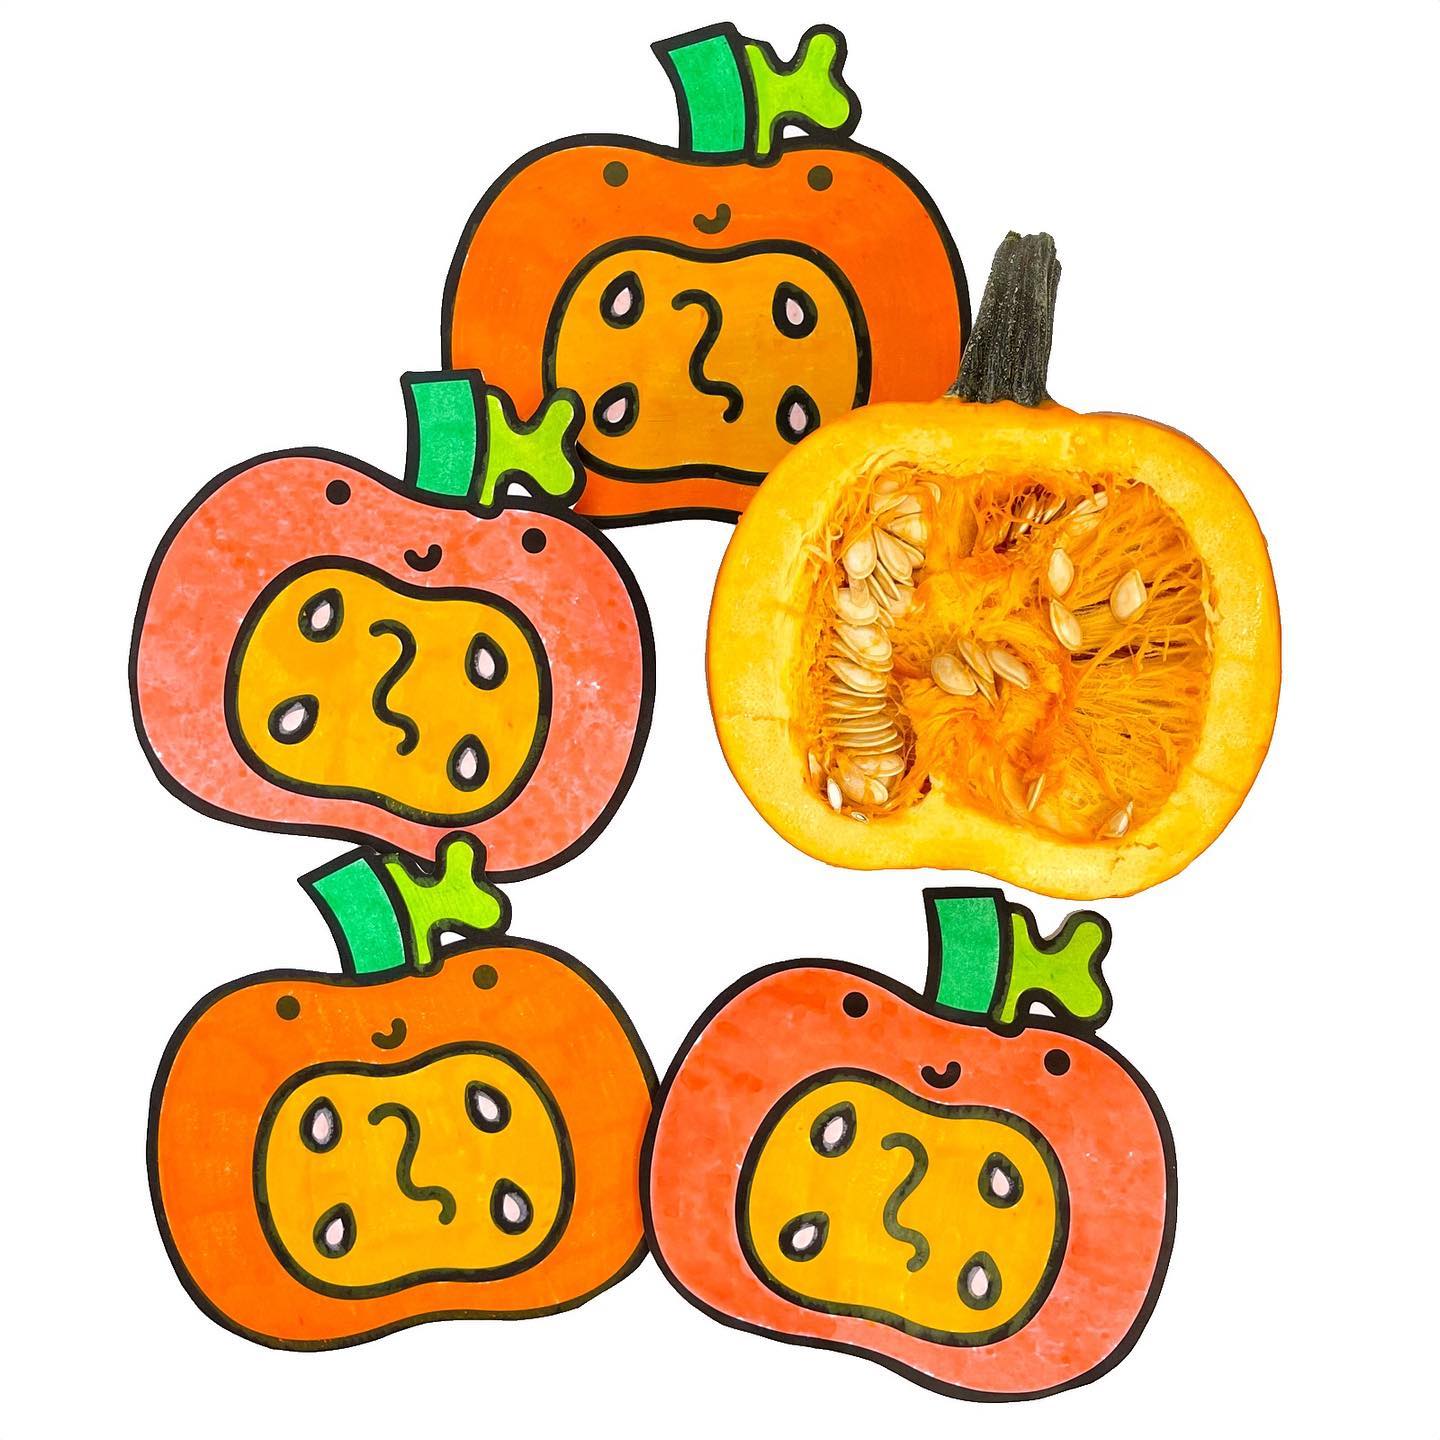
13. Collage
To create this torn paper pumpkin craft, begin by drawing or printing a simple pumpkin shape on white cardstock or construction paper. Tear pieces of orange construction paper into small, uneven shapes—these will be used to fill in the body of the pumpkin. Tear some green paper for the stem and a few black pieces for the jack-o’-lantern face. Using a glue stick, attach the orange pieces inside the pumpkin shape, slightly overlapping them to cover the white space. Then glue on the green piece at the top for the stem, and arrange the black pieces to form eyes, a nose, and a mouth. This craft is great for developing fine motor skills and is perfect for a Halloween or fall activity!
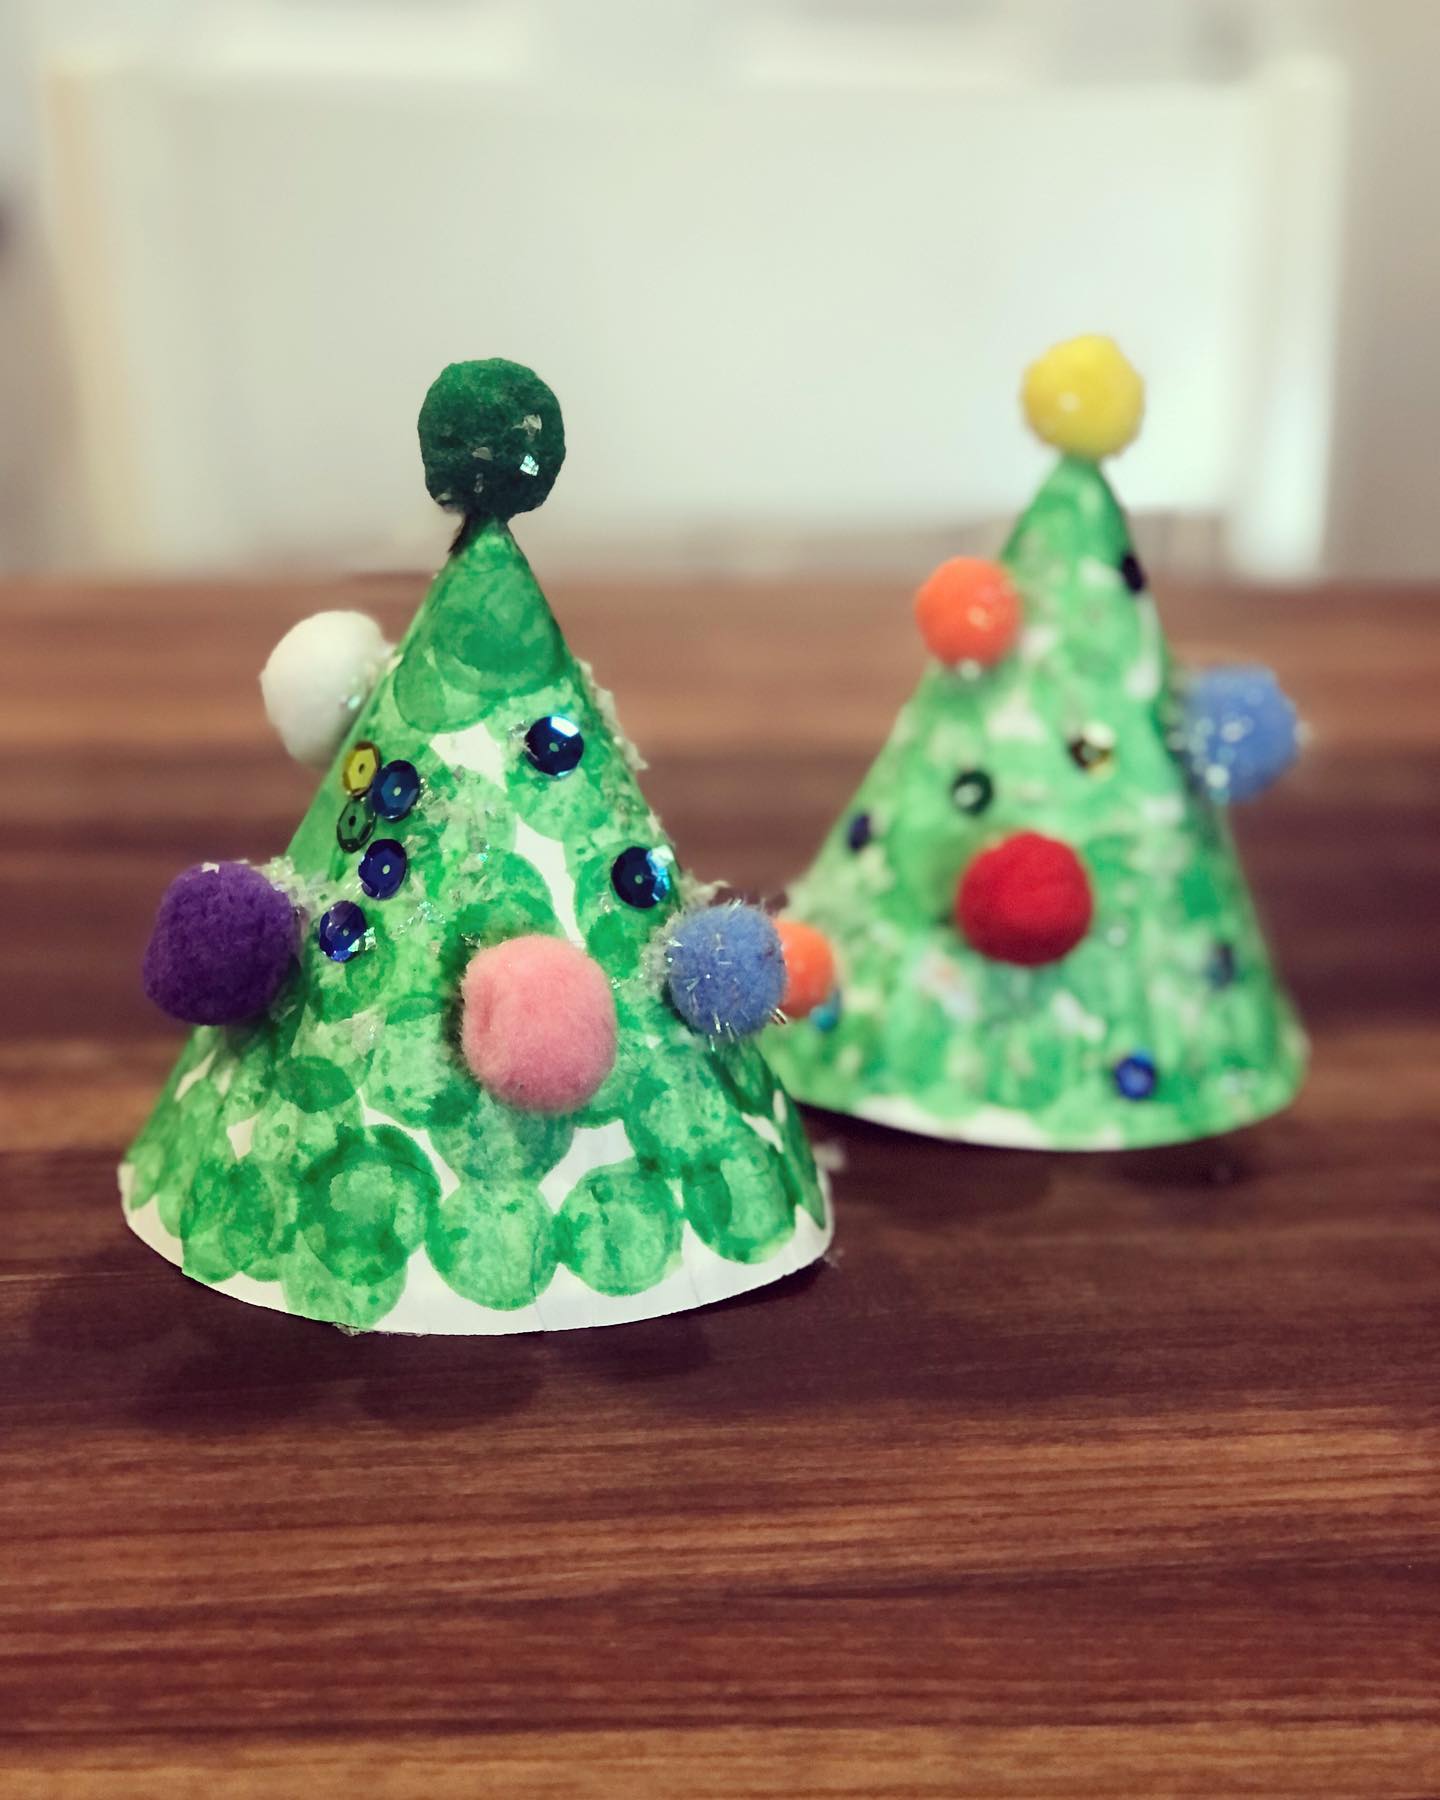
14. Christmas Tree
To make these adorable Christmas tree cone crafts, start by cutting a piece of green-painted or green-colored paper into a semi-circle. Roll the semi-circle into a cone shape and secure it with tape or glue. Decorate the cone using green paint or markers to add texture—using sponge stamps or fingerprints works great for a “tree” look. Once dry, embellish your tree with colorful pom-poms, sequins, and glitter to mimic ornaments. Finally, glue a larger pom-pom to the top of the cone as the tree topper. These festive crafts are simple, fun, and make great holiday decorations!
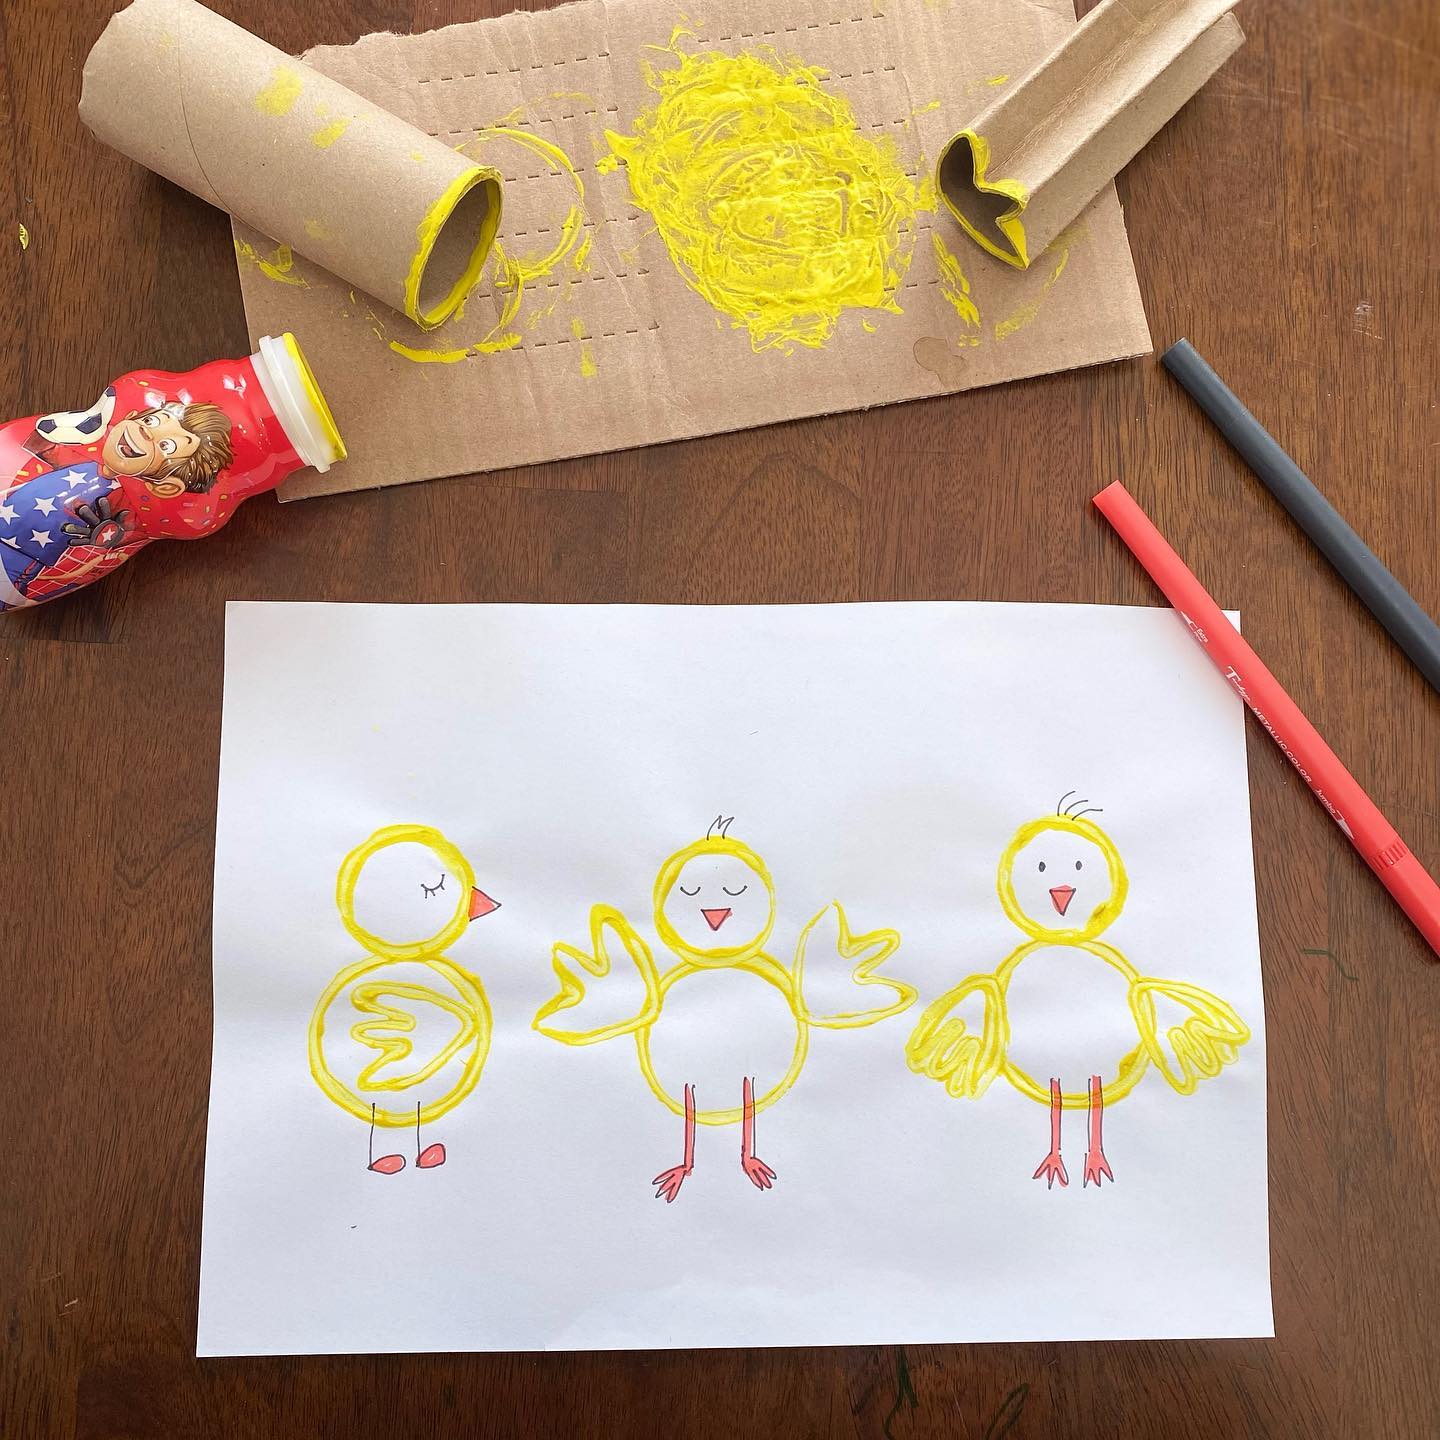
15. Birds
To make easy birds drawing you can use cardboard roll of tissue paper and create the stencil using shapes and then use it for drawing.
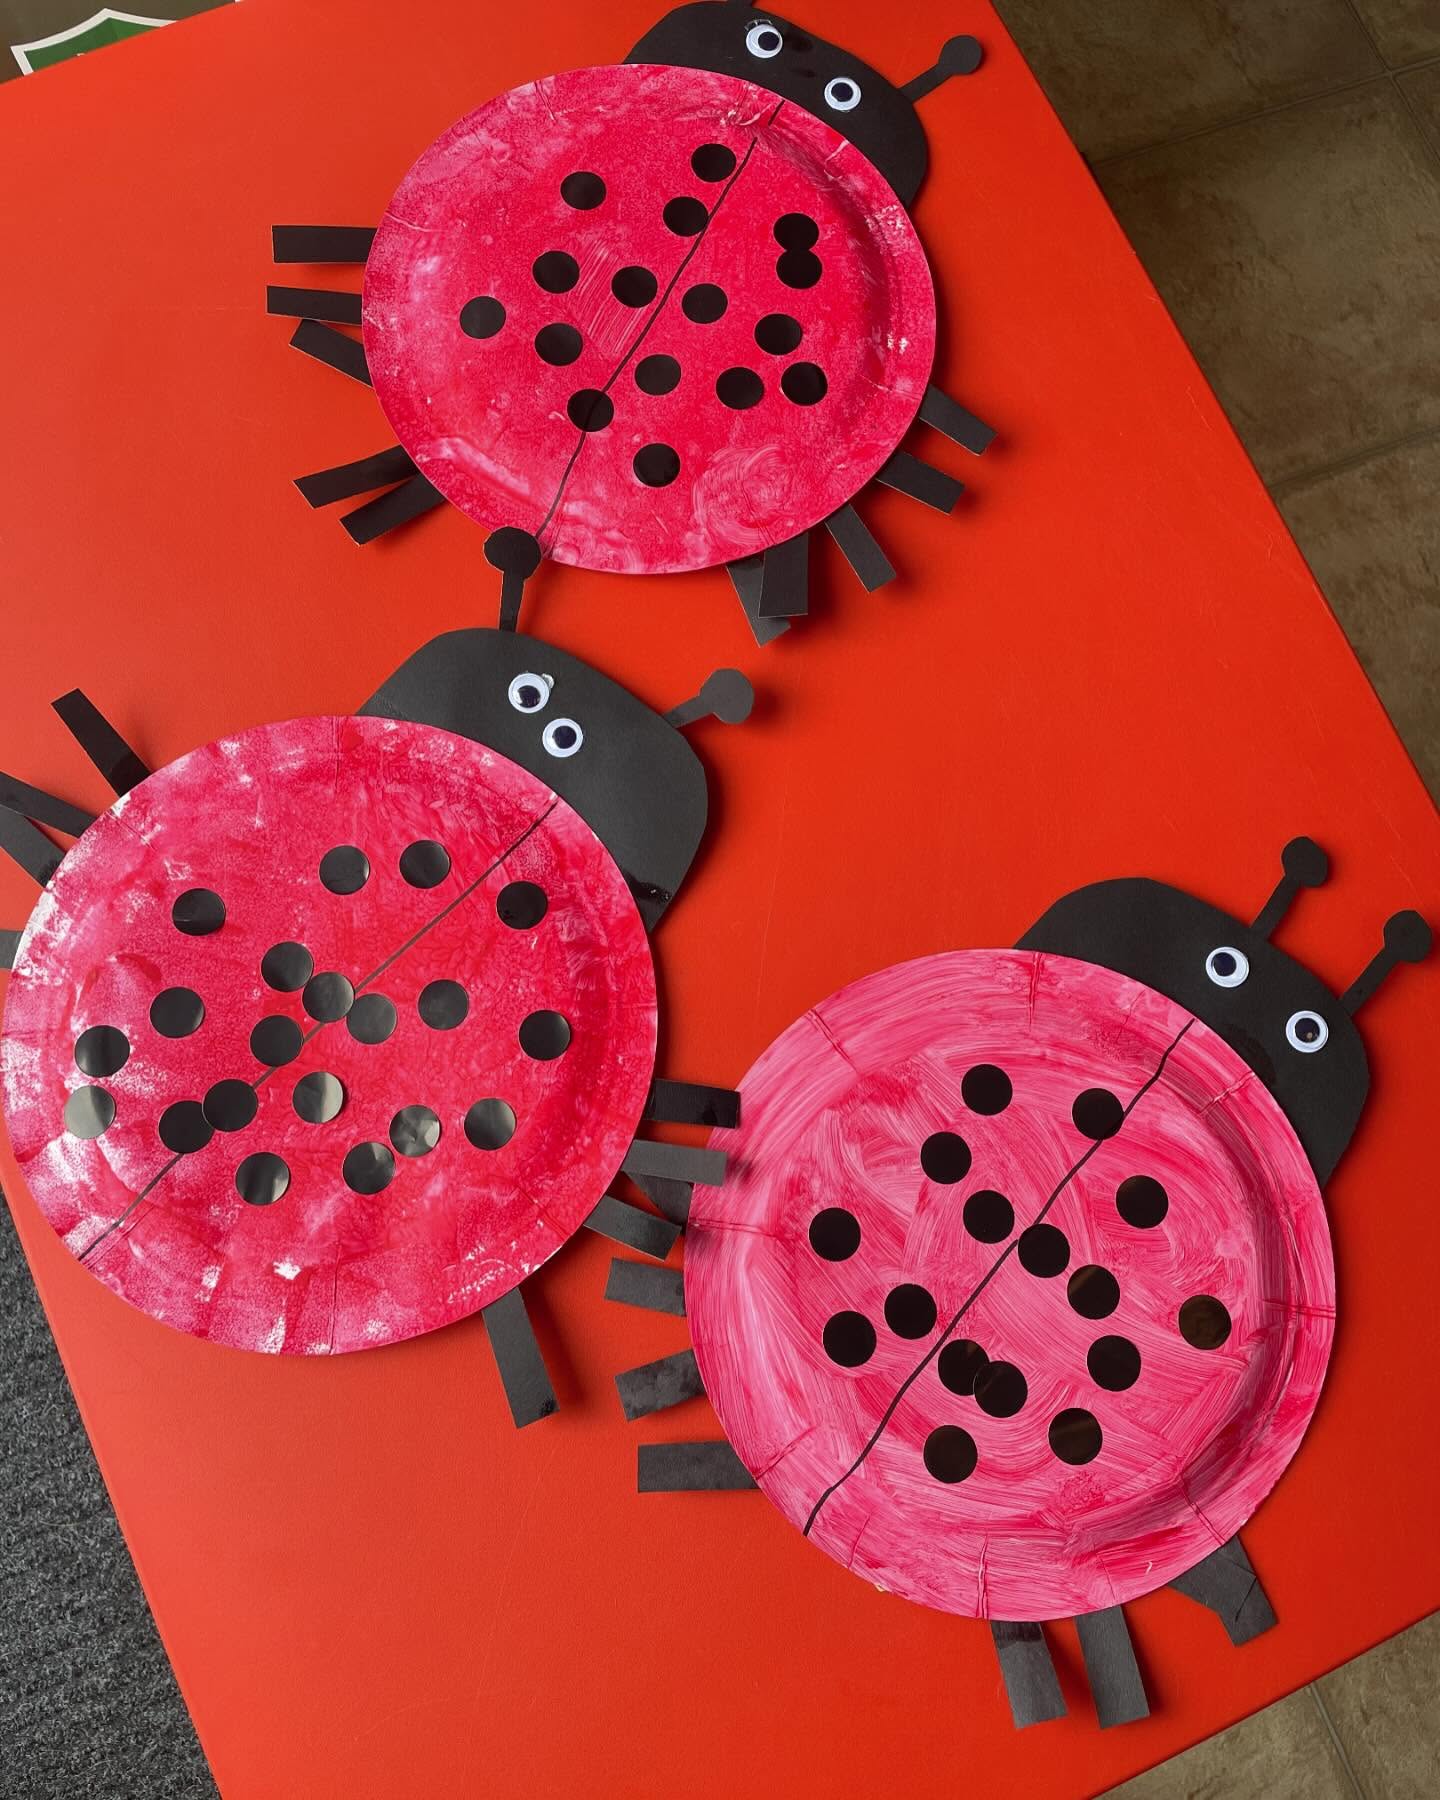
16. Lady Bug
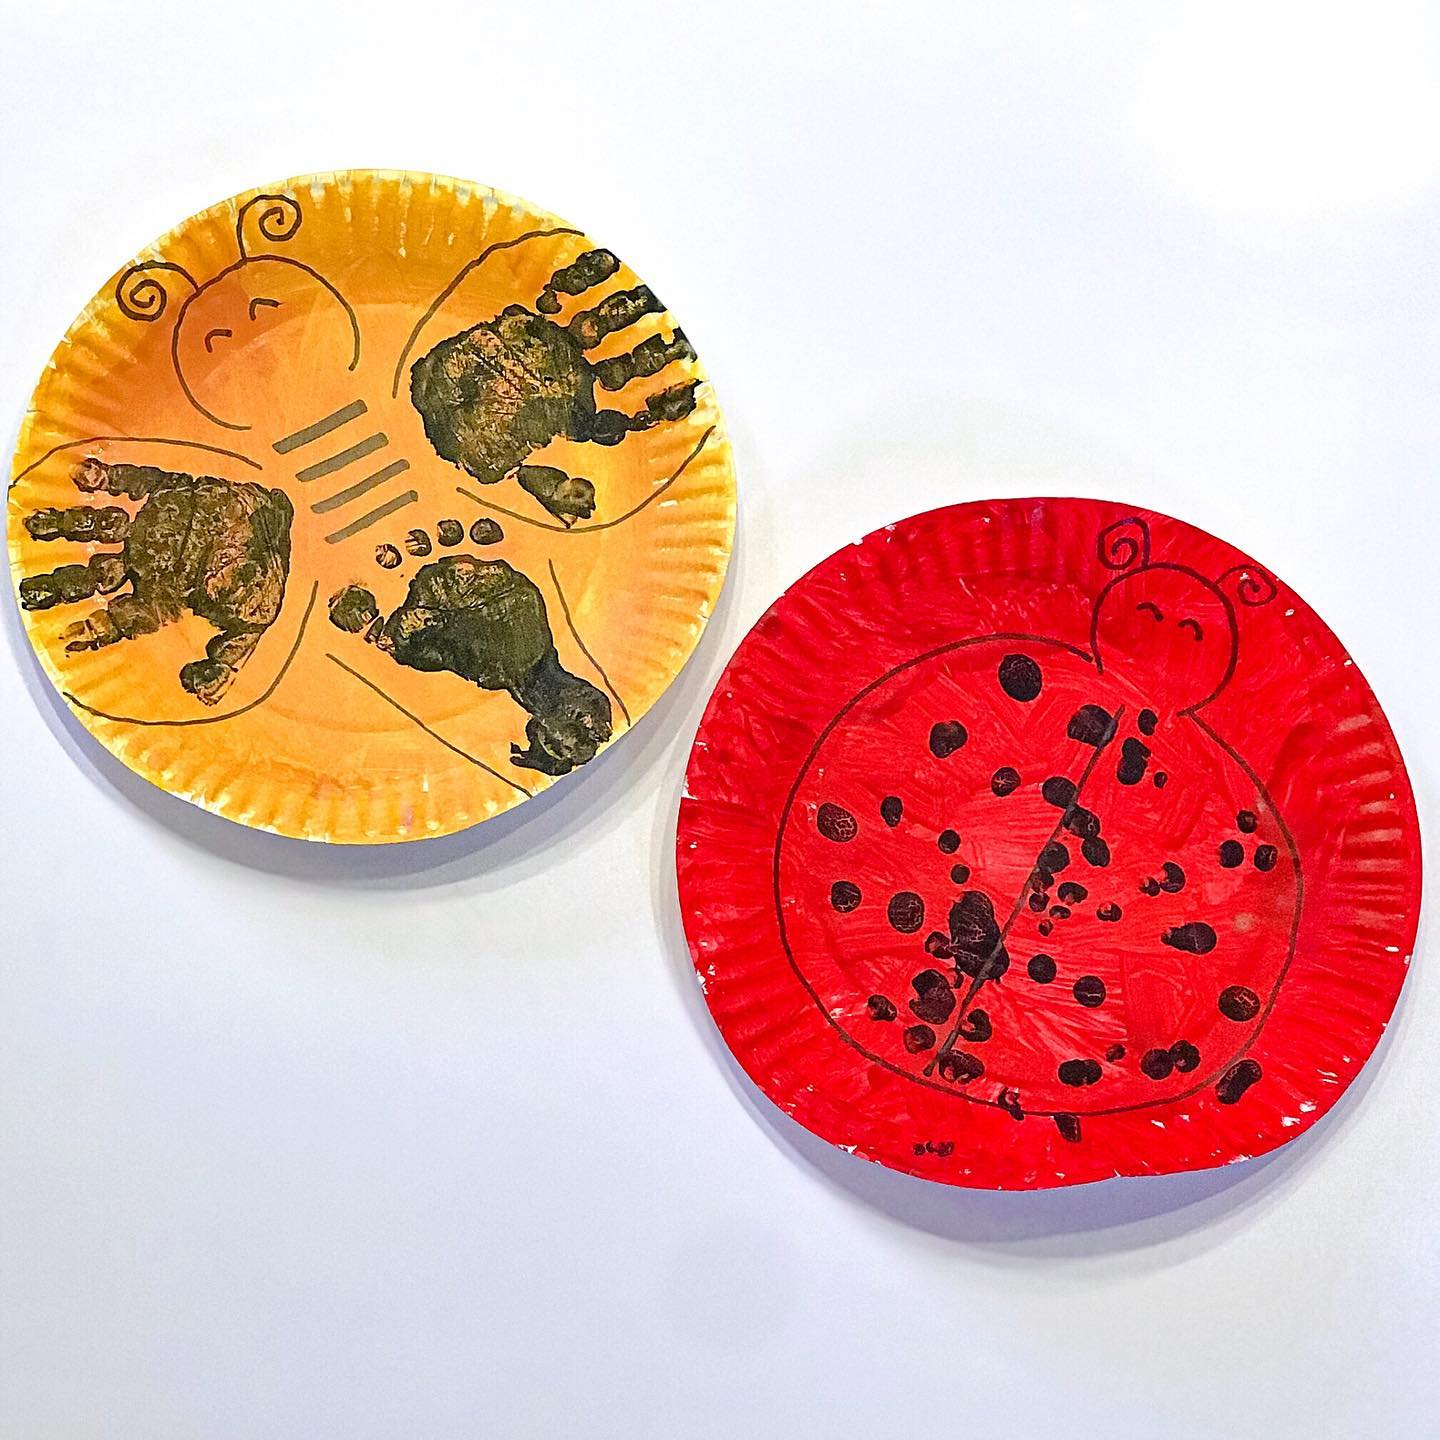
To make these adorable ladybug crafts, start with a white paper plate and paint the entire front side red. Once the paint is dry, use a black marker or black paint to draw a line down the middle, representing the wings. Cut small black circles out of construction paper and glue them on each side of the line as ladybug spots. For the head, cut a semicircle from black paper and attach it to the top of the plate. Add googly eyes to the head and glue on two thin strips with circles on top for antennae. Finish the ladybug by adding six black paper legs—three on each side. This fun and colorful craft is perfect for preschoolers and young kids learning about insects!
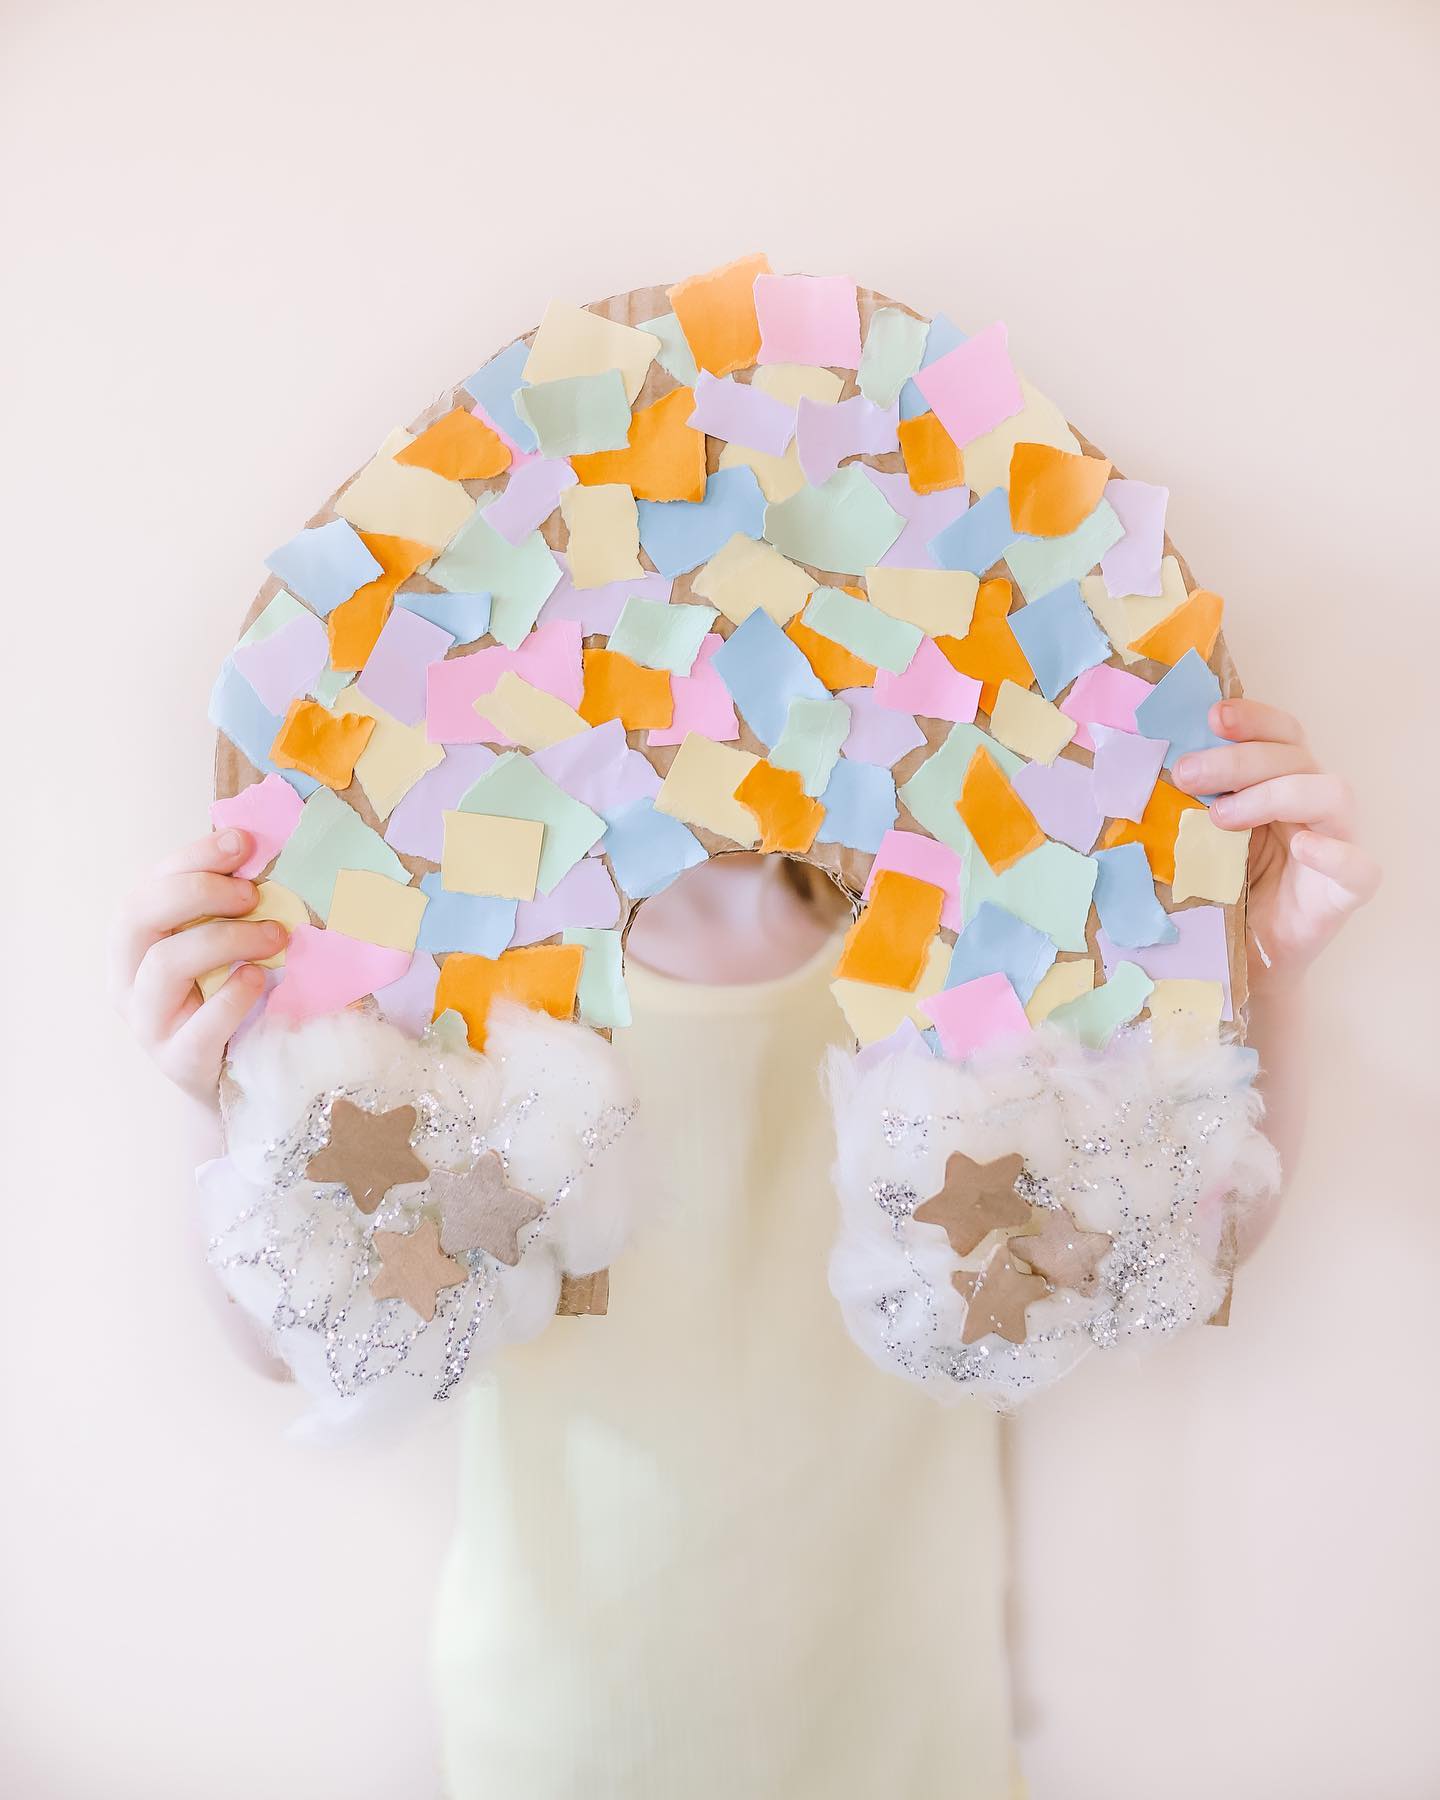
17. Clouds and Rainbow
This cheerful rainbow craft is a fun and simple activity that brings color and creativity together! Begin by cutting a large rainbow shape out of cardboard. Tear or cut small pieces of pastel-colored paper in various shades—like pink, yellow, blue, purple, and green—and glue them all over the top arch of the rainbow, creating a mosaic look. For the clouds at the bottom, glue cotton balls or cotton padding onto each end of the rainbow. Add some sparkle by sprinkling glitter and gluing on shiny paper or foam stars. This craft not only results in a beautiful decoration but also encourages fine motor skills and imaginative play.

18. Penguin
To make this cute penguin craft, start with a blue background paper as your base. Tear or cut small pieces of black and white construction paper. Arrange and glue the black pieces in an oval shape for the penguin’s body and the white pieces in the center for the belly. Cut out two black flipper shapes and glue them to the sides. Create two large eyes from white and black paper circles, and glue them at the top of the body. Cut a triangle from orange paper for the beak and two orange feet, then glue them in place at the bottom. This fun, textured craft is great for kids and helps develop fine motor skills!
19. Pumpkin
This is simple pumpkin drawing with wax crayons. First draw with pencil and marker and then colour it.
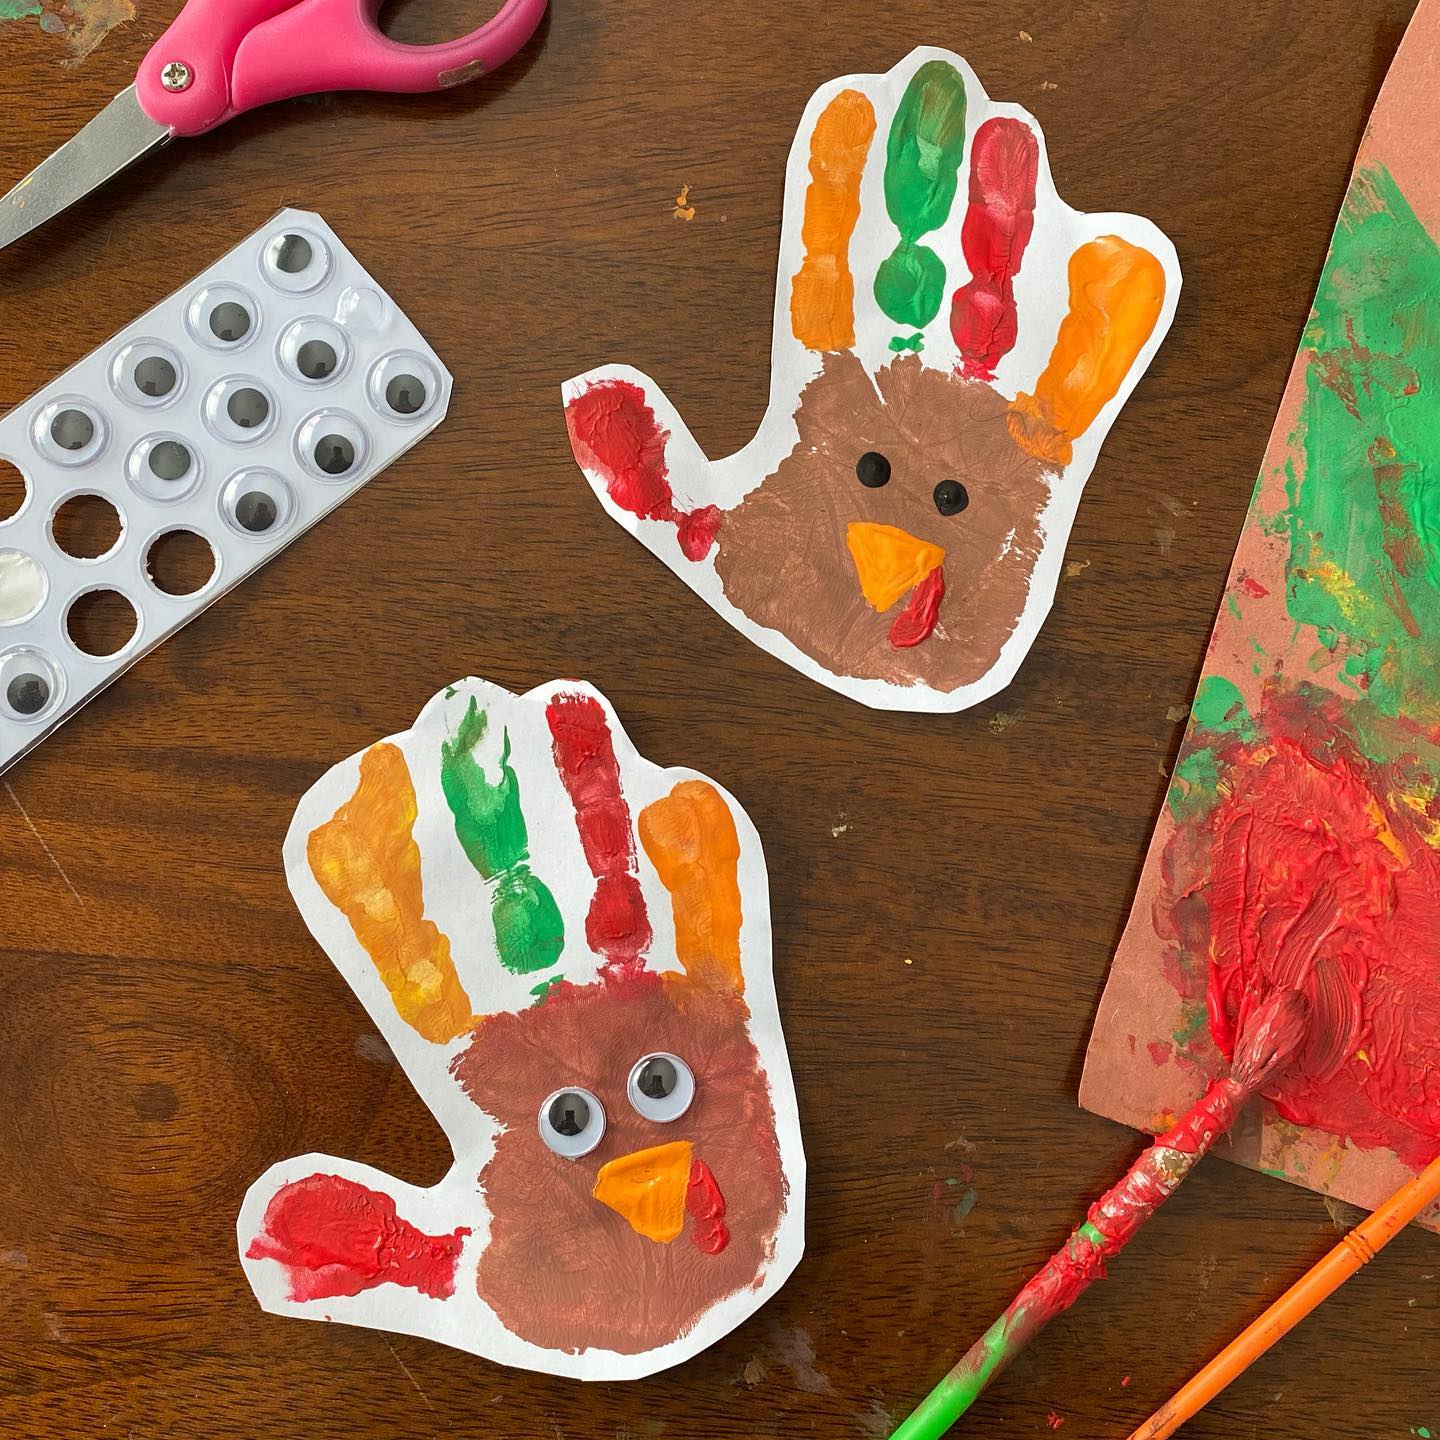
20. Hand Painting
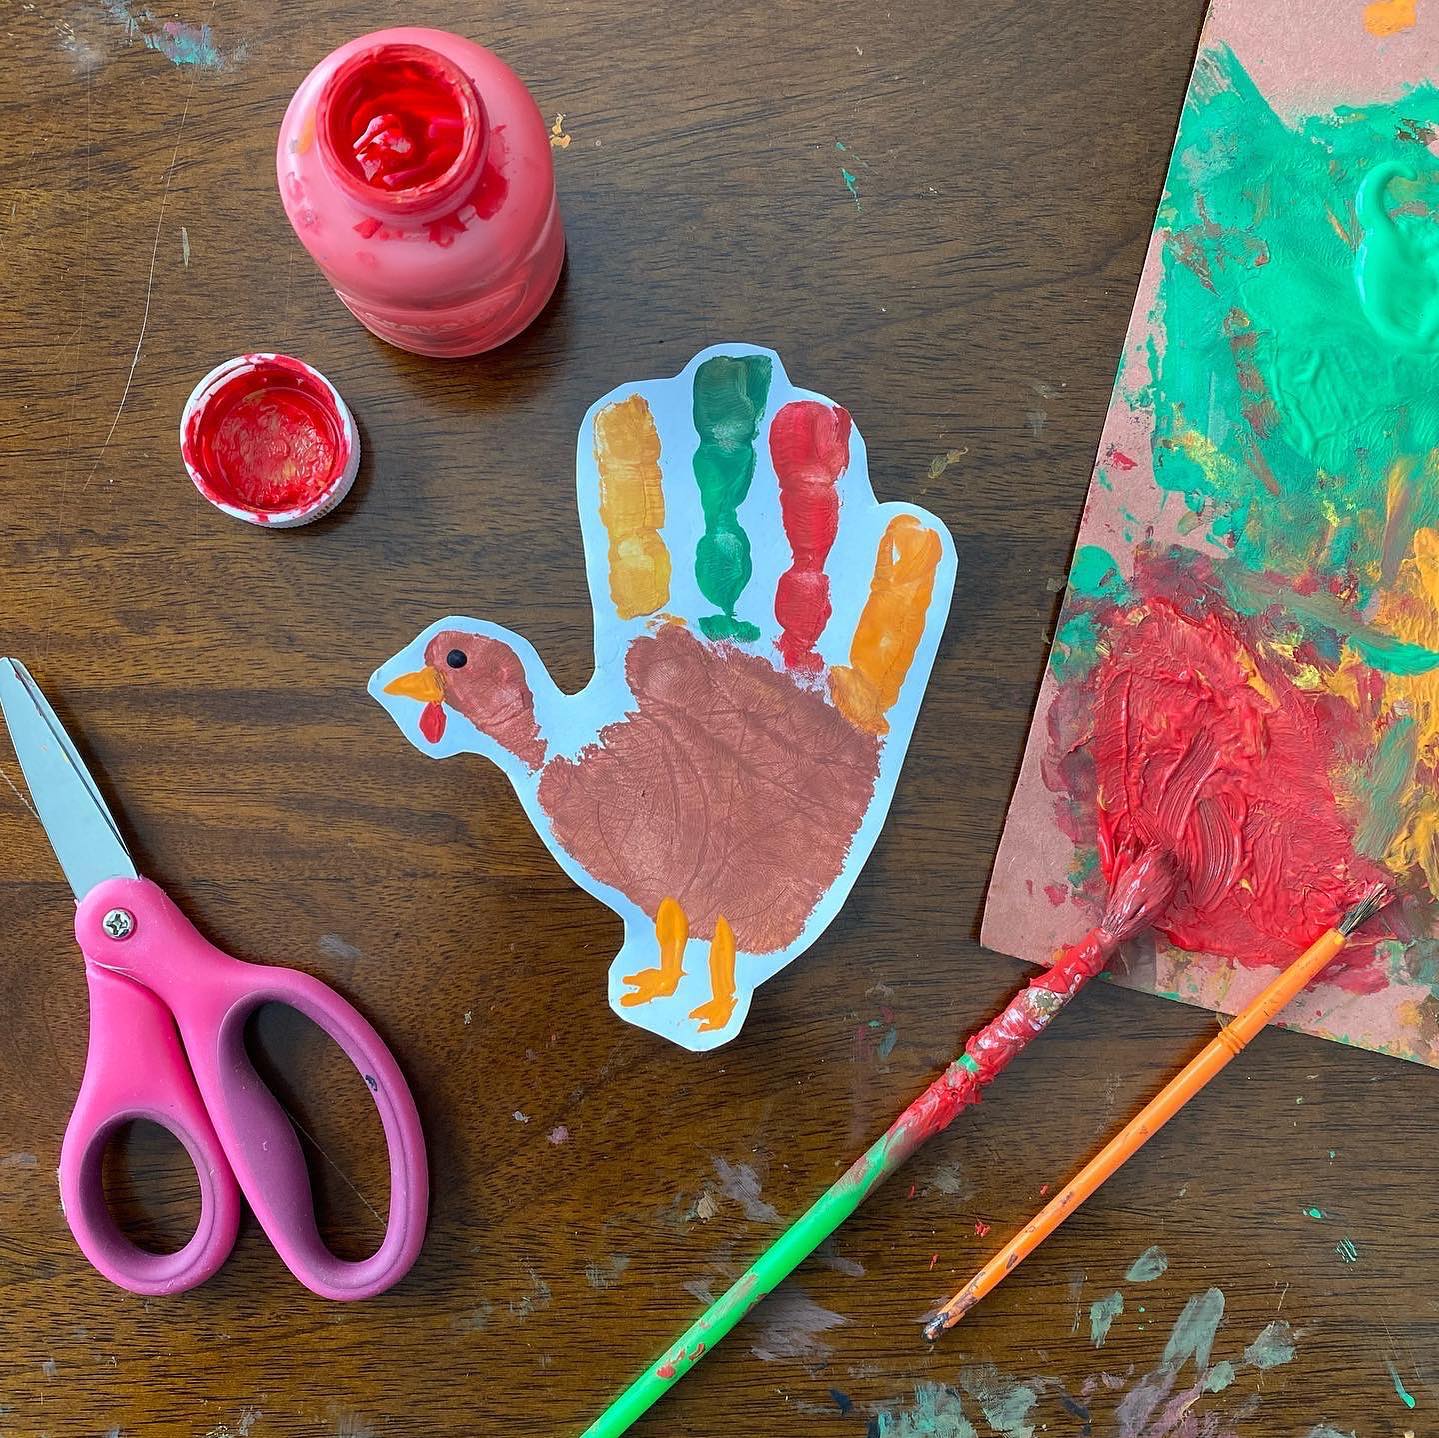
To make this cute handprint turkey craft, start by tracing a child’s hand onto a piece of white cardstock or construction paper and cut it out. Paint the palm and thumb area brown to form the turkey’s body and head, then paint each finger a different bright color—like red, orange, green, and yellow—to represent the feathers. Once the paint dries, glue on googly eyes and a small orange triangle for the beak. Add a red wattle using paint or red paper. For extra fun, let kids get creative with different feather colors or decorations. This festive craft is perfect for Thanksgiving and makes a great keepsake!
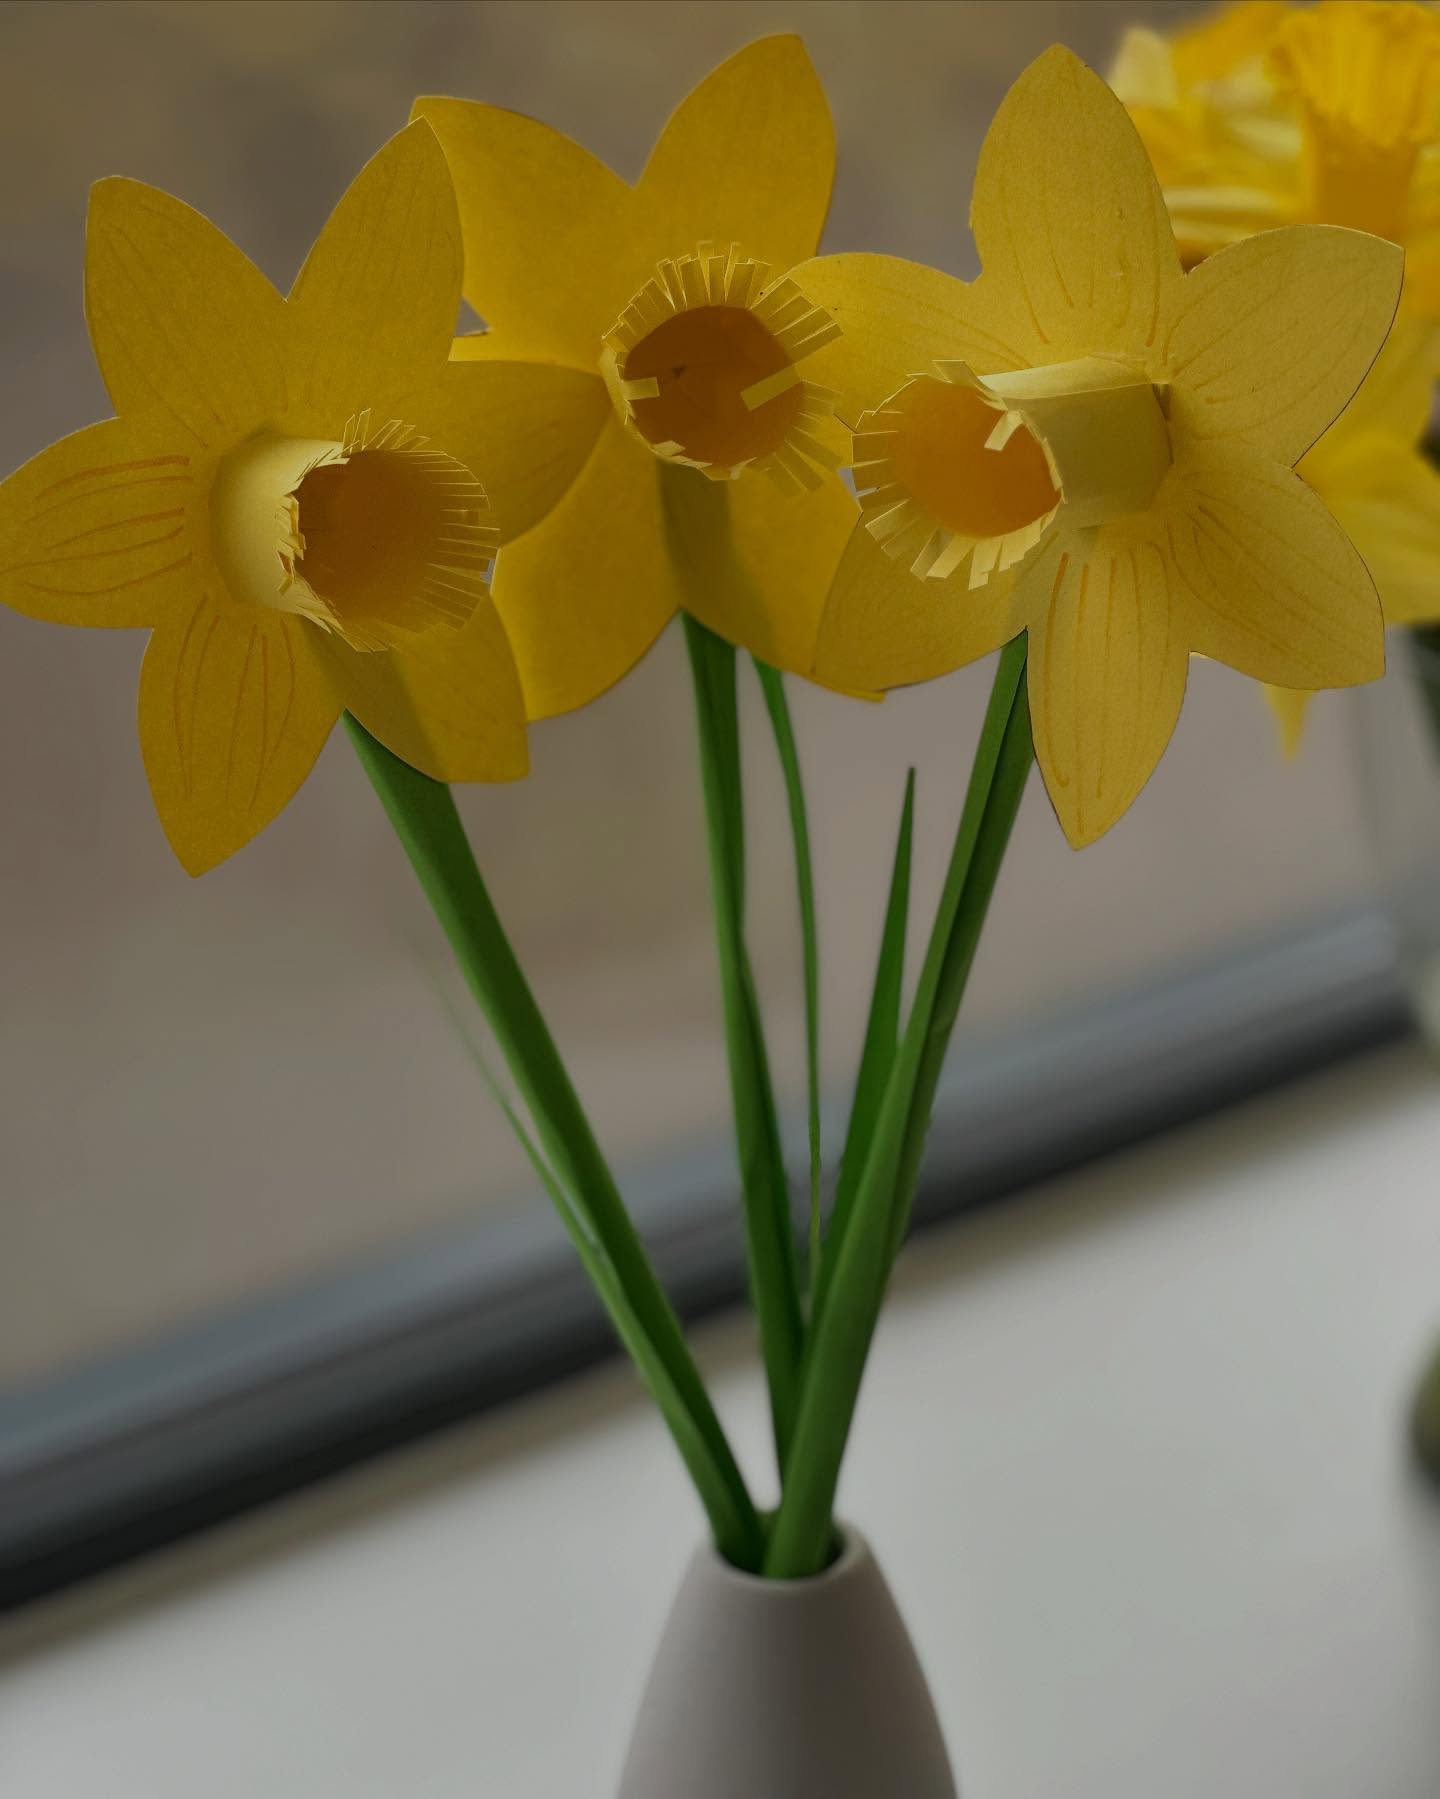
21. Daffodils
To make a daffodil flower with cardboard, start by cutting out six petal shapes from yellow-painted cardboard or yellow craft paper glued onto cardboard. Arrange and glue the petals in a circular pattern to form the outer part of the flower. Next, take a small rectangular piece of cardboard, roll it into a tube, and fringe one end to create the trumpet-shaped center. Paint the tube orange or cover it with orange paper, then glue it in the middle of the petals. For the stem, attach a green-painted straw, stick, or pipe cleaner to the back of the flower. You can also cut and glue two green cardboard leaves to the stem. This craft is a simple and fun way to create a bright, cheerful daffodil using basic materials!
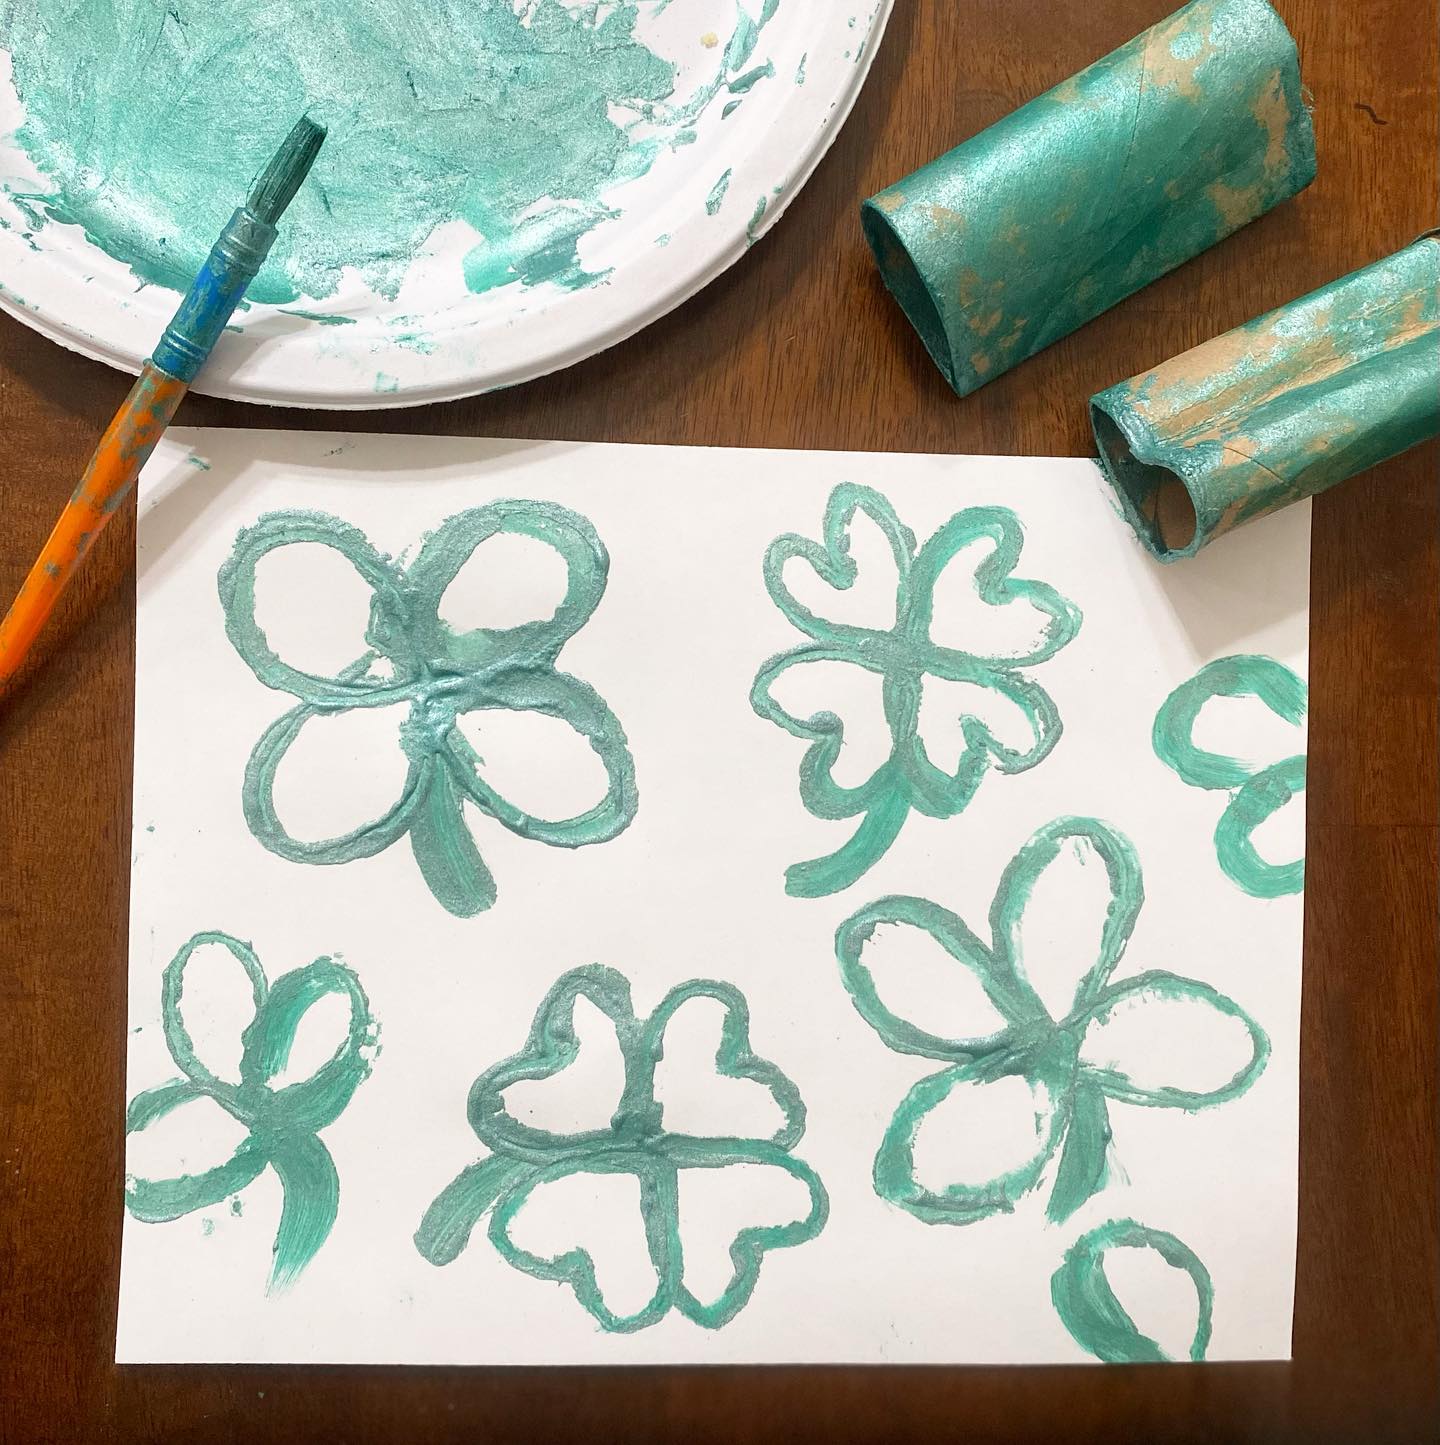
22. Painting with Stamp
To make this fun shamrock stamp art, you’ll need a few cardboard toilet paper rolls, green paint, a paintbrush, and a sheet of paper. Start by bending the top of the toilet paper roll inward to create a heart shape — this will form one petal of the shamrock. Use three heart-shaped stamps for each shamrock, arranging them in a clover shape. Dip the edge of the roll into green paint or paint directly onto it with a brush, then press it firmly onto your paper. Add a stem with a brush to complete each shamrock. This easy and creative craft is perfect for celebrating St. Patrick’s Day with kids!
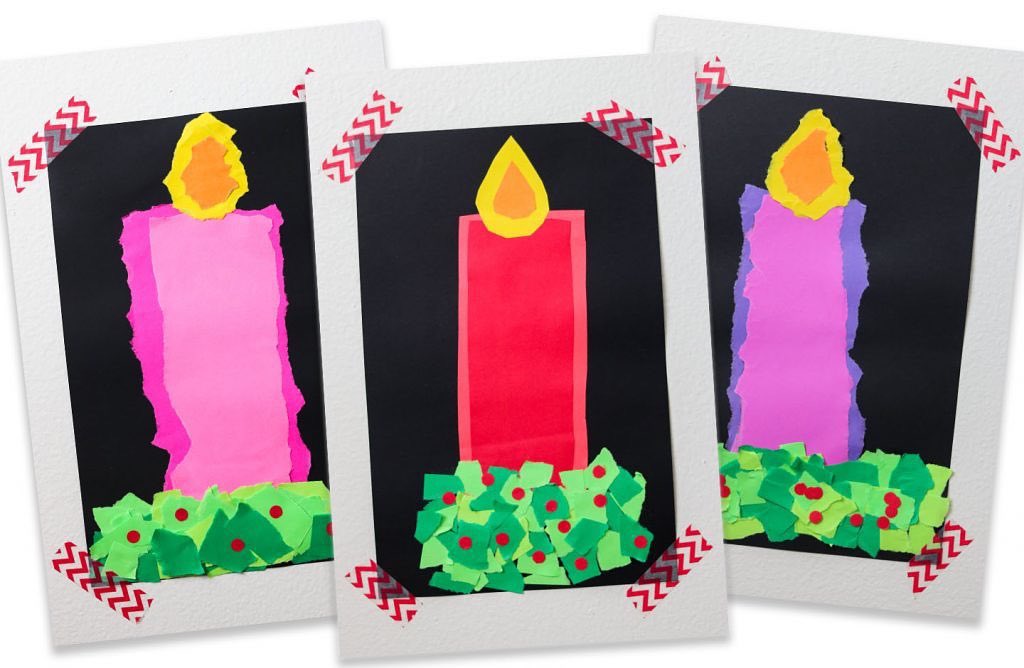
23. Candles
To make a candle using collage, begin by drawing a simple candle shape on a piece of paper—a tall rectangle for the candle and a small flame shape on top. Tear or cut small pieces of colored paper, tissue paper, or magazine pages in warm and bright tones like red, yellow, orange, and gold. Use these pieces to fill in the flame area, creating a glowing effect. Then, choose different colored paper scraps to fill in the body of the candle, layering them creatively for texture and depth. You can also use shiny or textured paper to add extra interest. Once the collage is complete, outline the candle and flame with a black marker to make it stand out. This is a fun and expressive art activity that encourages creativity while teaching about shapes and color blending.
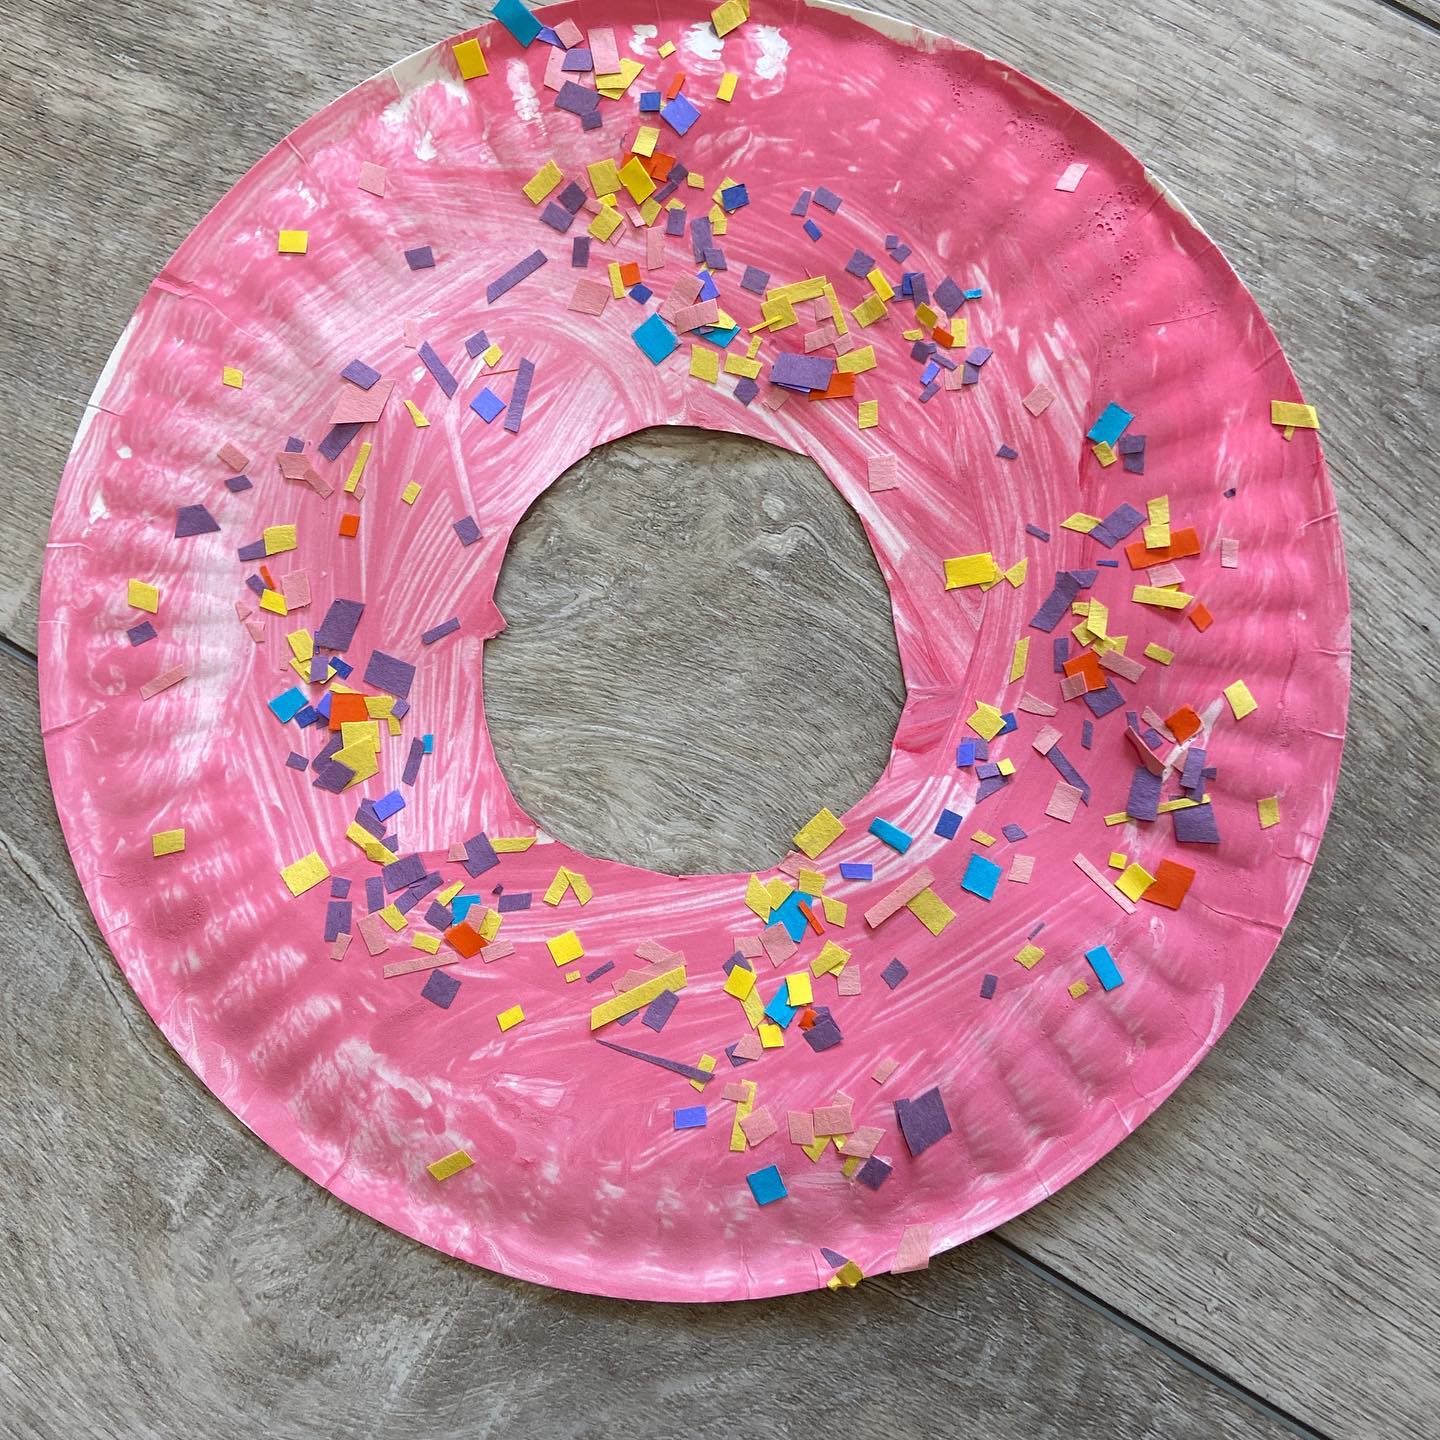
24. Donut
To make this fun donut-themed craft, start by taking a paper plate and cutting a large circle out of the center to create a donut shape. Next, paint the entire surface of the plate with pink paint to resemble frosting—feel free to mix in a little white for a swirled effect. Once the paint is dry, add the “sprinkles” by gluing on small pieces of colorful paper or tissue paper in various shapes and colors. Let the glue dry completely before handling. This easy and creative activity is perfect for kids and a great way to practice fine motor skills while having fun!
25. Painting on Tray
These cute insect crafts made from paper plates are a fun and engaging activity for kids that combines painting and stamping with their own hands and feet! To make them, start by painting one paper plate yellow or orange for the butterfly and another red for the ladybug. For the butterfly, use black or dark brown paint to make two handprints on the sides and two footprints at the bottom of the plate to form the wings. Once the paint is dry, use a marker to draw the butterfly’s body, head, antennae, and other details. For the ladybug, paint the plate red and let it dry. Then, draw the ladybug’s body and head outline, and use fingertips dipped in black paint to create the characteristic black spots. This is a great sensory and art activity that lets kids get creative while learning about insects!
26. Cock
This adorable handprint turkey craft is a classic and fun project perfect for Thanksgiving! Start by painting the palm and thumb of a child’s hand with brown paint to form the turkey’s body and head. Then, paint each of the four fingers in different bright colors—like orange, red, yellow, and green—to represent the turkey’s feathers. Press the painted hand onto a sheet of white or light-colored paper and let it dry. Once dry, cut around the handprint to make a turkey cutout. Add small details like a beak, wattle, eye, and feet using paint or markers. This craft is a great way to celebrate the season and makes a sweet keepsake of your child’s handprint!
27. Egg Painting
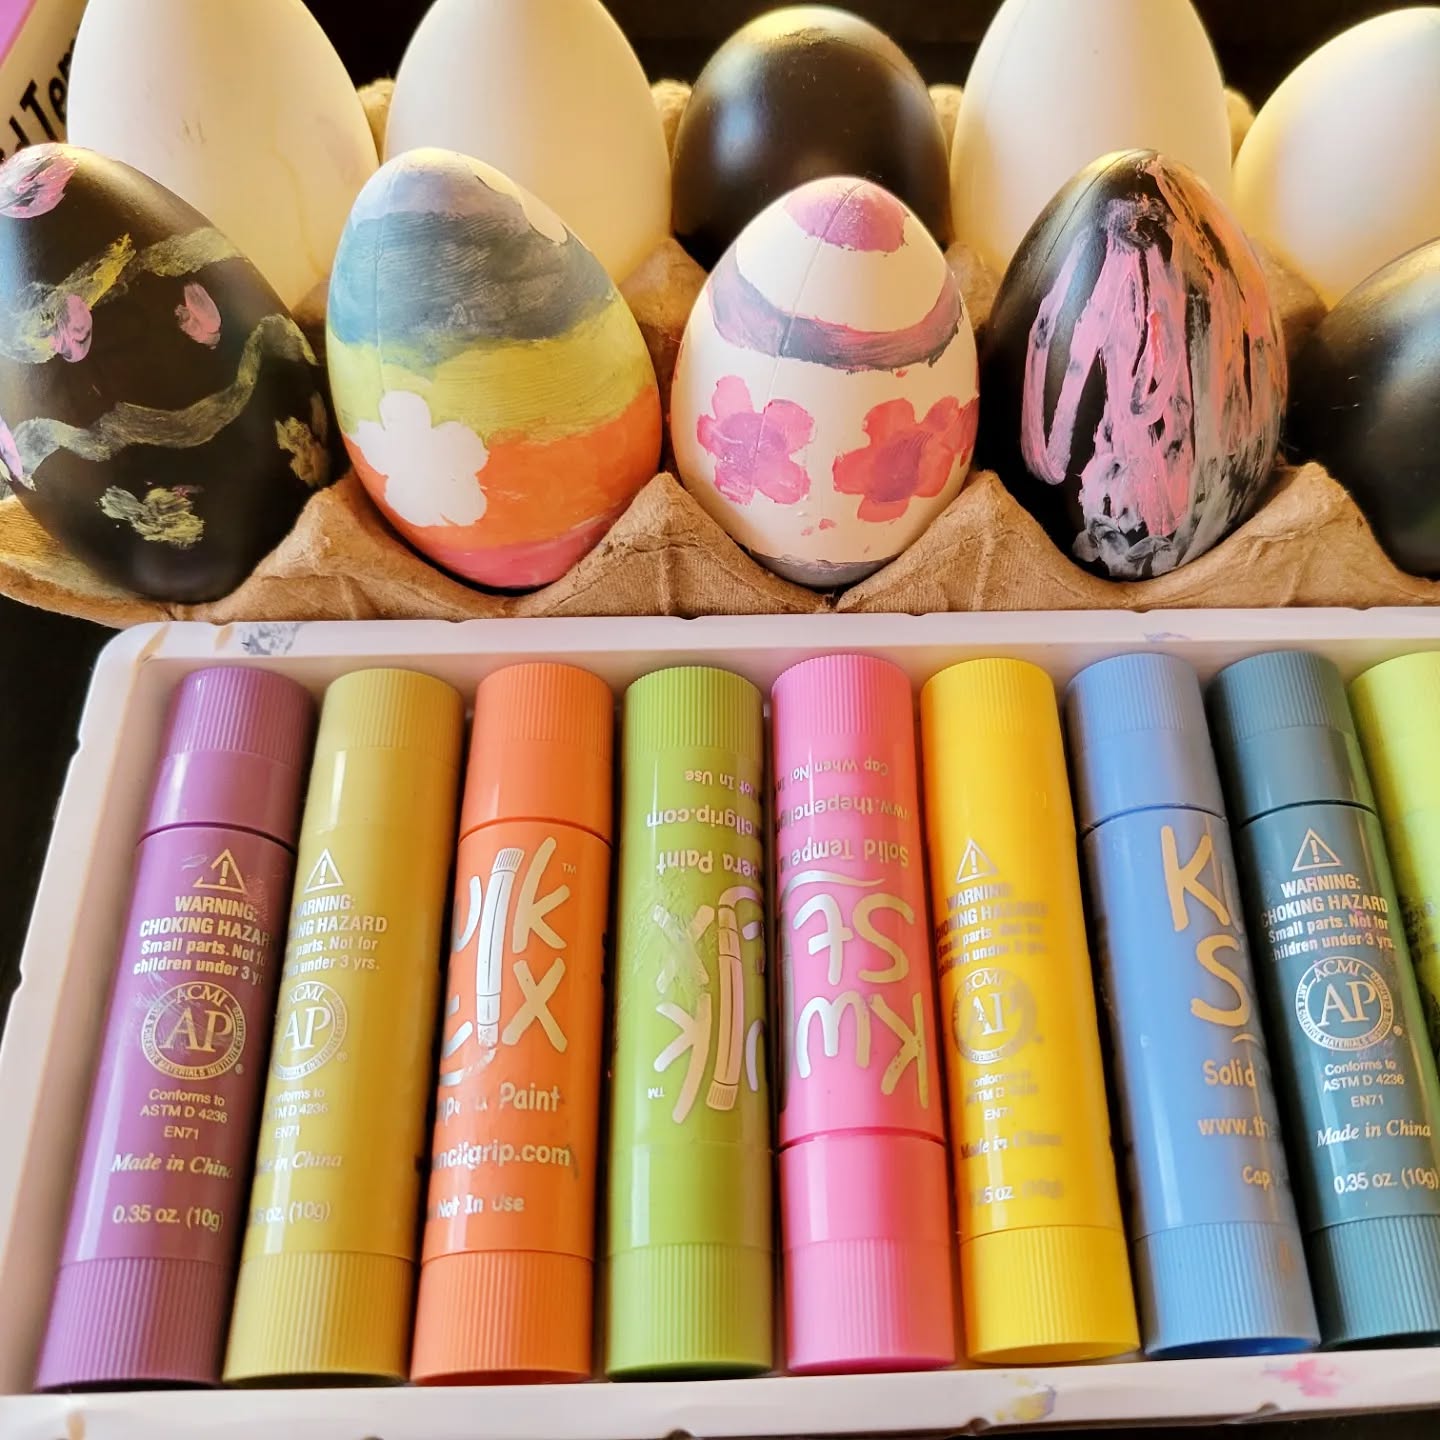
The eggs, placed in a recycled cardboard egg carton, have been decorated using various colors and patterns—some with stripes, others with flowers or abstract brush strokes. These mess-free paint sticks are ideal for kids and are clearly the tools used to decorate the eggs.